


.avif)

Recording meetings without bots is becoming more popular with the creation of desktop meeting recording apps like Granola.ai.
At a glance, building a desktop recorder from scratch seemed deceptively straightforward. The meeting is already happening on the user’s machine. Browsers expose media APIs. Electron exposes desktop capture. Screen recording apps have existed for years.
It was not straightforward.
For this project, I wanted to record Google Meet directly from a user’s machine without sending a bot to the meeting or requiring a loopback device. I had already built a Chrome extension meeting recorder using chrome.tabCapture, which could record meetings in the browser but was ultimately constrained by Chrome’s tab-based capture model and user-interaction requirements. This time, I wanted to see what it would take to build the recorder as a desktop app instead.
I ended up with an Electron app for orchestration and a native Swift process for capture. This post walks through how that architecture came together, what broke along the way, and why video capture, audio capture, transcripts, mute detection, and multitasking all turned into separate engineering problems.
Although it’s a bit of a spoiler, if you need video, accurate transcripts, or care about your device’s battery life, building with native APIs or Chrome extensions won’t work well. In those cases, the only reliable option is a desktop recording SDK.
I’ve seen people suggest prototyping with a native API, Electron’s desktopCapturer, or a Chrome extension. But as you might have gathered from the Chrome extension blog above, or you’ll soon see from my experience building a desktop recorder below, the problem with this advice is that none of these approaches gets you close to the table-stakes functionality required for a reliable desktop meeting recorder. You can spend a significant amount of time building them only to rip them out later, making much of that work ultimately for naught.
With that disclaimer out of the way, if you want to follow along with the code, here's the GitHub repo for the project.
This project is for macOS because that was the target environment I had access to. Most teams eventually want a Windows recorder as well, and would need to use a cross-platform solution like the Desktop Recording SDK.
What is a botless recorder?
Unlike meeting bots, desktop recorders run directly on a user’s machine and capture meeting data locally instead of joining the call as a separate participant.
In practice, that data can include meeting video, system audio, microphone audio, transcripts, participant activity, and screen shares.
Why record a meeting without bots?
Desktop recording is especially useful when meeting hosts do not allow bots, users do not want a visible participant joining the call, or users need to capture platforms and workflows that meeting bots do not support. This is helpful for regulated industries like finance and legal services, as well as situations where users might feel uncomfortable with a visible bot, such as a telehealth consultation.
Building a botless recorder with Electron
Before I started building, I tried to break the problem down into the actual systems the recorder would need to handle reliably.
At a high level, building a usable desktop recorder meant solving several separate problems at the same time:
| Problem | Why it matters |
|---|---|
| Audio capture | If you do not reliably capture the real meeting audio, any downstream processing using the audio, such as transcript generation, will be compromised. |
| Video capture | If the wrong window or tab is recorded, you leak unrelated content and miss relevant information. |
| Transcript generation | Audio alone does not give you transcript text, speaker separation, or real speaker names. |
| Speaker attribution | Transcripts without speaker labels aren't sufficient for most workflows. |
| Speaker names | Transcripts with labels like Speaker 1 and Speaker 2 are not enough for most note-taking products. |
Once I understood the core problems I needed to solve, Electron felt like the obvious place to start. It let me move quickly in TypeScript, which was the language I was already using to build the rest of the app. It also gave me access to basic desktop capabilities like window detection, permissions flows, and media capture without forcing me to use macOS-specific media code. If Electron could detect the meeting, find the right browser window, capture its audio and video, and save the result locally, then I could avoid the complexity of native frameworks like ScreenCaptureKit and AVFoundation.
Chrome exposed the meeting as a browser window, so my first assumption was simple: find the window, record it, and save the result locally.
The first architecture looked like this:
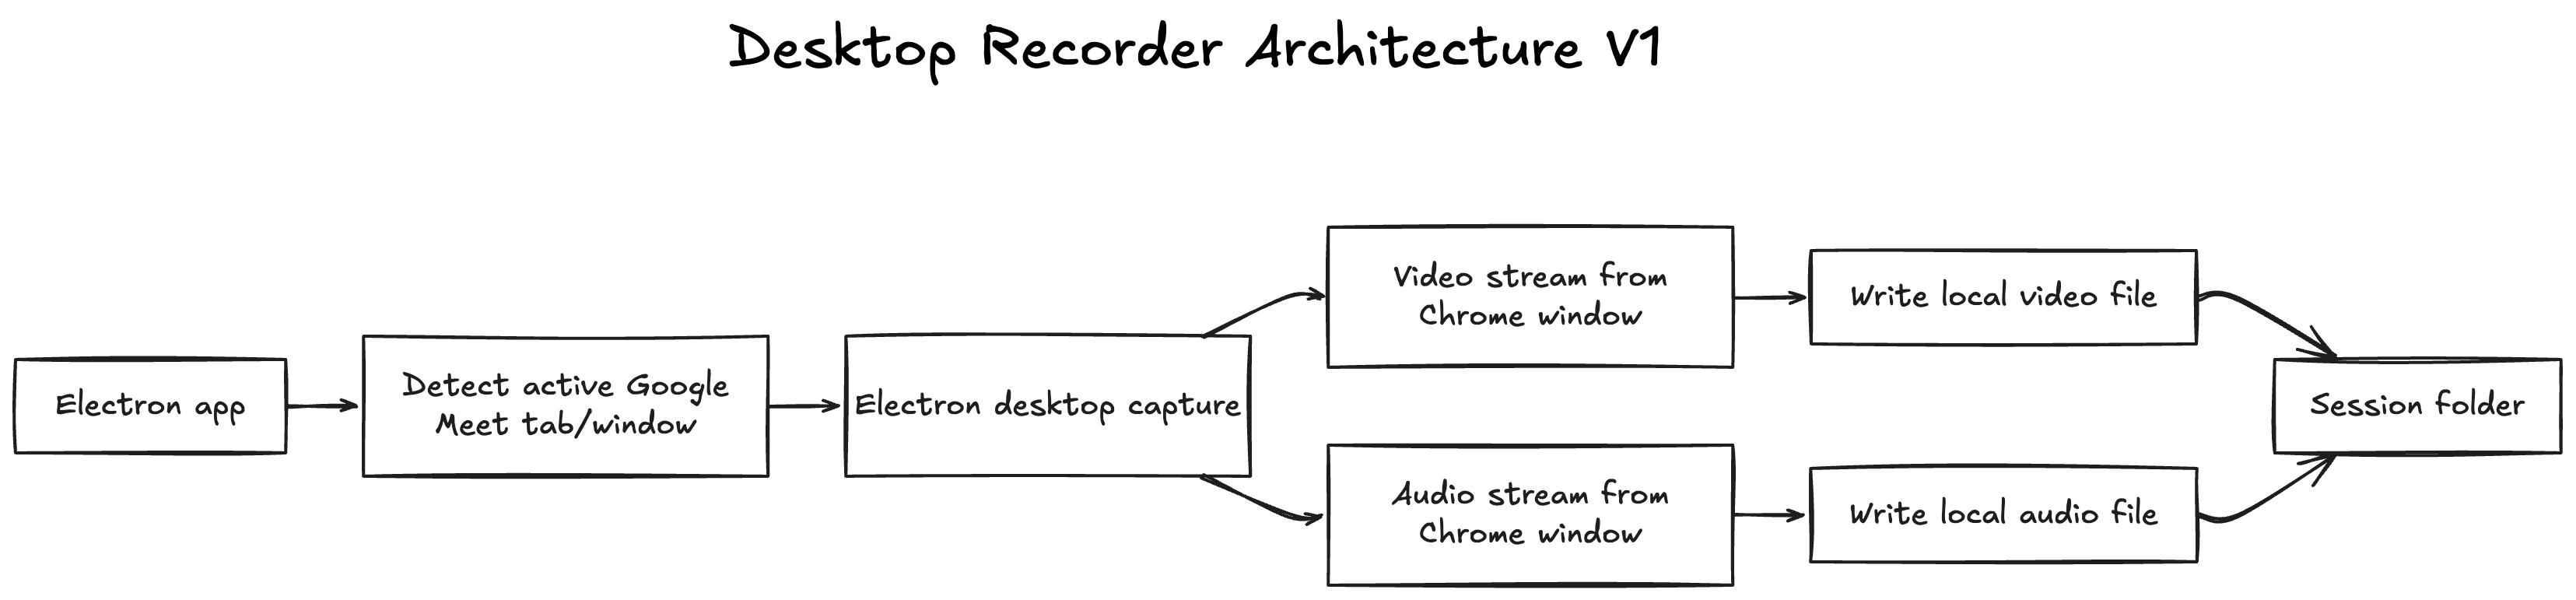
This was a reasonable first pass. It kept the architecture simple and matched the mental model most web engineers would probably start with: if the meeting is visible in a browser window, capture that window and save the result.
Capturing meeting video with Electron’s botless recording API
Recording video in Electron seemed promising at first. The first version I built used Electron’s built-in desktop capture path to identify a Chrome window, request a video stream for that window, and write the result with MediaRecorder. That was enough to get local video.webm files without touching any macOS-specific APIs.
The core capture flow looked roughly like this:
const stream = await navigator.mediaDevices.getUserMedia({
  audio: false,
  video: {
    mandatory: {
      chromeMediaSource: 'desktop',
      chromeMediaSourceId: sourceId
    }
  }
});

const recorder = new MediaRecorder(stream, {
  mimeType: 'video/webm; codecs=vp8'
});

recorder.ondataavailable = async (event) => {
  if (event.data.size > 0) {
    const bytes = new Uint8Array(await event.data.arrayBuffer());
    // write bytes to video.webm
  }
};

recorder.start(1000);
As long as the Google Meet call stayed visible in that Chrome window, I could get usable video frames. Initially, this made the problem seem much simpler than it actually was.
But what I was really capturing was the browser window itself, not the meeting as an isolated surface. That distinction did not seem important yet, but it became one of the biggest architectural problems later in the project.
Audio problems when using Electron
Once I felt that video was good enough, it was time to work on getting the audio from the meeting. The first version of audio capture was still entirely inside Electron.
I used Chromium’s desktop-capture path to grab the Chrome window containing the meeting, captured the machine’s default microphone separately, and mixed both streams together in the renderer before writing the output.
In theory, that should have been enough.
Electron was exposing what looked like the right audio components, but the recording was still missing the most important part: the other participants’ voices coming through the meeting.
I kept testing the Electron-only path, and the pattern repeated. The app could find the correct Chrome window and produce recordings, but the audio was still wrong.
The debug output looked promising:
desktop: track 1 · System Audio · 48000 Hz · 2 ch
mic: track 1 · Default - MacBook Pro Microphone (Built-in) · 48000 Hz · 1 ch
recorded mix: track 1 · MediaStreamAudioDestinationNode · 48000 Hz · 2 ch
I had a system-audio track, a microphone track, and a mixed output. But across repeated runs, the result failed in the same way: I could hear my own microphone, UI sounds, and meeting chimes, but not the other people on the call. Electron’s desktop-capture path was not giving me reliable access to the actual system audio itself.
First major architecture fork
Once I understood that I would have to rely on more than just Electron, there were really only two realistic directions forward: use a loopback device, or move into native macOS capture APIs.
Option 1: Loopback devices
The faster route to reliable audio is to use a loopback device like BlackHole or Loopback. A loopback device is a virtual audio device that lets you route sound your computer is playing back into another recording path, instead of only sending it to speakers or headphones. Using a loopback device is common because it provides usable system audio quickly. The primary downsides are that users often have to install extra software and audio routing can interfere with normal device preferences.
Option 2: Native macOS APIs
Using native macOS APIs gives you much more control. Your users do not need to install or configure another tool, you own the capture pipeline, and you can shape the UX around your product. The tradeoff is that these frameworks are much harder to work with. Apple does not give you TypeScript bindings for these APIs and the documentation around some of the macOS APIs is sorely lacking. Once you go the native route, you also take on code signing, privacy, and platform-specific maintenance, all of which could otherwise be handled by a managed solution like a desktop recording SDK.
Because I wanted to ensure that my desktop recorder didn’t interfere with audio routing on my device in day-to-day activities, I chose to use macOS native APIs.
Record a meeting without bots using macOS native APIs
Even after realizing that Electron was not enough on its own, I still wanted to keep as much of the existing TypeScript application intact as possible.
So instead of replacing the app entirely, I split the system in two.
Electron stayed responsible for the application layer, while media capture moved into a separate, native macOS process. That native layer used ScreenCaptureKit for video capture, native audio capture APIs for system and microphone audio, and a bridge back into the TypeScript app. I could either build a native Node addon or launch a separate Swift helper process from Electron.
I chose the Swift helper approach because it was easier to build and debug, kept the macOS-specific code isolated, and mapped more naturally onto Apple’s media frameworks. The downside was obvious: this was no longer a pure TypeScript project.
The resulting architecture looked roughly like this:
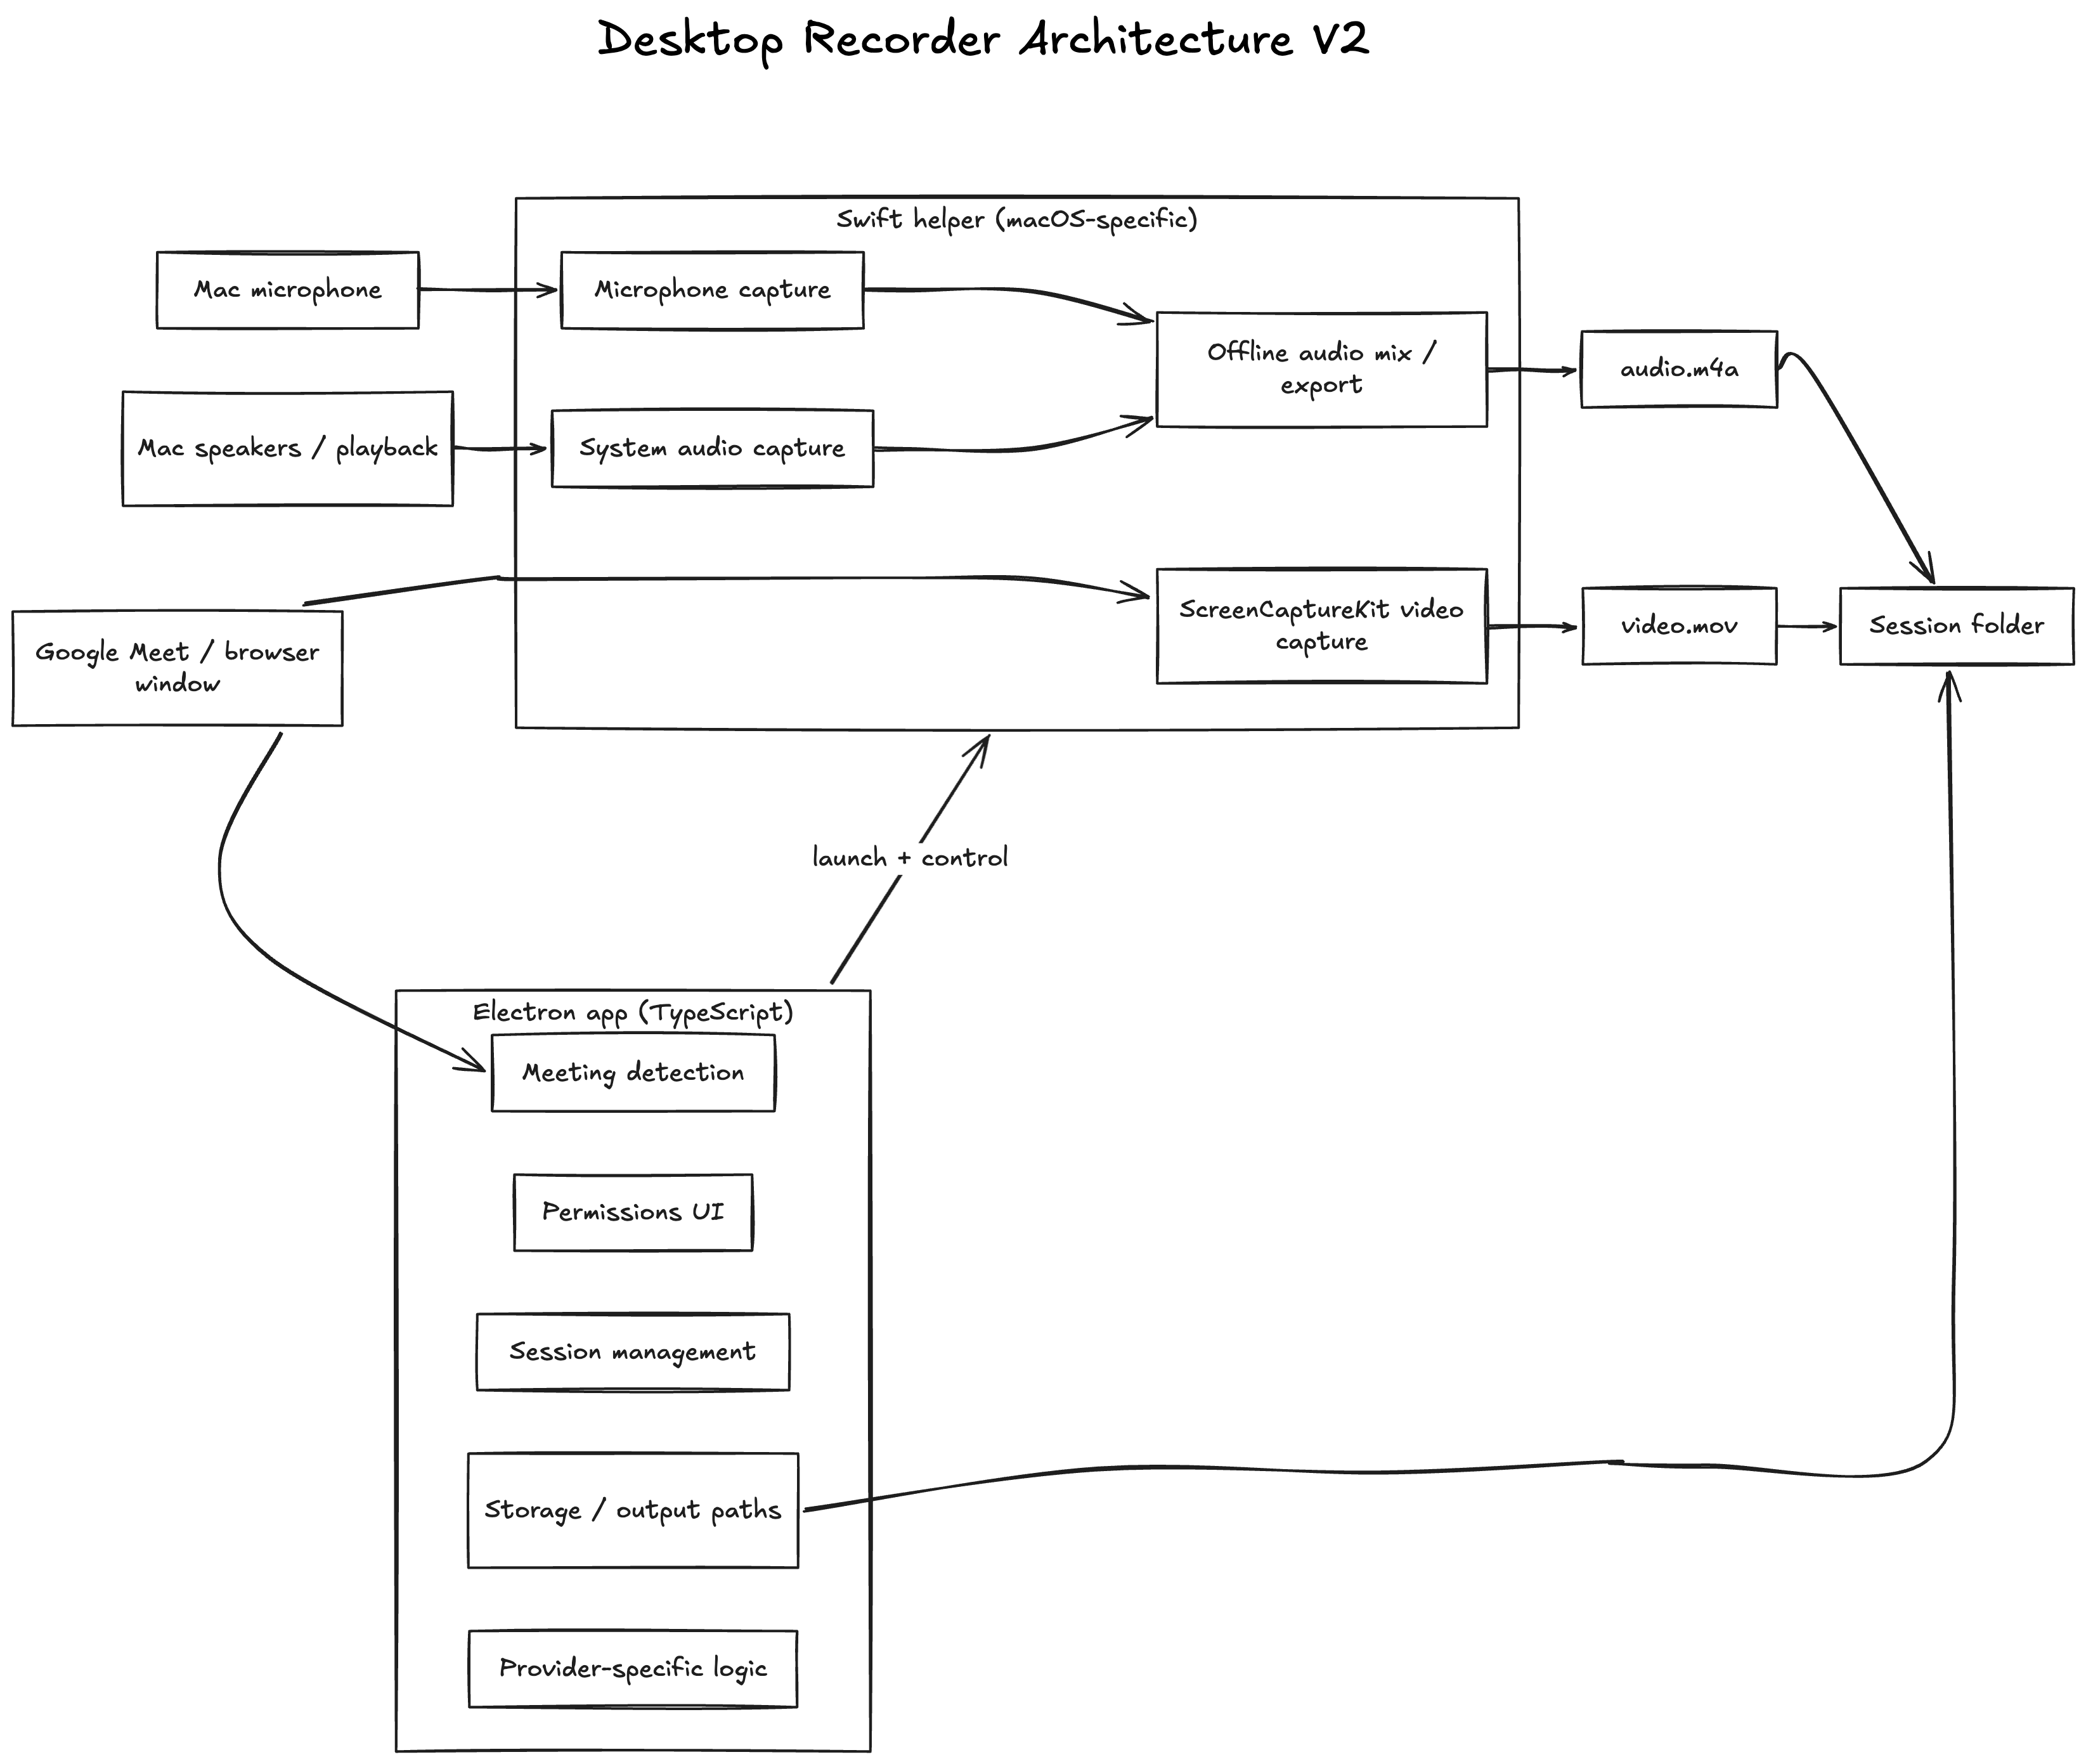
After the split, Electron became the orchestration layer for the app:
const sessionStore = new SessionStore();
const nativeRecorder = new NativeRecorderManager();
const chromeTabs = new ChromeTabDetector();
const transcriptRecorder = new GoogleMeetTranscriptRecorder(chromeTabs);

const providerManager = new ProviderManager([
  new ZoomAppAdapter(() => nativeRecorder.listSources()),
  new GoogleMeetAdapter(chromeTabs),
  new ZoomBrowserAdapter(chromeTabs)
]);

ipcMain.handle(IPC_CHANNELS.startNativeRecording, async (_event, request) => {
  const state = await nativeRecorder.startRecording(request);

  if (request.meetingUrl && request.meetingUrl.includes("meet.google.com/")) {
    await transcriptRecorder.start({
      meetingUrl: request.meetingUrl,
      transcriptPath: request.session.transcriptPath,
      transcriptJsonPath: request.session.transcriptJsonPath
    });
  }

  return state;
});
Electron handled coordination and product logic, while the Swift helper handled media capture directly through native macOS APIs. Keeping those responsibilities separate made the system much easier to think through and debug.
Video recording failures with macOS’s botless recording APIs
The move into native capture immediately introduced a new set of problems with crashes like: Assertion failed: (did_initialize), function CGS_REQUIRE_INIT, NSWindow should only be instantiated on the main thread! and repeated native recorder crashes followed by immediate retries. The renderer would immediately retry, and each retry would create a new empty session folder.
The errors pointed at the same underlying problem. Assertion failed: (did_initialize), function CGS_REQUIRE_INIT indicated some part of macOS’s display and windowing stack was being touched before it had been initialized correctly. NSWindow should only be instantiated on the main thread! was even clearer: window-related AppKit work was happening on a background thread instead of the main thread, which is the thread macOS expects all UI work to run on. Creating or manipulating windows from the wrong thread is not considered safe, so macOS raises an exception and the app crashes instead of continuing.
Once the recorder startup and ScreenCaptureKit initialization moved onto the main actor, the crashes stopped.
Once startup stabilized, new failures appeared when I tried to generate a video file:
SCStream stopped with error: Failed during stream due to application connection being interruptedHelper exited code=null signal=SIGTRAP state=error
Some failures were happening in my own recorder process, while others were happening inside the underlying SCStream capture pipeline. In the logs, those failures looked almost identical, which made debugging much slower.
Stabilizing video capture
To produce a video file, I first took the sample buffers coming out of the capture stream and fed them into Apple’s normal media-writing pipeline, expecting that handoff to be enough to produce a usable recording without much lower-level handling on my side. It was not. I eventually worked directly with the raw SCStreamOutput samples and handled video writing myself, which in practice meant inspecting the frame buffers coming out of ScreenCaptureKit instead of trusting a higher-level recorder flow to turn them into a correct file. That exposed a different set of issues: odd frame dimensions, incomplete frames, writer failures, and AVAssetWriter problems.
I had to validate and normalize the incoming samples instead of treating ScreenCaptureKit as “video in, file out.”
Some frames arrived incomplete and could not be appended at all. ScreenCaptureKit exposes frame metadata through the sample attachments, including an SCFrameStatus value for each frame, so I started filtering out anything that was not SCFrameStatus.complete.
The frame dimensions also were not always safe to pass directly into AVAssetWriter. Instead of assuming dimensions from the capture configuration, I started deriving them from the actual CVPixelBuffer attached to each CMSampleBuffer, then normalizing them to even values before configuring the writer.
I also started logging the real format description and dimensions of the first valid frame coming out of the stream instead of assuming what ScreenCaptureKit was producing.
At a high level, the final flow looked roughly like this:
func stream(_ stream: SCStream,
            didOutputSampleBuffer sampleBuffer: CMSampleBuffer,
            of outputType: SCStreamOutputType) {

    guard outputType == .screen else { return }
    guard sampleBuffer.isValid else { return }

    guard
        let attachmentsArray =
            CMSampleBufferGetSampleAttachmentsArray(
                sampleBuffer,
                createIfNecessary: false
            ) as? [[SCStreamFrameInfo: Any]],

        let attachments = attachmentsArray.first,
        let statusRaw = attachments[.status] as? Int,
        let status = SCFrameStatus(rawValue: statusRaw),
        status == .complete
    else {
        return
    }

    guard let imageBuffer =
        CMSampleBufferGetImageBuffer(sampleBuffer)
    else {
        return
    }

    let width = CVPixelBufferGetWidth(imageBuffer)
    let height = CVPixelBufferGetHeight(imageBuffer)

    let evenWidth = width % 2 == 0 ? width : width - 1
    let evenHeight = height % 2 == 0 ? height : height - 1

    if !didLogFirstFrame {
        print("first frame size: \(width)x\(height)")
        if let format =
            CMSampleBufferGetFormatDescription(sampleBuffer) {
            print("first frame format: \(format)")
        }
        didLogFirstFrame = true
    }
    // only append the sample buffer after these checks pass
}
Once the writer configuration came from the actual stream data instead of assumptions, the output stabilized and I finally got a playable video.mov.
Audio engineering challenges
Once a basic version of video capture was solved, I moved onto audio. Capturing clear meeting audio broke down into three separate audio problems: microphone capture, system audio capture, and combining microphone and system audio.
I started with capturing microphone audio because it was the simplest to test. I could check that mic audio was recording properly by starting a meeting and speaking. First, I had to get microphone permission from macOS, which in practice meant explicitly triggering the standard system microphone prompt. If a user denied this permission, this had to be treated as a hard blocker rather than assuming the app could just start recording.
Second, I had to make sure I was actually recording from the machine's current default microphone. In the native path, I did that by enabling SCStreamConfiguration.captureMicrophone, which follows the system's default input at recording start. Then, I verified that microphone samples were really arriving by logging the first mic sample plus the mic sample format and audio levels.
Once the user had accepted the macOS microphone permission prompt, SCStream was running with microphone capture enabled, microphone samples were arriving in the native recorder, and microphone capture became fairly predictable.
When I was working on the Electron-only version of the app, I could sometimes get bits of system audio as playback audio, but it was not reliable enough to use. Once I switched to the native version, I used SCStream audio capture, explicitly enabled SCStreamConfiguration.capturesAudio, and added an .audio stream output handler so the recorder could receive system-audio CMSampleBuffers directly from the capture stream. From there, I logged the sample format and audio levels to confirm that system-audio samples were actually arriving before I tried to do anything more complicated with them.
At first, I assumed that live-mixing system and microphone audio was a quick way to generate my audio output. However, when I listened to the mixed output it sounded wobbly, chorused, and garbled, so I knew I needed to add more logging. One recurring warning appeared:
Audio files cannot be non-interleaved. Ignoring setting AVLinearPCMIsNonInterleaved YES.
The warning was telling me that the audio-writing path was receiving PCM audio in a non-interleaved layout that would not be preserved exactly when writing the file. “Non-interleaved” audio stores each channel separately in memory instead of laying samples out together frame-by-frame, and the writer was explicitly ignoring that layout setting.
In order to try to understand if interleaving the system and microphone audio had anything to do with the bad output, I decided to inspect the two streams separately. I started logging the actual format of each incoming audio stream instead of assuming they were already compatible. System audio was arriving as a 48 kHz stereo float PCM, while microphone audio was arriving as a 44.1 kHz mono float PCM. The two streams were valid independently, but they were not naturally aligned in sample rate, channel layout, or timing.
That mismatch was why the live-mix path kept failing. A live mix would have required the recorder to resample, align, convert channels, and write the final output while new audio was still arriving. If one stream arrived slightly earlier, later, or in a different format than expected, that mismatch would immediately become part of the recording and produce drift, phasing, wobble, or garbled audio.
Since I did not need a final mixed file until after the meeting, I moved away from live mixing and switched to an offline approach instead.
For every incoming audio CMSampleBuffer, I inspected its format, created an AVAudioPCMBuffer that matched it, and wrote that buffer to an AVAudioFile using the format the source had arrived with. That produced separate intermediate files for system audio and microphone audio, rather than trying to combine the streams during capture.
After recording stopped, I converted both sources into a shared 48 kHz stereo AVAudioFormat. I then computed the offset between the first system-audio sample and the first microphone sample and converted that time delta into a starting frame number. For the final mix, I manually placed each converted buffer into the correct position inside one in-memory output buffer. The mix itself then happened sample-by-sample, with slightly lower gain on the microphone path.
Only after those steps did I write the mixed PCM output and export one final audio.m4a.

How to generate a transcript
Once recording was finally working, the next missing piece was the transcript.
There are several ways to get meeting transcripts. You can scrape meeting captions directly from the meeting UI. You can send recorded audio to a transcription provider. Or, on some platforms, you can use platform-specific transcript APIs like Zoom Cloud Recording API or Google Meet’s API to get transcripts from Google Meet meetings.
Each path solves a slightly different problem and comes with different tradeoffs around cost, portability, speaker names, and reliability.
For this repo, I used meeting captions to generate a diarized transcript.
Why I used captions to generate meeting notes
In the repo, transcripts come from Google Meet live captions. While limited in quality, this was the fastest path to a usable transcript because it gave me both transcript text and speaker names directly from the Google Meet UI.
Receiving speaker names was important because I wanted to know who actually said what in the meeting – not just that one anonymous speaker said one thing and another anonymous speaker said something else. Using a transcription provider and relying purely on machine diarization can usually separate speakers, but it typically only produces labels like Speaker 1 and Speaker 2.
Though I would not use captions as the architecture for a production system, they made sense for this repo. I had already built a Google Meet bot that scraped the DOM for captions and speaker names, so this part of the stack was much more familiar than the earlier audio and video work.
Why scraping captions does not work in production
The biggest limitation with this method is that the transcript pipeline depends on Google Meet captions being both available and readable from the UI. Using Chrome automation, the app does try to turn on captions by detecting and clicking the Google Meet captions control, but that step is still brittle. If Chrome blocks the automation, the Google Meet DOM changes, or the captions control cannot be found, transcript capture can fail unless the user enables captions manually.
The implementation is tightly coupled to Google Meet-specific DOM structure and browser automation. I did not build equivalent transcript handling for Zoom, Microsoft Teams, or other meeting platforms.
Captions also affect the meeting UI itself. Once enabled, they take up screen space, reduce the visible participant area, and become part of the captured video output.
For those reasons, captions are not suited for a general transcript architecture.
If you only need to record meetings on one meeting platform and are focused primarily on internal meetings, you may not need a desktop recorder at all. However, if you use platform APIs, a long list of assumptions needs to hold true: users need to be on supported workspace or enterprise plans, recording and transcription features need to be enabled, and the user must have the necessary host or admin permissions. Meanwhile, a desktop recorder works reliably across meeting platforms and plans and does not require users to be the host in order to record.
A more general production design would record audio cleanly, send it to a transcription provider such as Deepgram, AssemblyAI, AWS Transcribe, or ElevenLabs, and then solve speaker naming separately.
| Transcript path | What it gets you | Main downside |
|---|---|---|
| Live captions | Free transcript text plus visible speaker names | Relying on captions being enabled;having captions show up in the video output |
| Provider-based ASR | Better production path, no caption dependency | Still needs speaker-name mapping |
Caption polling implementation
Once I chose the caption path, the implementation itself was fairly small.
On recording start, the app does not just begin scraping immediately. It first checks whether captions are already visible in Google Meet; if not, it attempts to enable them through the same Chrome automation layer used elsewhere in the project. After that, it starts a caption poller tied to the active Google Meet URL:
export class GoogleMeetTranscriptRecorder {
  async start(options: {
    meetingUrl: string;
    transcriptPath: string;
    transcriptJsonPath: string;
  }): Promise<void> {
    await this.stop();

    const session: TranscriptSession = {
      meetingUrl: options.meetingUrl,
      transcriptPath: options.transcriptPath,
      transcriptJsonPath: options.transcriptJsonPath,
      startedAtMs: Date.now(),
      captionsEnabled: false,
      segments: [],
      lastSnapshot: [],
      rowToSegmentIndex: new Map<number, number>()
    };

    this.activeSession = session;

    const captionResult = await this.chromeTabs.ensureGoogleMeetCaptions(options.meetingUrl);
    session.captionsEnabled = captionResult.ok;

    await this.pollCaptions();
    this.pollTimer = setInterval(() => {
      void this.pollCaptions();
    }, POLL_INTERVAL_MS);
  }
}
The caption poller runs once per second, which is frequent enough to keep a rolling transcript updated without trying to scrape the page on every DOM mutation.
Each poll reads the currently visible caption rows and maintains a rolling transcript with speaker names:
private async pollCaptions(): Promise<void> {
  if (!this.activeSession || this.pollInFlight) {
    return;
  }

  this.pollInFlight = true;

  try {
    const session = this.activeSession;
    const captions = await this.chromeTabs.readGoogleMeetCaptions(session.meetingUrl);
    const nowMs = Date.now() - session.startedAtMs;

    if (captions.length === 0) {
      return;
    }

    const nextRowToSegmentIndex = new Map<number, number>();

    captions.forEach((caption, rowIndex) => {
      const previousCaption = session.lastSnapshot[rowIndex];
      const previousSegmentIndex = session.rowToSegmentIndex.get(rowIndex);

      if (
        typeof previousSegmentIndex === "number" &&
        this.canExtendSegment(session.segments[previousSegmentIndex], caption, previousCaption)
      ) {
        this.extendSegment(session.segments[previousSegmentIndex], caption.text, nowMs);
        nextRowToSegmentIndex.set(rowIndex, previousSegmentIndex);
        return;
      }

      session.segments.push({
        speaker: caption.speaker,
        text: caption.text,
        startMs: nowMs,
        endMs: nowMs
      });
      nextRowToSegmentIndex.set(rowIndex, session.segments.length - 1);
    });

    session.lastSnapshot = captions;
    session.rowToSegmentIndex = nextRowToSegmentIndex;
    this.persistTranscript(session);
  } finally {
    this.pollInFlight = false;
  }
}
The harder problem was deciding how to merge and deduplicate partial caption updates. Google Meet frequently rewrites or repeats partial caption text, so the poller had to decide whether a row should extend an existing segment, merge into the previous segment, or be treated as a duplicate. I added a small rolling dedupe window so the transcript would not keep re-appending the same caption fragment every time Google Meet repainted the UI.
The recorder also persisted the transcript continuously during capture and then wrote it one final time when recording stopped, so each session folder always contained an up-to-date text transcript plus a structured JSON transcript with speaker, text, and timing metadata.
    {
      "speaker": "You",
      "text": "Questions on and let's see. Captions are on and we'll just wait a minute for them to join. Okay. Hi, Anya. I'm just testing Speaker Diarization So, if you could say a few words, That would be very helpful.",
      "startMs": 73624,
      "endMs": 99792
    },
    {
      "speaker": "Anya Kondratyeva",
      "text": "Cool. One second. I just have my airpods and again I hope that this is able to give you a perfectly diarized transcript.",
      "startMs": 74626,
      "endMs": 99792
    },
    {
      "speaker": "You",
      "text": "Thank you.",
      "startMs": 87685,
      "endMs": 87685
    }
Transcript implementation issues
Even though the caption architecture was conceptually simple, the implementation was still brittle because it depended on Chrome automation, AppleScript, and JavaScript execution inside the Google Meet tab.
One major category of failures was simply losing reliable access to the Google Meet tab itself. If Chrome blocked JavaScript execution through AppleScript, transcript capture stopped entirely because the app could no longer inspect the page or read captions. In practice, that surfaced as errors like: Google Chrome got an error: Executing JavaScript through AppleScript is turned off
To address issues like this, just enable Chrome’s Allow JavaScript from Apple Events setting or fall back to a more manual setup.
The other persistent problem was making the caption bridge resilient to malformed responses, disappearing tabs, partial page loads, and Google Meet UI changes. The eventual implementation ended up needing explicit payload encoding, defensive parsing, and stricter transcript-read validation, as I could not assume the browser layer would always return valid caption data.
The eventual bridge looked like this:
async readGoogleMeetCaptions(meetingUrl: string): Promise<Array<{ speaker: string; text: string }>> {
  const javascript = [
    "(()=>{",
    "try{",
    "const badgeSelector='.NWpY1d, .xoMHSc';",
    "const normalize=(value)=>String(value||'').replace(/\\s+/g,' ').trim();",
    "const rows=[];",
    "const seen=new Set();",
    "const badges=Array.from(document.querySelectorAll(badgeSelector));",
    "for(const badge of badges){",
    "const speaker=normalize(badge.textContent);",
    "if(!speaker) continue;",
    "let row=badge.parentElement;",
    "for(let i=0;i<6&&row;i+=1){",
    "const clone=row.cloneNode(true);",
    "if(!(clone instanceof HTMLElement)) break;",
    "clone.querySelectorAll(badgeSelector).forEach((element)=>element.remove());",
    "const text=normalize(clone.textContent);",
    "const visible=window.getComputedStyle(row).display!=='none'&&window.getComputedStyle(row).visibility!=='hidden';",
    "if(visible&&text&&text.toLowerCase()!==speaker.toLowerCase()){",
    "const key=`${speaker}::${text}`;",
    "if(!seen.has(key)){seen.add(key);rows.push({speaker,text,top:row.getBoundingClientRect().top});}",
    "break;",
    "}",
    "row=row.parentElement;",
    "}",
    "}",
    "rows.sort((left,right)=>left.top-right.top);",
    "return '__CAPTIONS__'+encodeURIComponent(JSON.stringify(rows.map(({speaker,text})=>({speaker,text}))));",
    "}catch(error){",
    "return '__CAPTION_ERROR__'+String(error&&error.message?error.message:error);",
    "}",
    "})();"
  ].join("");

  const output = await this.executeGoogleMeetJavascript(meetingUrl, javascript);
  const trimmed = output.trim();

  if (trimmed.length === 0 || trimmed === "undefined" || trimmed === "null") {
    return [];
  }

  if (!trimmed.startsWith("__CAPTIONS__")) {
    return [];
  }

  const encodedPayload = trimmed.slice("__CAPTIONS__".length);
  const decodedPayload = decodeURIComponent(encodedPayload);
  return JSON.parse(decodedPayload) as Array<{ speaker: string; text: string }>;
}
Transcript capture failed independently from recording. Audio and video could be working correctly while the transcript pipeline failed.
The hardest parts of recording meetings without bots
Once I had a serviceable version of the recorder, I began using it in my own meetings. Two missing features became obvious: mute detection and multitasking support.
Adding mute detection
After I began to get microphone and system audio recordings reliably, another problem showed up during testing: even when I muted myself in Google Meet, the recorder still captured local microphone audio because the system microphone itself was still active.
That was a real problem for two reasons. First, it meant that background conversations, keyboard noise, or side comments made while muted could still end up in the recording. Second, it polluted any downstream system that depended on the audio stream. Even though this project did not feed audio directly into a transcription pipeline, a more production-ready version almost certainly would. Recording microphone noise while the user appeared muted in the meeting would degrade transcript quality and speaker separation.
“The microphone is active” and “the user is unmuted in the meeting” are not the same thing.
So instead of relying on the device-level microphone state, I needed the recorder to understand the mute state inside the meeting itself.
I already had the meeting URL from the meeting-detection step, where the app scanned active Chrome tabs, recognized the Google Meet URL pattern, and identified the matching tab as the active meeting. When recording started, I passed that meeting URL into the separate Swift recorder process. That gave the recorder a reliable way to identify the correct Google Meet tab later, instead of trying to infer it again from whatever Chrome windows happened to be open.
From there, I reused the same Chrome automation approach I was already using for other Google Meet-specific behavior. The recorder polled the active Google Meet tab in Chrome by executing JavaScript in that tab through AppleScript automation and scanning interactive controls in the DOM with document.querySelectorAll('button,[role=button],[aria-label],[title]'), then inspecting each element’s aria-label, title, and textContent for strings like turn on microphone, unmute, turn off microphone, and mute. If Google Meet was showing turn on microphone, that meant the user was currently muted. If it was showing turn off microphone, that meant the user was currently unmuted.
I chose that approach because the lower-level signals were not enough. macOS microphone permission only tells you whether the app is allowed to use the mic. SCStream only tells you whether microphone samples are arriving. Raw audio levels only tell you whether sound exists. None of those answer the actual product question: is the user muted in Google Meet right now?
I used that signal to decide whether microphone audio should be written at all. When the Google Meet mute control indicated that the local microphone was muted, the recorder stopped writing mic audio while continuing to record system audio and video. When the user unmuted in Google Meet, the recorder started writing mic audio again. The final output was still a single mixed audio.m4a, but microphone audio was only included during the parts of the meeting when the user was actually unmuted in the call.
One important consequence of that implementation is that muted stretches were not padded with silence. If a thirty-minute meeting contained eighteen minutes where the local microphone was muted, the microphone contribution to the final audio would contain only the twelve minutes where audio was actually written. In other words, the video timeline could still be thirty minutes long while the associated audio lasted for just the first twelve-minutes of the recording unless silence was explicitly reinserted during the final mix.
This path also had the same kinds of fragility as the rest of the Google Meet-specific automation. It depended on being able to find the correct Google Meet tab, run JavaScript in Chrome, and read the expected UI state. If Chrome automation permissions were missing or the tab state could not be read, mute detection could fail and the recorder would have to fall back to continuing microphone capture. That was acceptable for this project, but it is another example of how quickly the logic for recording meetings becomes platform-specific and operationally complex.
Multitasking breaks the recorder
While dogfooding the recorder in real meetings, I also realized that when I multitasked, the recorder multitasked too.
The recorder was not actually capturing the meeting. It was capturing a browser surface that happened to contain the meeting.
If I played a Loom video in another tab, the recorder would capture both the meeting audio and the Loom audio. If I switched tabs inside the same browser window, the recording would happily capture whatever I was reading, searching, or typing instead of the meeting itself.
Switching to another app was less destructive because the Google Meet window itself could remain the active capture surface. Switching tabs inside the captured browser window was much worse because the recorder had no real concept of the meeting tab. It only knew about the browser surface it had been asked to capture.
This ended up being the hardest problem in the project.
At first, I tried to get the recorder to keep following the Google Meet tab even when it was no longer the active tab. That led into a mix of browser-surface detection, Chrome automation, and window-selection experiments, all aimed at answering the same question: how do you keep recording the meeting when the user is still in the call but no longer actively looking at the main Google Meet tab?
I ran into numerous errors here, but two proved particularly useful: Google Chrome got an error: Executing JavaScript through AppleScript is turned off and Could not find Google Meet tab for URL. The first error told me that Chrome was blocking the browser-automation layer entirely, so the app could not inspect the Google Meet tab or drive the logic that depended on it. The second error revealed the recorder could no longer reliably identify the correct browser tab for the meeting.
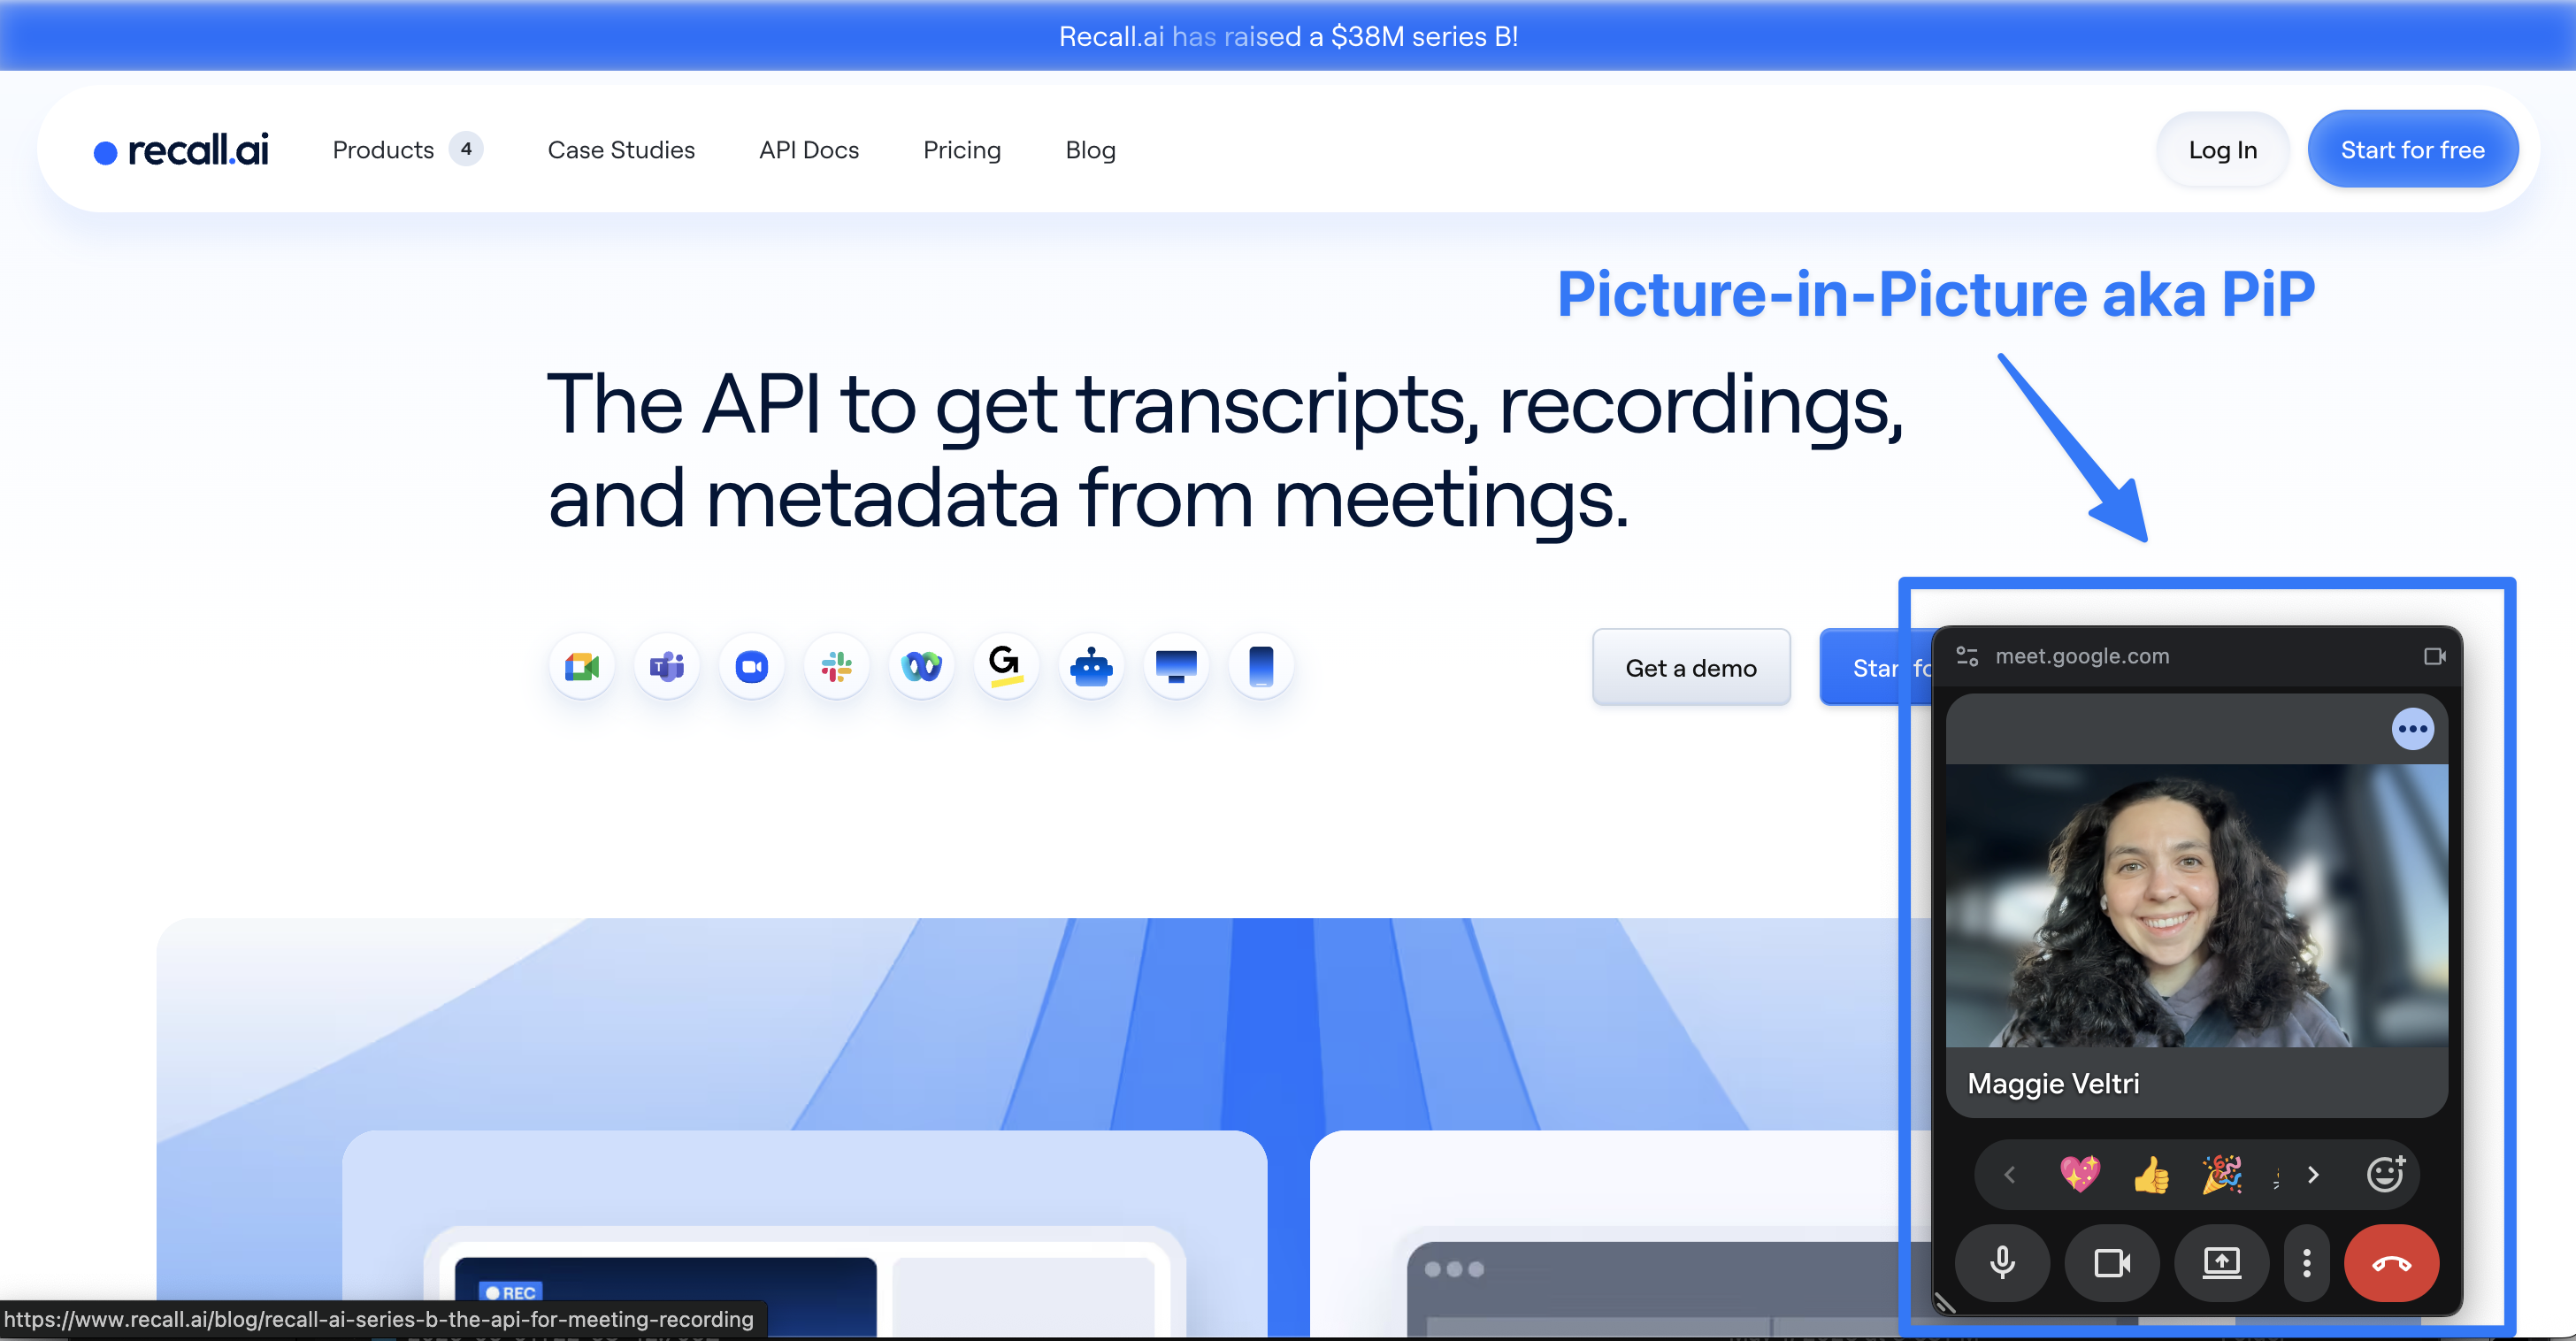
Once I realized how taped together this entire project was, I decided to phone a friend and reached out to Elliot, the lead engineer on Recall.ai’s Desktop Recording SDK, for advice. His suggestion was simple: when you tab away from Google Meet, look at what Google Meet itself does. In some cases, Google Meet shows a smaller popup or miniplayer version of the meeting. Instead of trying to keep the main tab visible, maybe the recorder should switch to capturing that smaller meeting surface instead. So I started experimenting with the miniplayer, or Picture-in-Picture (PiP), flow.
How to use Picture-in-Picture to record while multitasking
The idea was straightforward: when the main meeting tab was active, capture the main meeting surface. When the user tabbed away, switch capture to the smaller PiP or popup meeting surface instead.
In practice, the popup/miniplayer path added another layer of browser automation fragility. Small failures in the AppleScript control layer or changes to Google Meet’s UI could break the entire transition flow. Errors like: 930:931: syntax error: Expected “"” but found unknown token. (-2741) and Google Meet popup button not found in page controls usually mean one of two things: either the Chrome automation path itself had broken, or the recorder could no longer find the exact Google Meet controls it expected in order to open or manage the popup surface.
The implementation had become tightly coupled to Google Meet’s browser UI.
Even when the popup window appeared successfully, the switching behavior itself was messy for a long time. The recorder often lagged before switching from the main meeting tab to the PiP surface, so it could continue recording the wrong browser tab for several seconds before the PiP window was considered stable enough to capture.
The recording pipeline itself also became fragmented. Instead of producing one continuous recording, the output was split into multiple surface-specific segments: one before PiP, one during PiP, and one after returning to the main meeting tab.
At one point, the PiP segment was not even playable. The second video.mov frequently failed because the PiP window disappeared before the writer finalized cleanly. Fixing that required changing the native probe path so that interrupted PiP captures would still flush and finalize into valid video files.
Even after the PiP segment became playable, another problem remained: switching back out of PiP was unreliable. Entering PiP and exiting PiP turned out to be two separate engineering problems.
And even when the browser automation layer behaved correctly, the popup/miniplayer flow still interacted badly with the native capture layer in ways that sometimes caused interrupted SCStream sessions or helper crashes:
SCStream stopped with error: Failed during stream due to application connection being interruptedHelper exited code=null signal=SIGTRAP state=error
At that point, I stopped guessing and built a separate minimal native probe.
The probe did almost nothing: its job was to select one Chrome Google Meet window, start SCStream, and keep the capture path as small as possible. That changed the debugging process because it let me separate application-level bugs from native capture failures.
Sometimes the probe failed too. But the successful runs proved something important: the underlying SCStream capture of the active Google Meet window could work reliably. The instability was coming from the complexity layered on top of it.
Instead of continuing to partially disable pieces of the original helper, I rebuilt the recorder around the simpler probe-style helper path.
One practical problem still remained: even after the switching logic stabilized, the recording was still physically split across multiple surface-specific segments. So after the switching behavior was reliable enough, I grouped those segments into one logical recording session and stitched the media back together afterward. The final step was merging the pre-PiP, PiP, and post-PiP video.mov segments into one final video and merging the corresponding audio segments into one final audio.m4a.
Even after the stitching logic worked, the transitions themselves were still imperfect. Surface switches could briefly capture browser UI during the handoff, some frames were still dropped while changing capture targets, and the audio timeline occasionally needed adjustment afterward to stay aligned with the final stitched video.
Final architecture for my botless meeting recorder
The final architecture ended up split cleanly between Electron and the native helper.
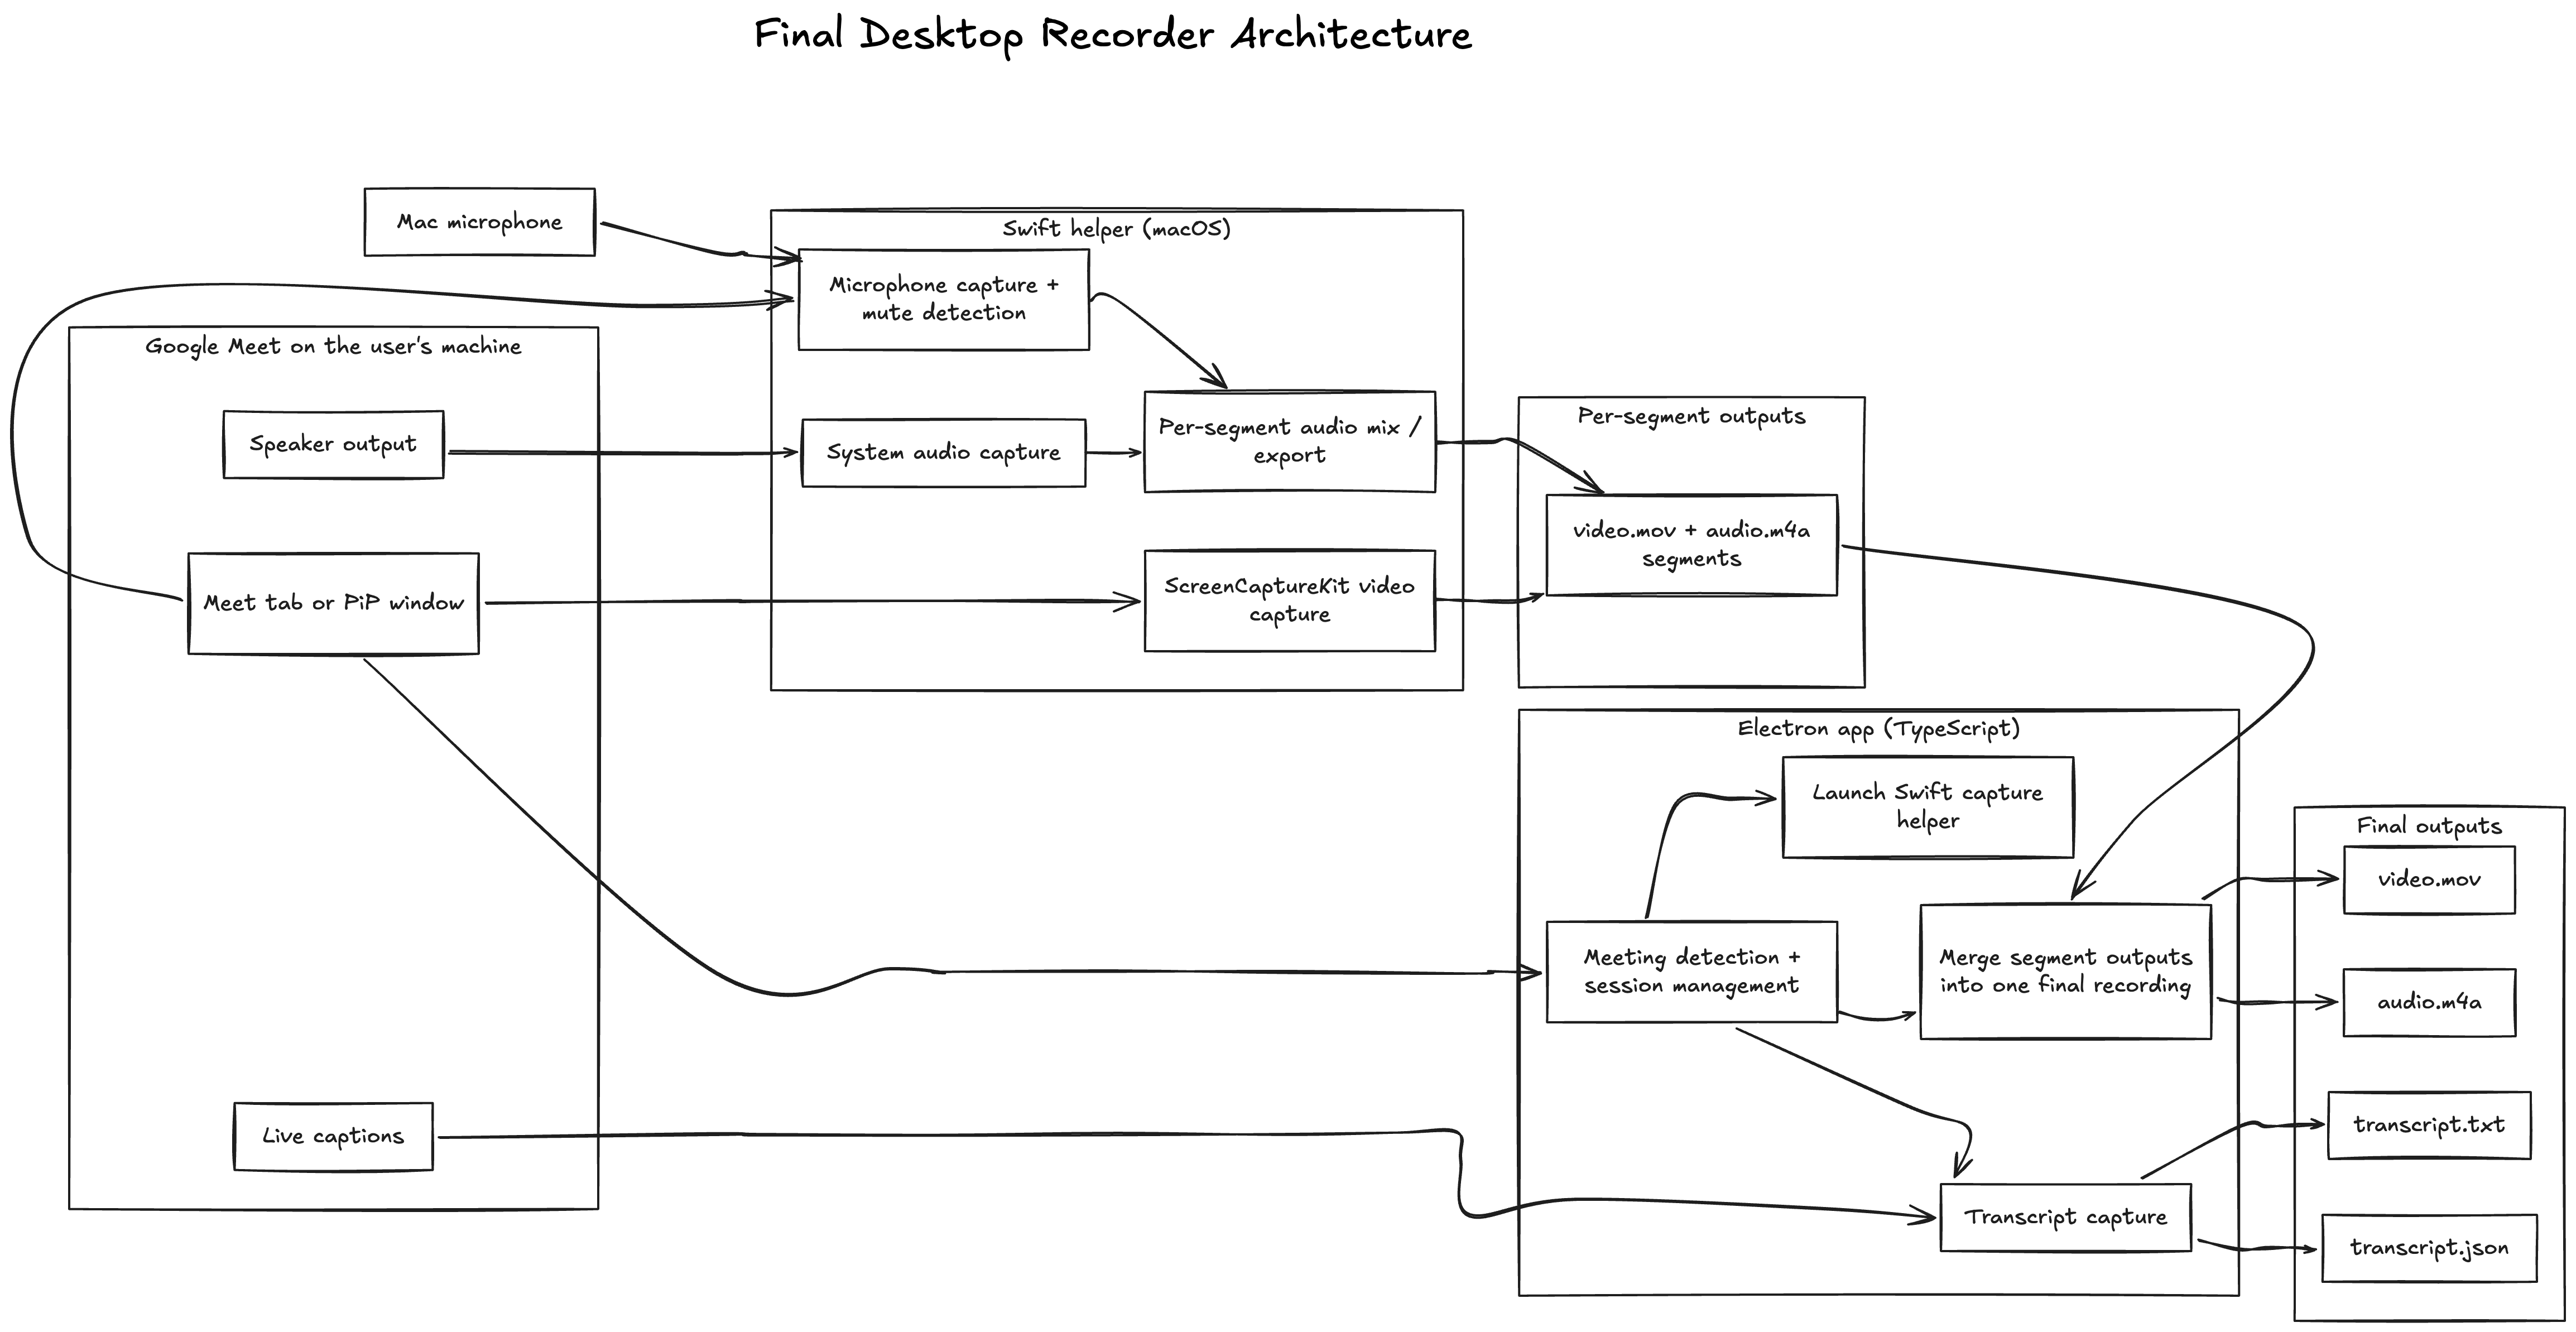
The Electron app handles Google Meet detection, permissions UI, session management, local storage management, transcript orchestration for the repo version, and launching the native process. The Swift helper handles ScreenCaptureKit capture, writing video.mov, capturing system audio, capturing microphone audio, and offline mixing into one final audio.m4a.
The key design decision was: keep the app in TypeScript, keep the capture core in Swift, and keep the capture path as small and boring as possible.
For each session, the app can now produce a set of local artifacts that includes a playable video.mov, a final audio.m4a, and transcript output for the Google Meet caption–based path.
If you open the repo, this final split is visible in two places. The Electron side owns orchestration and transcript lifecycle, while the native helper owns the actual media capture path. That separation is one of the main reasons the final version is understandable at all.
Where my botless meeting notetaker falls flat
Even after all of this work, several parts of the recorder are still incomplete or fragile.
Multitasking is still messy. Because this implementation records browser surfaces instead of true meeting primitives, PiP and browser transitions are still imperfect. As mentioned in the multitasking section, the recorder can now switch between the main meeting tab and fallback PiP surfaces, but the transitions are not seamless. When the active tab is not the meeting tab, there is a lag in cutting over to the PiP. Audio and video around the switches are often lost and anyone using the app to record will occasionally need to edit the video and audio due to drift.
Audio quality is still worse than I would want for production, especially for participants who are not the local app user. The recordings work, but the output is still less polished than a purpose-built meeting media pipeline.
Screen-share fidelity is still limited. If the real goal is capturing shared content at high quality, recording the meeting’s rendered view of that content is still a compromise.
Mute detection exists, but only through Google Meet-specific states in the browser tab. If both the user and the meeting are silent, you also need to add silence padding explicitly so the audio timeline stays aligned with the video. The approach I took works for this project, but the Google Meet-specific mute handling is not a general cross-platform solution.
Transcript generation is only partially solved. In this repo, transcripts depend on Google Meet captions, which means captions must stay enabled during the meeting. That changes the meeting layout and visual experience. Using a transcription provider solves the text problem, but introduces a different issue: speaker diarization may produce Speaker 1 and Speaker 2 instead of real participant names, and even the speaker labeling itself is not perfectly accurate.
My recorder only supports one meeting platform on one operating system. Expanding to platforms like Zoom or Microsoft Teams, supporting additional operating systems like Windows, or even handling different browser configurations would require significantly more engineering work and testing.
And even within a single platform and operating system, users still have different devices, hardware capabilities, browser versions, and OS versions, all of which introduce additional edge cases and compatibility problems to test and maintain over time.
Use a botless recording SDK
By the end of the project, the pattern was clear: almost every feature that sounds simple turns into a nightmare once you try to build it yourself.
Reliable audio capture requires obtaining separate microphone audio from system audio, handling mute-state edge cases, dealing with sample-rate mismatches, avoiding echo and feedback, recovering from flaky audio APIs, and making the final mix sound good across real devices and environments.
Reliable video capture is similarly difficult, as you must deal with tab switching, popup and PiP states, changing participant layouts, hidden or minimized surfaces, browser-specific behavior, and the risk of capturing unrelated content when the user multitasks.
And this project only covered one slice of the problem space: Google Meet running in Chrome on macOS. I did not even attempt support for Zoom, Microsoft Teams, Electron meeting apps, Safari, Firefox, Windows, Linux, or different browser capture models. Every additional operating system, meeting platform, and browser combination introduces another layer of UI behavior, capture APIs, permissions, and edge cases.
Screen-share capture becomes its own major engineering problem too. Recording “what the meeting sees” is very different from recording the actual screen or application window being shared. If you want high-quality screen-share capture, you eventually need to identify what surface the user is presenting, switch capture to that source, and keep tracking it as the user changes windows, shares different applications, resizes content, or moves between desktop spaces.
Transcript generation is its own set of decisions and engineering tasks. Caption-based approaches can give you real speaker names, but they depend on browser automation and meeting-platform DOM structure, making them fragile and unreliable for non-browser meetings. Provider-based transcription is more portable, but makes speaker naming difficult: diarization can usually separate speakers, but it will often give you labels like Speaker 1 and Speaker 2 instead of real participant names.
The same pattern appears everywhere else. Meeting detection and lifecycle handling turn into another layer of heuristics around browser support, waiting rooms, desktop-space changes, permission prompts, and platform-specific behavior.
Developers building from scratch need to consider the long tail of real-world usage: battery drain, laptops going to sleep mid-meeting, users changing mics during capture, Chrome permission failures, low disk space, old hardware, unstable networks, and OS-level regressions introduced by browser or macOS updates.
That is why building a reliable desktop meeting recorder ends up being much more operationally heavy than it first appears, and why desktop recording SDKs exist in the first place. Shipping the first working version is only the beginning. After that, you still own the maintenance burden across operating systems, browsers, meeting platforms, hardware configurations, and constantly changing UI behavior.
Instead of building every capture primitive yourself, a desktop recording SDK gives your desktop app reliable audio and video recording, diarized transcripts with speaker names, and metadata. Recall.ai's Desktop Recording SDK also has functionality like meeting detection to allow your app to automatically start recording when a meeting starts, mute detection so that you don't capture conversations that aren't part of the meeting, screen-share handling, cross-platform support, and long-tail device compatibility.
For many teams, the biggest advantage of using a desktop recording SDK is not just reducing initial engineering complexity – it’s speeding up time-to-market and reducing the amount of time spent supporting meeting recording in perpetuity. Building a reliable cross-platform recorder from scratch can become incredibly costly as you realize how many features you have to build, how many operating systems, devices, and browsers you must support, and how much time you have to spend on maintenance.
Final takeaways from recording meetings without bots
Electron was enough to prototype the recorder, but not enough to build a reliable one. Once system audio, mute state, multitasking, transcripts, browser behavior, and meeting-specific UI handling entered the picture, the project turned from simple screen recording into a much larger media-capture problem.
The final version I built works, but it still only supports one meeting platform, one browser, and one operating system. Expanding it into something production-ready would require substantially more work around reliability, additional meeting platforms, browser differences, Windows support, screen-share handling, transcript infrastructure, and long-term maintenance.
That tradeoff is a large part of the reason desktop recording SDKs exist in the first place. Unless you specifically need to own the entire recording stack yourself, using Recall.ai’s Desktop Recording SDK removes a very large amount of engineering and operational work.


