


.avif)

In this tutorial, I’ll show you how to build a desktop recording app similar to Granola using Recall.ai’s Desktop Recording SDK.
By the end of this guide, you’ll understand how the desktop recording app I built detects and records meetings, retrieves the meeting transcript with speaker names, generates a meeting summary, and returns a link to the meeting recording once the meeting ends. You’ll also gain an understanding of how the core features of the Desktop Recording SDK work.
All the code used in this guide is available in this Github repository.
What is a Desktop Recording SDK?
The Desktop SDK for recording enables developers to build desktop applications that automatically detect and record meetings occurring on a user's computer. It supports major meeting platforms including Zoom, Google Meet, Microsoft Teams, Slack Huddles and can also capture in-person conversations through the system’s microphone.
The Desktop Recording SDK doesn’t join the meeting as a bot or require the user to be the host to record the meeting.
What we need to build a desktop recording app
In this tutorial I built a simple desktop recording app that:
- Detects meetings
- Records the meeting
- Returns the meeting recording link
- Retrieves the transcript with speaker names
- Generates an AI summary of the meeting
Tech stack used:
- Electron to build the desktop application
- Express as our backend server
- ngrok to receive webhooks
- Recall.ai for recording and transcription
- OpenAI for meeting summarization
ngrok exposes your local server to the internet so it can receive webhooks from Recall.ai. It is an alternative to port forwarding for local development.
Architecture overview of a desktop recording app
The application will have two components:
Desktop Application (Electron)
- Detects meetings using the Desktop Recording SDK
- Records meetings using the Desktop Recording SDK
- Displays transcripts, summaries and other data
Backend Server (Express)
- Creates recording sessions
- Handles Recall.ai webhooks
- Retrieves recordings and transcripts
- Generates summaries using an LLM

Prerequisites for building a desktop recording app
For this tutorial, I am using the US West 2 region. Update the base URL to match your account’s region.
| Region | Base URL |
|---|---|
| US West 2 | us-west-2.recall.ai |
| US East 1 | us-east-1.recall.ai |
| EU | eu-central-1.recall.ai |
| Asia | ap-northeast-1.recall.ai |
Before starting, make sure you have the following:
- A Recall.ai API key (sign up for free)
- An OpenAI API key
- A backend server that can receive webhooks
- I used ngrok as the backend tunnel for this tutorial
- This Github tutorial repository cloned locally
Configure your .env file:
RECALL_API_KEY=your_recall_key
OPENAI_API_KEY=your_openai_key
RECALL_API_BASE=your_account_region // you choose the region when you first sign up for Recall.ai
When you run the application, your system prompts you to grant the following permissions:
- Microphone access
- Screen recording
- Accessibility permissions
Ensure they are granted. These are required for the Desktop SDK for recording to capture meetings.
Installing the Desktop Recording SDK
Once you are ready, install the Desktop Recording SDK on your terminal:
npm install @recallai/desktop-sdk
Initialize the Desktop Recording SDK at the start.
//@title index.js
const RecallAiSdk = require("@recallai/desktop-sdk");

RecallAiSdk.init({
    apiUrl: "https://us-west-2.recall.ai"
})
Once the Desktop Recording SDK is initialized, your application can listen for events emitted by the SDK. These events represent different stages of the meeting lifecycle. Below are the event types used in this tutorial:
meeting-detectedrecording-startedrecording-ended
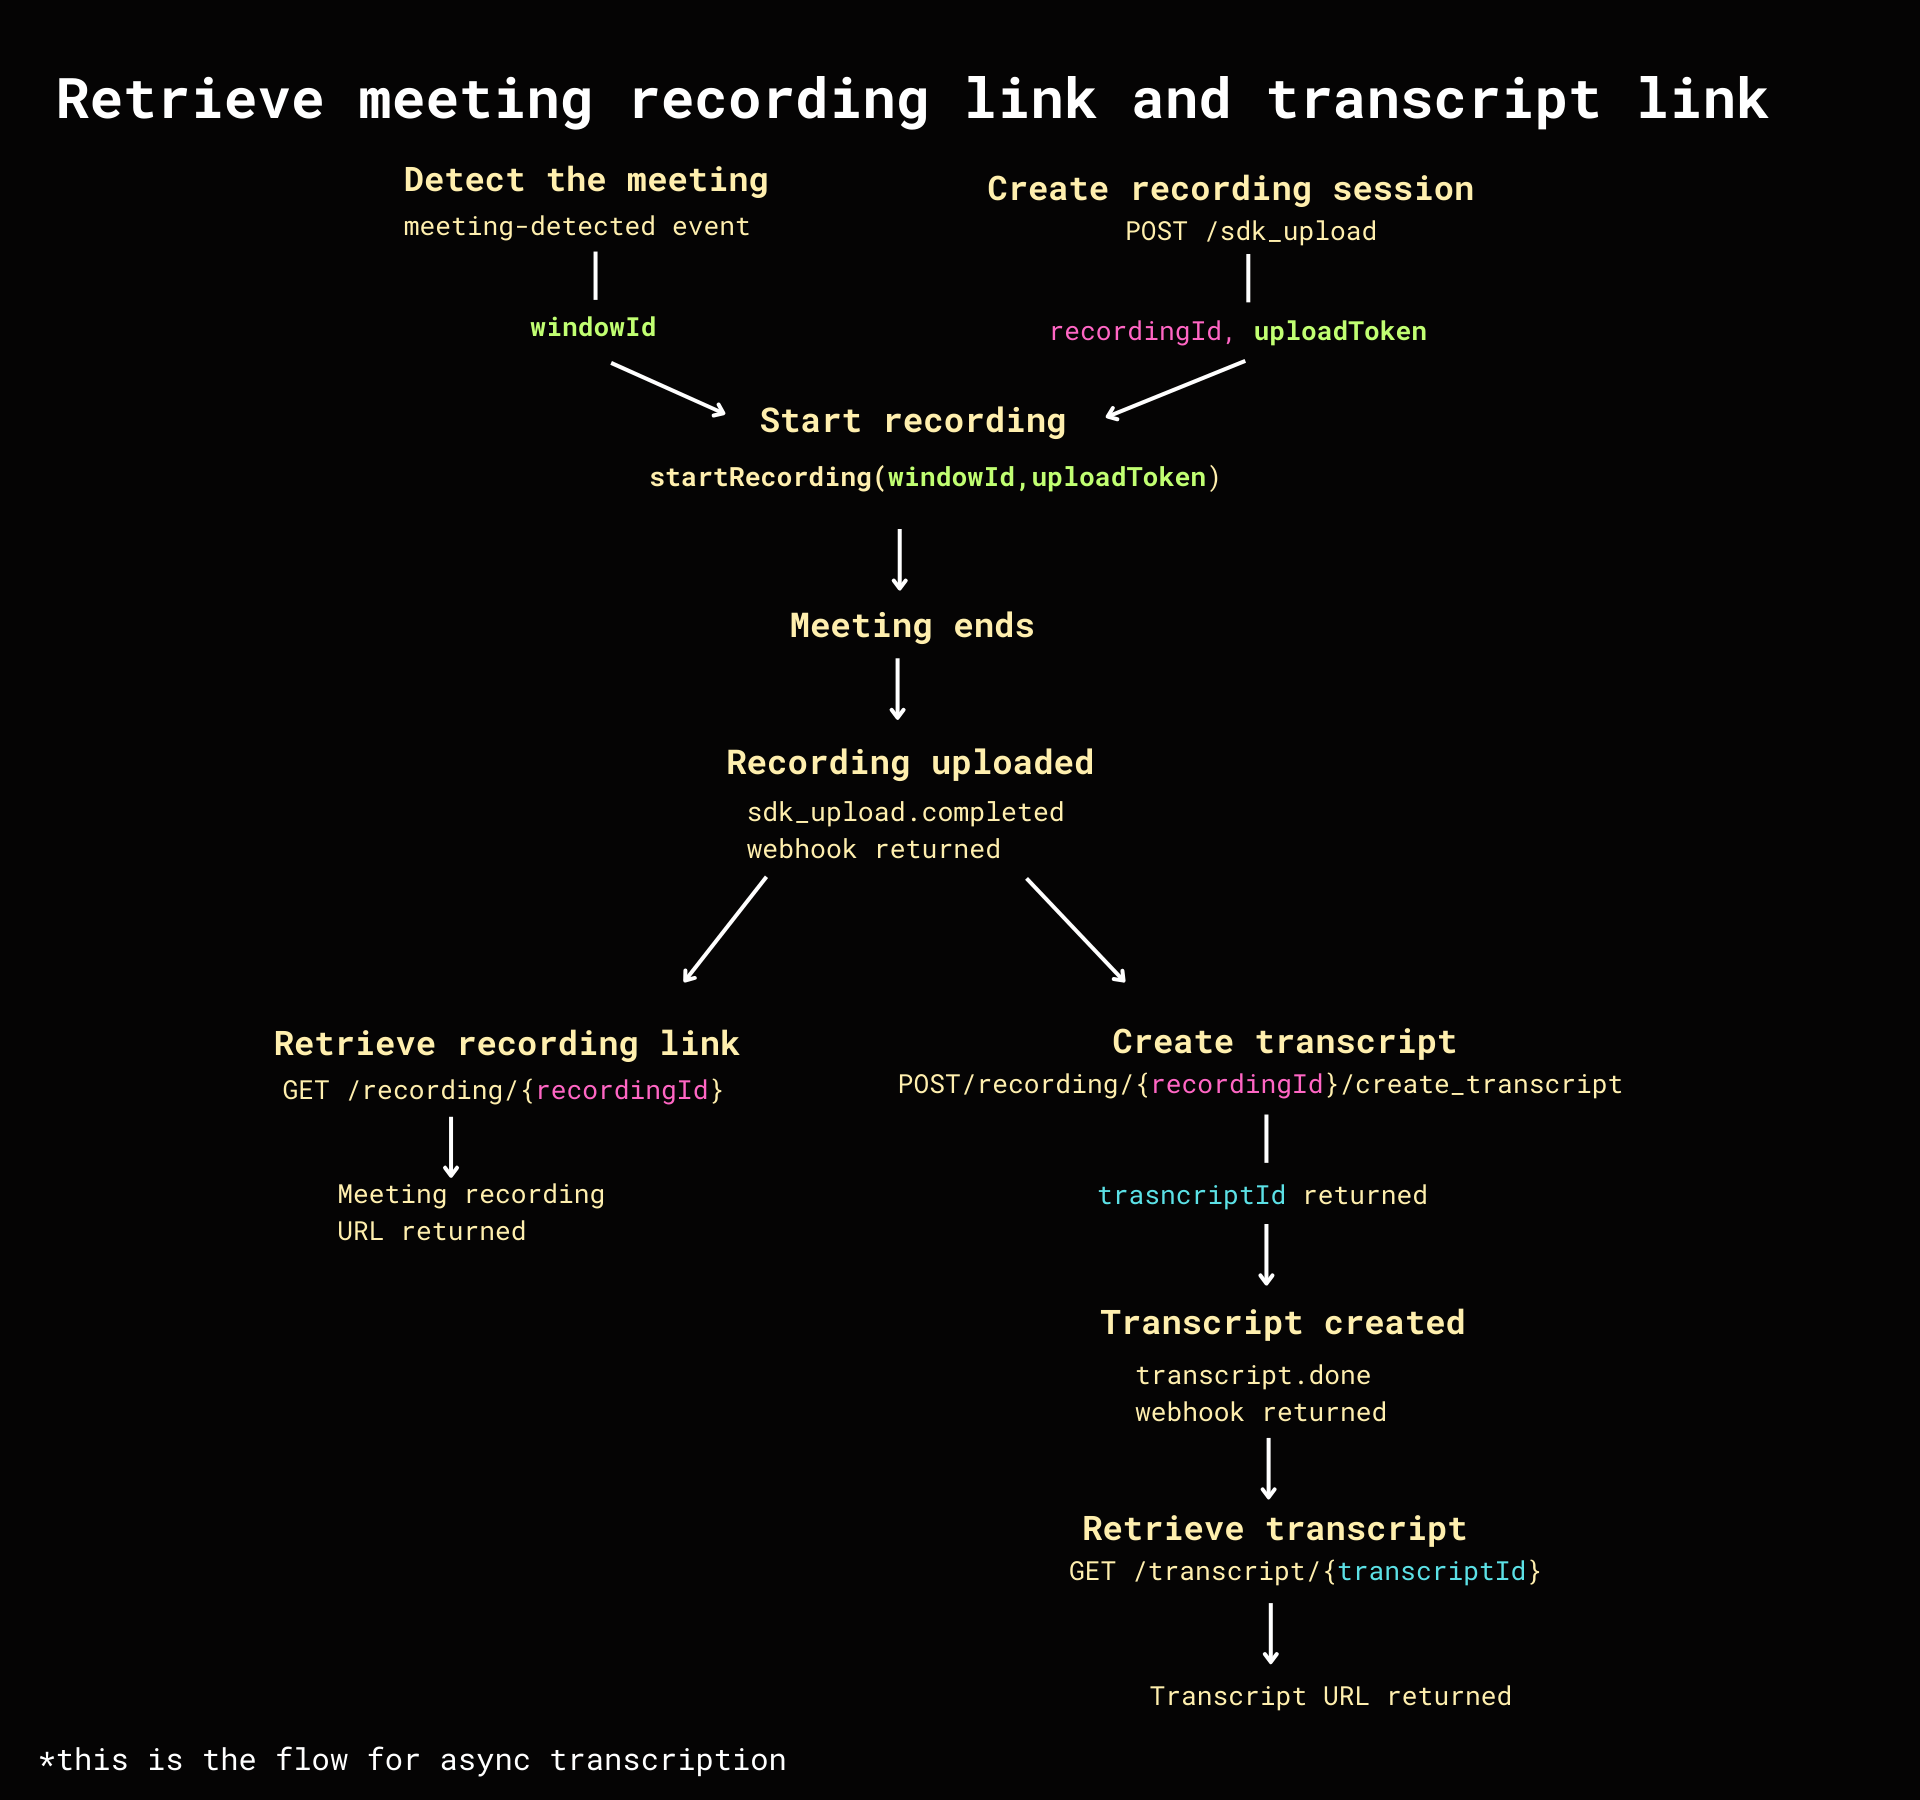
Step 1: Recording a meeting
To record a meeting, the Desktop Recording SDK first detects when a meeting is running. The Desktop Recording SDK emits events when it identifies supported meeting applications. For example, the meeting-detected event fires whenever the Desktop Recording SDK identifies an active meeting window.
//@title index.js
RecallAiSdk.addEventListener("meeting-detected", async (evt) => {
    console.log("meeting-detected", evt);
})
The event payload contains metadata about the meeting window, including the windowId. The windowId uniquely identifies the meeting window and is required to start recording.
// event object
window: {
    url: null,
    id: '1234ABC-32FR-234234', // windowId
    title: 'null',
    platform: 'google-meet'
}
Before recording can begin, call the sdk_upload API endpoint from your backend.
//@title server.js
const recallRes = await fetch(`${RECALL_API_BASE}/api/v1/sdk_upload/`, {
        method: "POST",
        headers: {
          accept: "application/json",
          "content-type": "application/json",
          Authorization: `Token ${RECALL_API_KEY}`,
       },
});
The endpoint returns an upload_token and a recording_id:
upload_tokenauthorizes the Desktop Recording SDK to record and upload captured meetingrecording_ididentifies the recording so it can be retrieved later
The
sdk_uploadendpoint returnsupload_idandupload_token.Use theupload_tokeninstead of theupload_idbecause it authorizes the Desktop Recording SDK to upload the captured meeting.upload_idis only used to identify the upload object.
Example of payload returned:
// response payload
payload {
    id: 'abc-1234-efgh-1234',
    status: {
code: 'pending',
sub_code: null,
updated_at: '2026-03-15T02:33:24.209687Z',
},
recording_id: 'nmabc-744-42c0',
upload_token: '4nd3WLke',
created_at: '2026-03-15TO2:33:24.209687Z',
metadata: {}
}
Pass the windowId and upload_token to the Desktop Recording SDK’s startRecording method on the client side to begin recording the meeting.
//@title index.js
const uploadToken = payload.upload_token;
RecallAiSdk.startRecording({
    windowId: windowId,
    uploadToken: uploadToken
});
The Desktop Recording SDK can now capture audio and video directly from the meeting window.
Once the meeting ends, as detected by the recording-ended event, the Desktop Recording SDK automatically uploads the recorded meeting to Recall.ai’s servers. The uploaded media is processed into transcripts and other metadata, which may take several minutes to complete.
Step 2: Retrieving the meeting recording
To retrieve the meeting recording link, first ensure that the meeting recording has been successfully uploaded. You can do this by waiting for the webhook that indicates the upload has completed.
What are webhooks?
Recall.ai uses webhooks to notify your server when certain events happen. You can configure which events to subscribe to in the Recall.ai dashboard.


When the upload completes, Recall.ai sends a webhook sdk_upload.completed to your backend.
This webhook notifies your backend that the meeting recording link is ready to be retrieved. The full code for handling the webhook responses can be found on the Github repository.
To retrieve the meeting recording link, call the following endpoint:
//@title server.js
const recRes = await fetch(`${RECALL_API_BASE}/api/v1/recording/${recordingId}/`, {
      headers: {
        accept: "application/json",
        Authorization: `Token ${RECALL_API_KEY}`,
      },
    });
The API response includes download URLs for the meeting recording.
Step 3: Retrieving the transcript
Async transcription is generated after the meeting ends while real-time transcription is generated during the meeting. The steps to retrieve real-time and async transcription are different.
For this app, I am using async transcription.
Recall.ai uses its built-in transcription provider by default to generate transcripts automatically. You can also use other transcription providers that we natively integrate with if needed.
To retrieve the transcript, first create the transcript by calling the create_transcript endpoint:
//@title server.js
const res = await fetch(`${RECALL_API_BASE}/api/v1/recording/${recordingId}/create_transcript/`, {
    method: "POST",
    headers: {
    accept: "application/json",
    "content-type": "application/json",
    Authorization: `Token ${RECALL_API_KEY}`,
    },
    body: JSON.stringify({
    provider: { recallai_async: { language_code: "en" } }, // example
    }),
});
When the transcript is created, Recall.ai returns the transcript.done webhook to your backend. At that point, you can retrieve the transcript. The full code for transcript retrieval can be found on the Github repository.
The retrieved transcript also includes speaker data that allows us to identify who spoke during the meeting. The transcript is then cleaned, passed to an LLM to generate a summary, and the results are displayed in the Electron UI.
Step 4: Running the desktop recording app
To run the full desktop recording application, start the following services in separate terminals: ngrok, the backend server, and the Electron app.
# Terminal 1 — expose webhooks
ngrok http 3000

# Terminal 2 — start backend in backend directory
node server.js

# Terminal 3 — start Electron app in root directory
npm start
You can test the functionality by starting a meeting, speaking for a bit, and then ending the meeting. The UI will automatically update with speaker names, the meeting video link, transcript, and meeting summary once the meeting has ended and the data has been processed.
When should you use the Desktop Recording SDK?
The Desktop Recording SDK is ideal when you want your users to have a bot-free meeting experience. Here are the key differentiators between the Desktop Recording SDK and the Meeting Bot API:
Desktop Recording SDK
- No meeting bot in the meeting
- Records in-person meetings
Meeting Bot API
- 100% perfect speaker diarization
- AI agents that participate in meetings
- No local app installation
If you’re interested in building a meeting bot, check out our tutorial on how to build a meeting bot.
Conclusion
In this tutorial, we built a Granola-style desktop meeting recorder using Recall.ai’s Desktop Recording SDK. From here, you can use our free Calendar API to enrich meeting data with meeting URLs and participant email addresses.
You can sign up for a free Recall.ai account to try out the desktop recording app in your next meeting. If you’d like to use our products at scale, book a demo with the Recall.ai team.
