


.avif)

On paper, building a meeting notetaker sounds easy. Taking notes is something we’ve been conditioned to do since childhood. However, as any engineer who’s tried to automate a “simple” human task knows, the gap between intuition and implementation can be surprisingly wide.
This guide walks through how to build a meeting notetaker that joins meetings, generates transcripts, and turns them into structured summaries with an LLM.
Demo Video How to Build a Meeting Notetaker
For this project, my teammate Aydin used the following stack (you can swap out any LLM provider, tunnel provider, or programming language you prefer):
- Recall.ai API - sends a bot to a meeting and automatically captures transcripts.
- OpenAI API - turns raw transcripts into structured meeting notes.
- Node.js + Express - backend logic to orchestrate the flow between Recall.ai, OpenAI, and the frontend.
- React (Vite) - frontend for starting the bot and displaying results in real time.
- ngrok - for handling Recall.ai’s webhook callbacks while developing locally.
All the code in this guide lives in the meeting-action-items-bot repo. Clone the repo to follow along as you read.
By the end of this tutorial, you’ll have a working notetaker:
Paste a meeting link -> a Recall.ai bot joins -> when the meeting ends, your browser shows per-participant action items.
If you just want a notetaker that works out of the box, there are plenty of SaaS notetakers. This guide is for when you need a custom notetaker or an in-house build where you control the data, the models, and the workflow end-to-end. If you are looking for a guide on building a meeting bot, check out our blog on how to build a meeting bot which walks you through the process with sample code and demos.
Architecture Overview
Here’s what we’re building:
User → Frontend (React)
     → Backend (Express)
         → Recall.ai Bot joins meeting
         → Recall.ai Webhook → Transcript Ready
         → Backend calls OpenAI → Meeting Summary
         → Server-Sent Events → Frontend Display
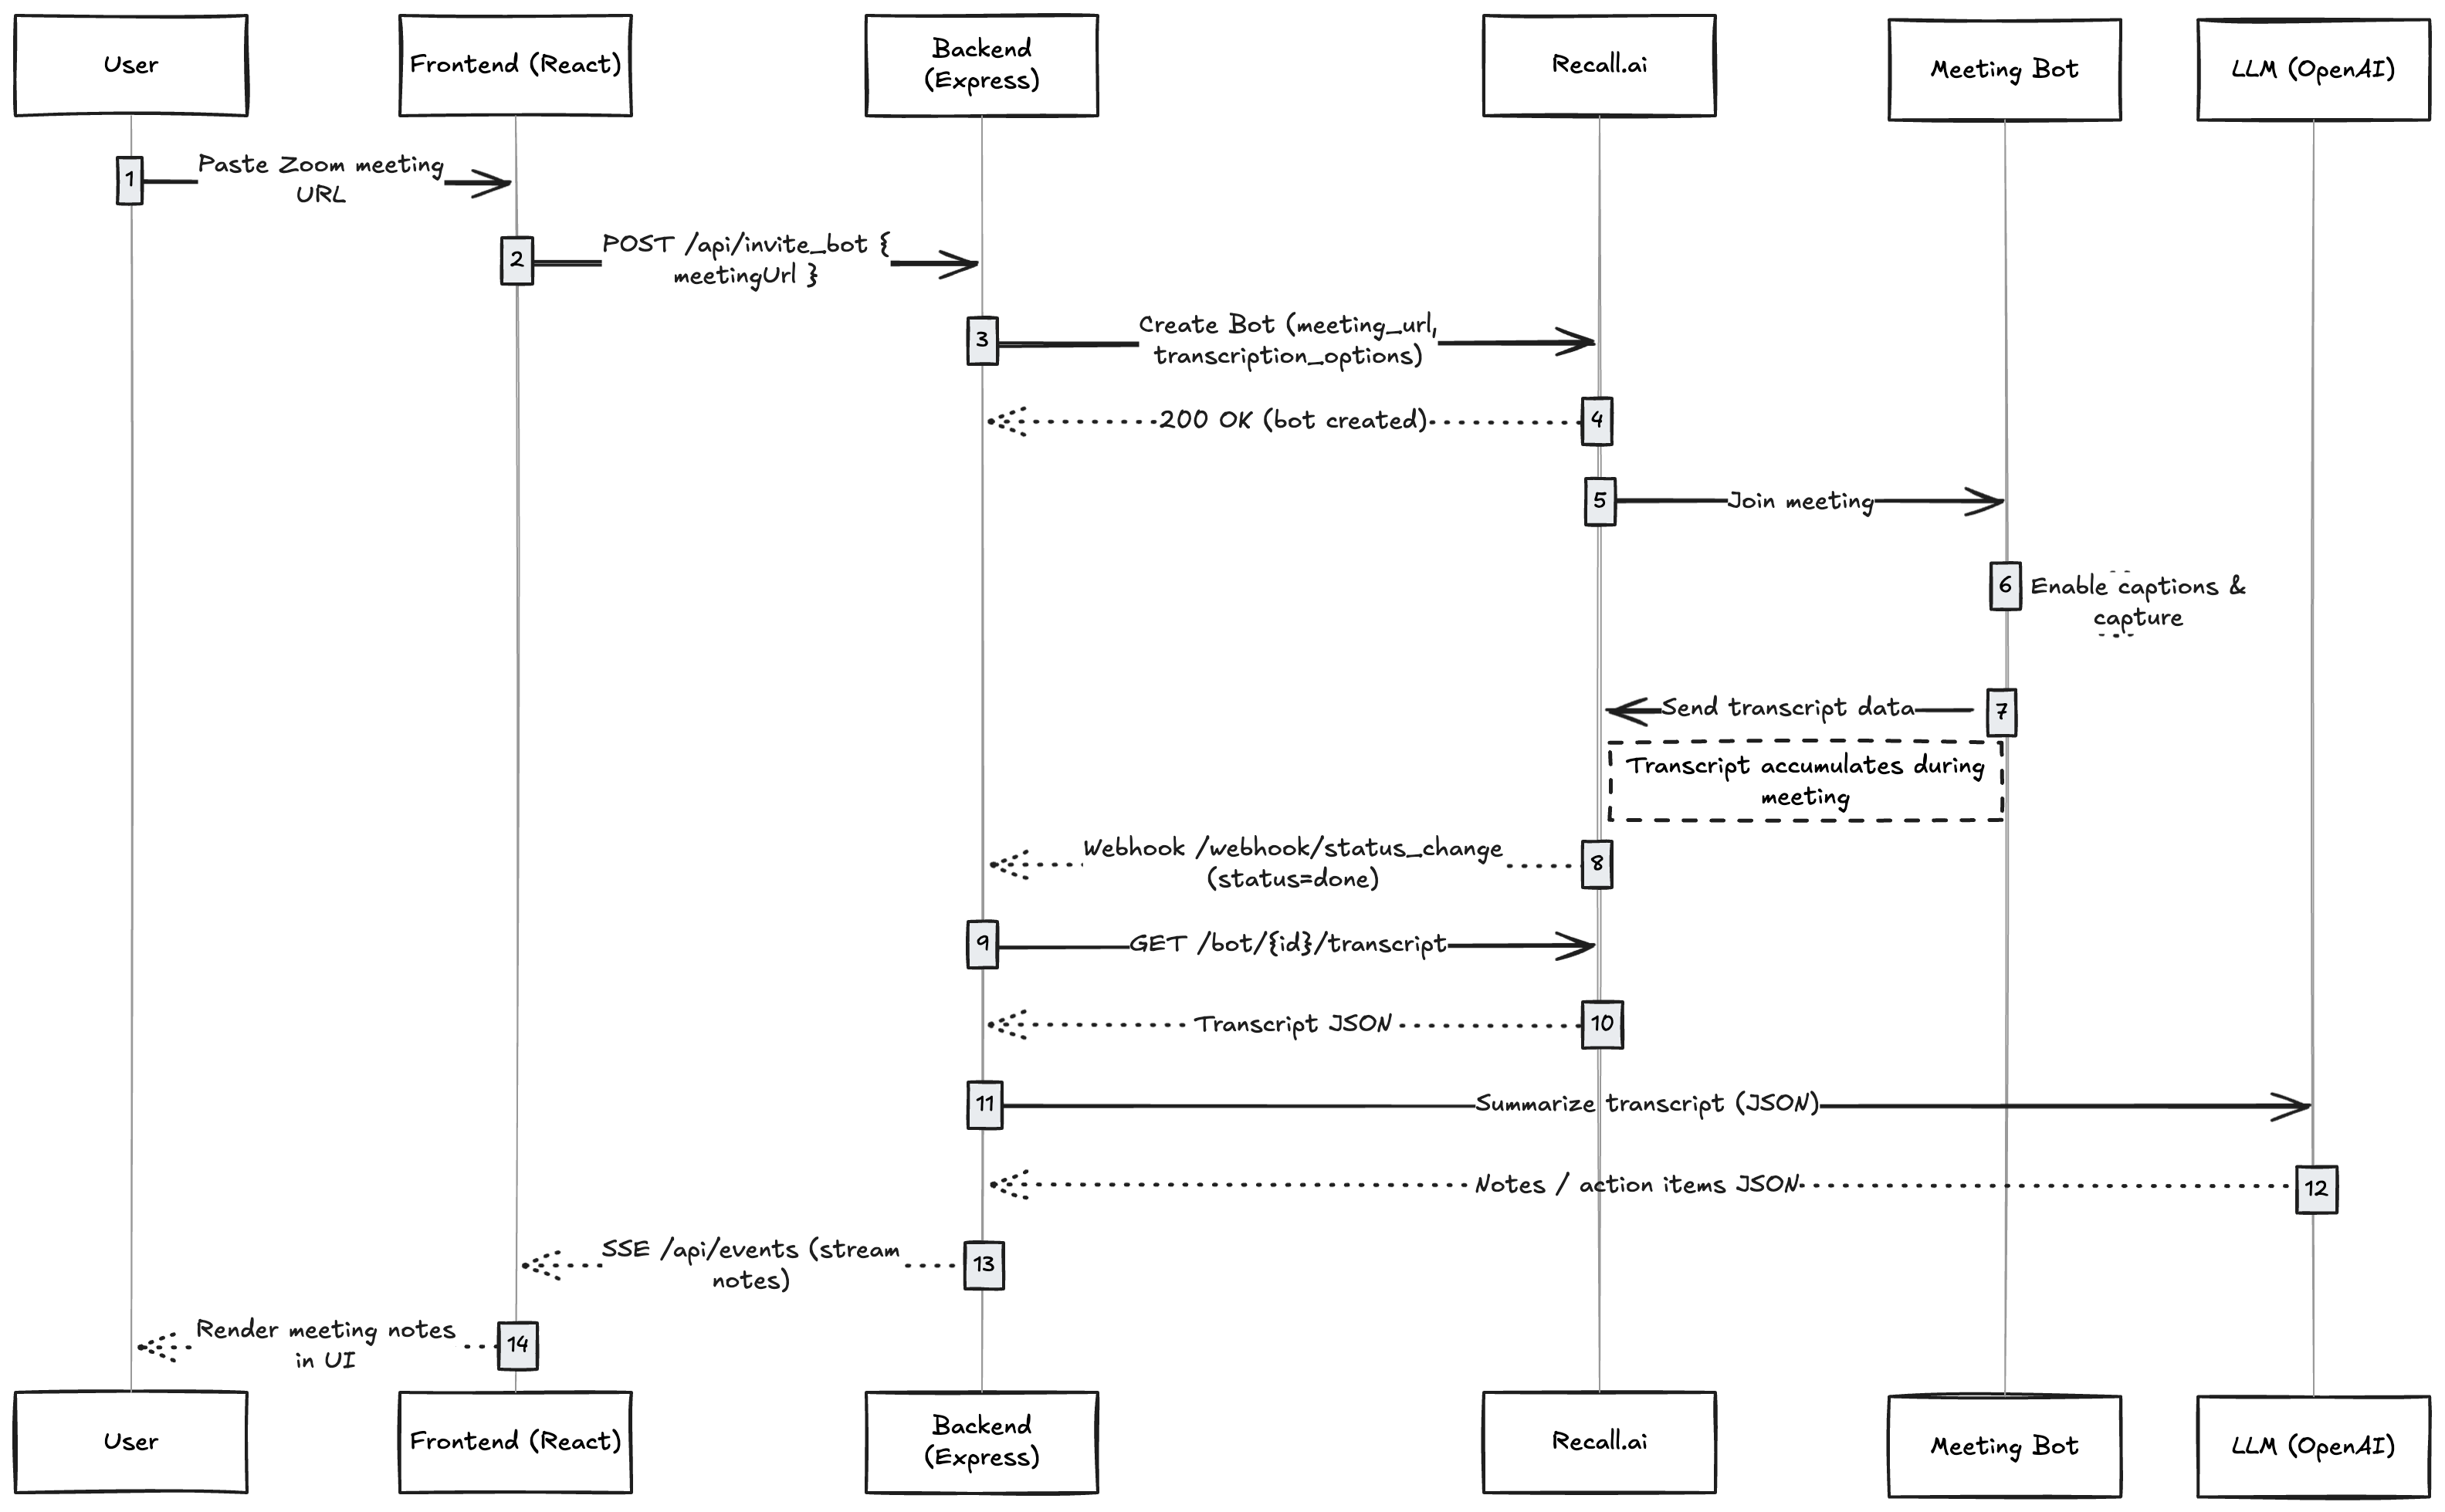
Here’s the entire loop in five steps:
- A user enters a meeting URL in the frontend.
- The backend calls Recall.ai to invite a bot to that meeting.
- The bot joins and generates a transcript.
- Recall.ai notifies your backend via a webhook when the meeting ends.
- The backend retrieves the transcript, sends it to an LLM for summarization, and streams the action items to the frontend via Server-Sent Events (SSE).
In other words: your app never joins the meeting directly. It asks Recall.ai to send a bot, then reacts when Recall.ai tells you the meeting is done.
Prerequisites to building a meeting notetaker
You need three things before you start writing code:
-
A Recall.ai account + API key, you can sign up for free
-
A meeting URL (Zoom, Google Meet, or Microsoft Teams).
* During development, manually pasting a meeting link into the request is no problem. In production, though, you probably won’t want users copying and pasting URLs every time they need a bot in a meeting. A calendar integration solves that: once a user connects their calendar, your app can identify their upcoming meetings and supply the meeting URL to the bot automatically. -
A backend that can receive webhooks. During development, you can make your local server reachable by using ngrok (or any tunneling tool). With a free ngrok account, you can reserve a static subdomain so the URL doesn’t change every time you run
ngrok http --domain {YOUR_CLAIMED_NGROK_DOMAIN} 3000
Step 1: Setting up the backend
Start by separating what your frontend calls from what Recall.ai calls:
/api/*for user-triggered actions (like inviting a bot)/webhook/*for Recall.ai’s callbacks (like notifying us that the transcript is ready)
The separation may look trivial, but it saves time later when you add authentication, retries, or signature verification.
With the routes split, you can boot up the Express server and mount two routers, one for API requests (/api) and one for Recall.ai webhooks (/webhook), in just a few lines of code:
//@title server/index.js
app.use("/api", apiRoutes);
app.use("/webhook", webhookRoutes);
app.listen(3000, () => console.log("Listening on port 3000."));
Once the server is running, we’ll invite the bot to the meeting.
Step 2: Inviting a meeting bot
Before the app can generate notes, it needs a way to capture the meeting itself. When the user clicks Start Recording, the frontend sends the meeting link to the backend. The backend then makes an authenticated POST request to Recall.ai, which provisions a bot to join the meeting and start generating a transcript.
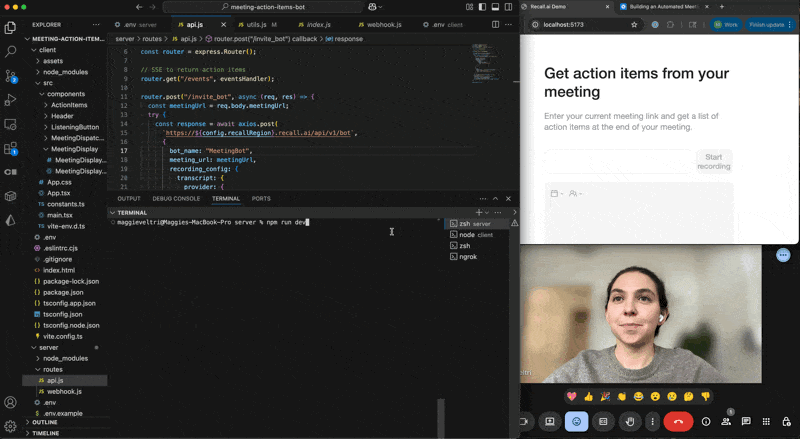
The /invite_bot endpoint is the frontend’s entry point. It simply forwards a meeting URL to Recall.ai so a bot can join.
//@title server/routes/api.js
router.post("/invite_bot", async (req, res) => {
  const meetingUrl = req.body.meetingUrl;
  try {
    const response = await axios.post(
      `https://${config.recallRegion}.recall.ai/api/v1/bot`,
      {
        bot_name: "MyMeetingBot",
        meeting_url: meetingUrl,
        recording_config: {
          transcript: {
            provider: {
              recallai_streaming: {
                mode: "prioritize_accuracy"
              }
            }
          }
        }
      },
      {
        headers: {
          Authorization: `Token ${config.recallApiKey}`,
          Accept: "application/json",
          "Content-Type": "application/json",
        },
      }
    );
    res.send(JSON.stringify(response.data, null, 2));
  } catch (error) {
    console.error("Failed to invite bot", error);
    const status = error.response?.status;
    const message = error.response?.data;
    res.status(400).send({ status: status, message: message });
  }
});
This code uses Recall.ai Transcription, which is denoted as recallai_streaming in the config, to generate transcripts reliably. If you want to try out different transcription providers in place of Recall.ai Transcription, you can switch to any of the other transcription options mentioned in the docs by updating the recording_config. You can also route audio to your own backend and use an internal model or a third-party provider.
The
bot_namefield controls what shows up in the participant list and on the bot’s tile in the meeting. You can set it to anything you like. A common pattern is[MyCompanyName] Notetaker.
Step 3: Listening for the end of the meeting
When the meeting ends, Recall.ai sends a status_change event to your webhook endpoint. That’s your green light: the transcript is complete, and ready to process.
In webhook.js, we handle that event and fetch the transcript:
//@title webhook.js
router.post("/status_change", async (req, res) => {
  console.log("Received webhook:", JSON.stringify(req.body, null, 2));

  const { data } = req.body || {};
  res.status(200).send("OK");

  if (!data || !data.status || data.status.code !== "done") {
    return;
  }

  try {
    const transcriptResponse = await axios.get(
      `https://${config.recallRegion}.recall.ai/api/v1/bot/${data.bot_id}/transcript`,
      {
        headers: {
          Authorization: `Token ${config.recallApiKey}`,
          Accept: "application/json",
          "Content-Type": "application/json",
        },
      }
    );

    const transcript = transcriptResponse.data;

    if (!transcript || transcript.length === 0) {
      sendEvent({ error: "No transcript found" });
      return;
    }

    const actionItems = await extractActionItems(JSON.stringify(transcript));
    sendEvent(actionItems);
  } catch (error) {
    console.error(error);
    sendEvent({ error: "Error extracting action items" });
  }
});

module.exports = router;
This endpoint does three things:
- Confirms receipt to Recall.ai (
res.status(200).send("OK")) - Fetches the final transcript (
GET /bot/{id}/transcript) - Passes the transcript to the summarizer (
extractActionItems(), then streams the results viasendEvent())
Step 4: Summarizing the meeting with OpenAI
With a full transcript in hand, the backend calls an LLM to summarize the meeting and generate action items.
The example uses gpt-4-turbo to extract per-user action items. You can easily switch to a different model or adjust the prompt to output decisions, blockers, sentiment, or a high-level summary instead.
//@title utils.js
const extractActionItems = async (meetingTranscript) => {
  const response = await openai.chat.completions.create({
    model: "gpt-4-turbo",
    response_format: { type: "json_object" },
    messages: [
      {
        role: "system",
        content: `
          You will be provided with a meeting transcript.
          Extract key tasks for each participant as concise action items.
          Format as:
          {
            "meeting_data": [
              { "user": "Name", "action_items": ["...", "..."] }
            ]
          }
        `
      },
      { role: "user", content: meetingTranscript }
    ],
  });

  const data = JSON.parse(response.choices[0].message.content).meeting_data;
  return data;
};
When this function runs, it returns structured JSON that the frontend displays. The decision to use JSON is deliberate. It makes integrating with downstream systems without text parsing trivial. Because the output includes users and action_items, you can extend this project to update CRMs, task managers, or internal tools. You can also easily adapt the prompt to summarize topics, decisions, or meeting summaries instead of just action items.
Step 5: Streaming results to the frontend
To keep the frontend updated without polling, we use Server-Sent Events (SSE). SSE is built into the browser and lets the server push the summary or action items to the client (browser) as soon as the items are ready. Since it’s a simple one-way channel, SSE maps cleanly to what we need here: the server sends action items, and the browser just listens. There’s no complex connection logic or bidirectional messaging.
For multi-user production systems, consider WebSockets or a message queue as concurrency grows.
In events.js (referenced by api.js):
//@title events.js
function eventsHandler(req, res) {
  res.setHeader("Content-Type", "text/event-stream");
  res.setHeader("Cache-Control", "no-cache");
  clients.push(res);
}
In a production system, you’d also listen for the close event on res and remove the client from the clients array to avoid leaks.
function sendEvent(data) {
  clients.forEach(client => client.write(`data: ${JSON.stringify(data)}\n\n`));
}
The handler is mounted at /api/events so that the browser can subscribe in server/routes/api.js and the frontend opens an EventSource connection to it. That’s all you need. The browser keeps the connection open, and the server pushes data whenever the action items are ready without polling or timers. Every call to sendEvent() (in webhook.js) immediately streams an update to all connected clients.
Step 6: Building the frontend
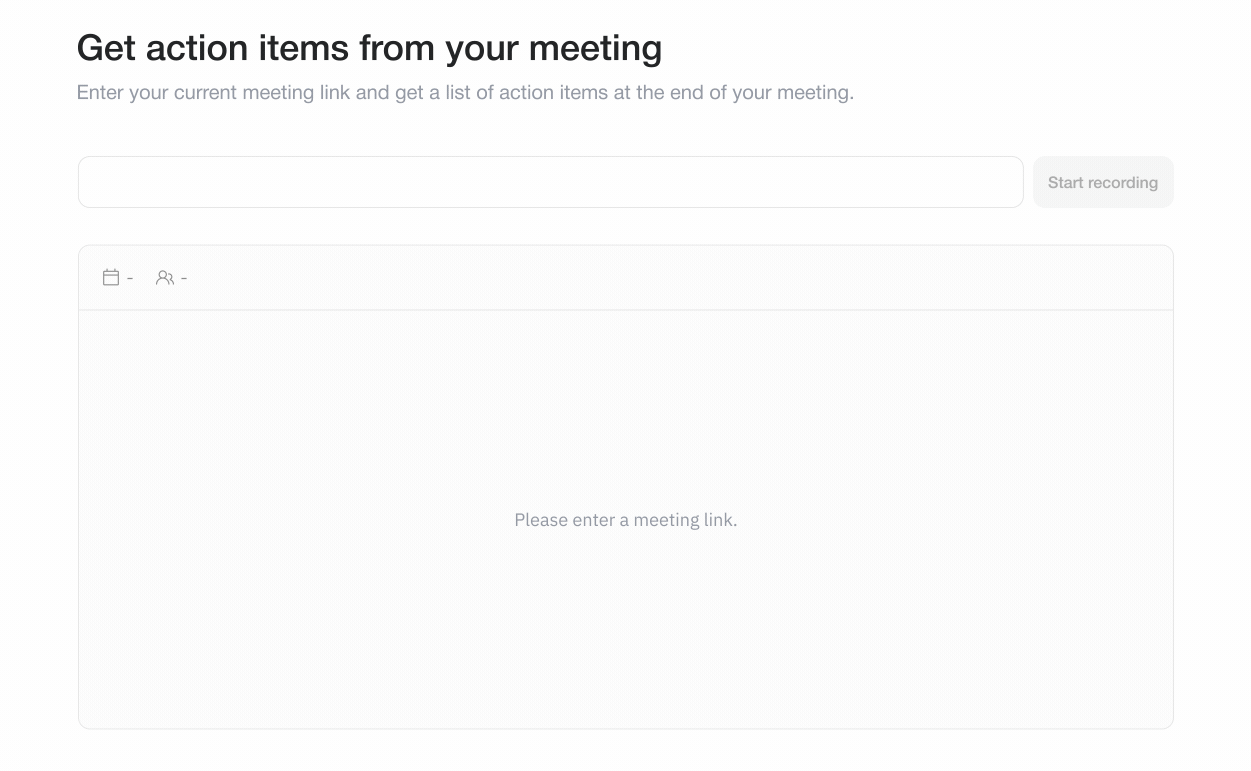
The frontend does two things: it accepts meeting URLs from the user and displays summarized results as soon as they’re ready via SSE.
client/
 ├─ components/
 │   ├─ MeetingDispatcher/  # User enters meeting URL
 │   ├─ MeetingDisplay/     # Subscribes to SSE, renders action items
 │   ├─ ListeningButton/    # Animated "listening" indicator
MeetingDispatcher.tsx
Handles user input and triggers the /api/invite_bot endpoint:
//@title MeetingDispatcher.tsx
await axios.post(`${import.meta.env.VITE_BACKEND_URL}/api/invite_bot`, {
  meetingUrl: meetingUrl,
});
MeetingDisplay.tsx
Listens for SSE updates:
//@title MeetingDisplay.tsx
useEffect(() => {
  const eventSource = new EventSource(`${import.meta.env.VITE_BACKEND_URL}/api/events`);
  eventSource.onmessage = (event) => {
    const meetingData = JSON.parse(event.data);
    setActionItems(meetingData);
    setMeetingState(MeetingState.FINISHED);
  };
  return () => eventSource.close();
}, []);
The key piece is new EventSource() because as soon as the backend calls sendEvent(), this handler fires and updates the UI.
Once the backend sends the summarized data, it’s displayed neatly via the ActionItems component.
When you’re ready to move beyond the prototype, the appendix covers production hardening and extensions. Learn about verifying webhook signatures, handling retries, validating LLM output, and adding configurable prompts.
Step 7: Running locally
To run the repo locally, start by cloning the repo.
git clone https://github.com/recallai/meeting-action-items-bot.git
Once you’ve cloned the repo and opened it up in your IDE, you can see the architecture I laid out before. The repo consists of three moving pieces:

- Backend (Node + Express) on port
3000 - Frontend (React + Vite) on port
5173 ngroktunnel so Recall.ai can reach your local/webhook/status_changeendpoint
Note: The backend is API-only. Going to
http://localhost:3000/and seeingCannot GET /is expected.
The UI lives athttp://localhost:5173/.
I’ll take you through how to get all three parts up and running.
1. Backend setup
From the repo root:
cd meeting-action-items-bot/server
npm install
Create a .env file in the server folder (you can use .env.example as a reference). It should contain:
RECALL_API_KEY=your_recall_api_key
RECALL_REGION= your_region (us-west-2 for pay as you go)
OPENAI_API_KEY=your_openai_api_key
Then start the backend:
npm run dev
You should see: Listening on port 3000.
2. Frontend setup
In a new terminal:
cd meeting-action-items-bot/client
npm install
Create a .env file in the client folder. You can copy .env.example and rename it to .env, then make sure it contains: VITE_BACKEND_URL=http://localhost:3000
This tells the frontend where to find the backend API. Without this, it will try to call http://localhost:5173/undefined/api/... and you’ll see 404s in the console.
Start the frontend:
npm run dev
By default the frontend runs on: http://localhost:5173/
Open that URL in your browser. This is where you’ll paste your meeting link.
3. ngrok + webhook setup
The backend receives status updates from Recall.ai via a webhook at:
/webhook/status_change
To expose your local backend to Recall.ai while developing, run ngrok from the repo root or server directory:
ngrok http 3000
ngrok will give you a public URL like: https://your-ngrok-domain.ngrok.io
Go to the Recall.ai dashboard → Webhooks, and add a new endpoint: https://your-ngrok-domain.ngrok.io/webhook/status_change
Make sure:
- The path is exactly
/webhook/status_change - The method is
POST - This endpoint is configured to receive
status_changeevents
(If you’ve added logging in webhook.js, you should see req.body printed in your server logs when a webhook hits.)
4. Sending the bot to a meeting
Once backend, frontend, and ngrok are all running:
- Start a meeting (Zoom, Google Meet, Microsoft Teams, etc.)
- Copy the meeting URL
- Open
http://localhost:5173 - Paste the meeting link into the input
- Click
Start Recording - Once the meeting ends you’ll see your action items for each speaker
Behind the scenes:
- The frontend calls
POST ${VITE_BACKEND_URL}/api/invite_botwith yourmeetingUrl. - The backend calls
POST https://{RECALL_REGION}.recall.ai/api/v1/botto invite the Recall.ai bot. - The bot joins the meeting and captures audio/captions.
- When Recall.ai finishes processing, it sends a
status_changewebhook to your ngrok URL at/webhook/status_change. - The backend fetches the transcript, sends it to OpenAI to extract action items, and uses SSE to push the result to
/api/events. - The frontend is subscribed to
${VITE_BACKEND_URL}/api/eventsand updates the UI as soon as the action items arrive.
You’ll see the per-participant action items appear in the browser when the meeting is done and the summary has been generated.
Common issues and what they really mean
| Symptom | What’s probably happening | Quick check |
|---|---|---|
| No webhook fired | Wrong ngrok URL or blocked request | Log req.body in /webhook/status_change, confirm a 200 OK |
| “No transcript found” | Captions off or meeting too short | Ensure transcription in recording_config is set correctly |
400 on /invite_bot |
Bad meeting link or region mismatch | Return Recall.ai’s full error body to the UI |
| Nothing streams back | SSE connection dropped | Reconnect on the client or let users manually refresh notes |
These are the most common hiccups when you’re testing locally. Each one maps to a single point in the flow, so diagnosing them is usually quick once you know where to look.
Conclusion
With just a few files and a couple hundred lines of backend code, you’ve built a working meeting notetaker that joins calls through Recall.ai’s Meeting Bot API, summarizes transcripts with an LLM, and streams action items straight to the browser without polling or platform-specific logic required.
Because Recall.ai’s Meeting Bot API works across major platforms, you can pass links from Zoom, Google Meet, Microsoft Teams and more and receive transcripts, recordings, and metadata the same way. For use cases where meeting bots aren’t appropriate, such as desktop apps or in-person meetings, the Desktop Recording SDK offers local capture and can feed into the same summarization pipeline as the Meeting Bot API. This setup gives you a solid base to experiment, extend, and make it your own whether you need a notetaker API, meeting recording API, or meeting transcription API. If you have any questions, feel free to reach out to us. Though the docs are thorough and signing up is free, we’re also happy to help you figure out if this solution is the right one for your use case, offer support if it is or resources to other options if it isn’t.
Appendix
Production polish
The app you’ve built so far is solid for demos and prototypes. It joins a meeting, waits for a webhook, summarizes the transcript, and streams results to the UI. But if you want to deploy it in production or embed it in another product, there are a few finishing touches that make it more reliable, secure, and maintainable.
1. Idempotent webhooks
Recall.ai can occasionally resend the same webhook event (for example, if your server doesn’t respond quickly enough or returns a non-200). To avoid processing the same meeting multiple times, make your webhook handler idempotent. Running the code twice should not trigger duplicate summarization or downstream calls. Here is a simple approach you can adopt:
//@title webhook.js
if (await db.hasProcessed(data.bot_id, data.status.code)) return;
await db.markProcessed(data.bot_id, data.status.code);
Deduplicating by (bot_id, status) ensures you only summarize once, even if multiple identical status=done events arrive.
You can store this in Redis, Postgres, or any persistence layer you already use.
2. Retry transcript fetch
Sometimes a status=done webhook can arrive before the transcript is fully committed on Recall.ai’s side. If you fetch immediately, you might get an empty array.
Instead of failing silently, retry with exponential backoff:
for (let i = 0; i < 3; i++) {
// where transcriptUrl is https://${RECALL_REGION}.recall.ai/api/v1/bot/{id}/transcript
  const response = await axios.get(transcriptUrl, headers);
  if (response.data.length) return response.data;
  await new Promise(r => setTimeout(r, 2 ** i * 1000));
}
This adds a few seconds of resilience for free and avoids false “no transcript” messages after short or laggy meetings.
3. Validate LLM output
Due to token truncation or formatting drift, LLMs can produce malformed JSON. Before sending that output to clients, run it through a validator like Zod or Yup to ensure it matches the expected structure.
import { z } from "zod";

const MeetingData = z.array(z.object({
  user: z.string(),
  action_items: z.array(z.string())
}));

const parsed = MeetingData.parse(JSON.parse(llmOutput).meeting_data);
A small schema check like this prevents frontend crashes and catches edge cases like truncated responses or missing fields.
4. Verify webhook signatures
Recall.ai can sign its webhooks using a shared secret. Verifying these signatures prevents spoofed requests or accidental test calls from triggering your logic. Here’s an example of a typical pattern:
import crypto from "crypto";

function verifySignature(req) {
  const signature = req.headers["x-recall-signature"];
  const payload = JSON.stringify(req.body);
  const expected = crypto
    .createHmac("sha256", process.env.RECALL_WEBHOOK_SECRET)
    .update(payload)
    .digest("hex");
  return signature === expected;
}
If the signature doesn’t match, reject the request with a 401. It’s a one-line check that adds a major security guarantee.
5. Structured logs
When you go beyond local testing, log structured data instead of free-form strings.
It makes debugging production issues much faster and allows you to add observability later.
// logging example
console.info(JSON.stringify({
  event: "summary_complete",
  bot_id: data.bot_id,
  transcript_bytes: transcript.length,
  summary_chars: JSON.stringify(actionItems).length,
  timestamp: Date.now(),
}));
Even if you don’t have a logging system yet, writing predictable JSON means you can pipe these logs into any analytics or APM tool later.
6. Configurable summarization prompts
Right now the summarizer extracts action items only, but the same transcript can support multiple analysis modes (summaries, key decisions, highlights, or sentiment).
Instead of hardcoding one prompt, expose a query parameter or UI toggle:
POST /api/invite_bot?mode=decisions
Then, in utils.js, pick the appropriate prompt template:
//@title utils.js
const prompt = {
  action_items: "...extract tasks per participant...",
  decisions: "...list decisions made and who made them...",
  summary: "...summarize the key discussion points..."
}[mode || "action_items"];
This lets users choose what kind of notes they want without any architectural change.
Extensions and variations
Once the notetaker works end-to-end (bot joins, transcript fetched, summary displayed), you can start to customize it to your use case/your users’ use cases.
Because the architecture cleanly separates data capture (Recall.ai), transformation/analysis (OpenAI), and presentation (React), you can add entirely new capabilities without touching the core flow. Below are a few directions that take the same base system further.
1. Live transcription view
Right now, the frontend stays quiet until the meeting ends. For longer calls, that can feel opaque.
To allow users to see the transcript in real time, you can stream partial caption updates directly from Recall.ai’s live transcription endpoint and feed them into the same SSE channel you already built for summaries.
Conceptually, it looks like this:
Bot joins → Live captions stream (partial) → SSE to browser
Meeting ends → status=done → Fetch full transcript → Final summary
The browser can show a “live transcript” panel during the meeting, then collapse it into a summarized version once the webhook fires.
It’s the same pattern, just using Recall.ai’s live caption stream instead of waiting for the post-meeting transcript.
2. CRM or task sync
Summarized notes are most valuable when they trigger action. With structured JSON output, it’s straightforward to integrate your notetaker with task or documentation tools.
For example:
- Jira/Linear: Create a ticket for each action item.
- Notion/Confluence: Append meeting summaries to a running notes database.
- ClickUp/Asana: Auto-assign tasks to participants mentioned in the transcript.
You can handle these pushes inside the same webhook handler that processes status=done. If the meeting produces "action_items": [...], post them downstream as soon as they’re summarized.
Because you already have participant names and actions, the mapping logic becomes as simple as:
for (const { user, action_items } of meeting_data) {
  await postToJira(user, action_items);
}
This turns your notetaker from a passive summary tool into an active productivity workflow.
3. Multi-platform support
Even though this tutorial uses specific meeting platforms in examples, nothing in the code is platform-specific.
Recall.ai handles the complexity of connecting to different meeting platforms (Zoom, Google Meet, Microsoft Teams, Webex, Slack Huddles, and others) by inferring the right connector from the meeting_url.
That means your app can instantly support multiple providers with zero code change.
All you need to do is accept any meeting URL, and Recall.ai will handle joining the correct platform automatically.
If you’d like to show the platform type in your frontend, you can detect it client-side (new URL(meetingUrl).hostname) and adjust branding or icons accordingly.
4. Advanced summaries
The OpenAI step doesn’t have to stop at action items. By adjusting the system prompt, you can extract much richer insights from the same transcript:
- Key decisions: What did the group agree to?
- Blockers: What’s preventing progress?
- Sentiment or tone: Was the discussion positive, tense, or uncertain?
- Topics and themes: What were the main subjects discussed?
For instance, to extract decisions instead of tasks, you could change your system prompt to:
content: `
  You will be provided with a meeting transcript.
  Identify the key decisions made, who made them, and any follow-up items.
  Output:
  {
    "decisions": [
      { "decision": "...", "made_by": "Name", "follow_up": "..." }
    ]
  }
`
Because the entire summarization layer is already modularized (extractActionItems()), you can swap in new prompt templates or chain multiple summaries without touching the rest of your system. For example, a “decisions” pass followed by a “sentiment” pass.
Key terms
Meeting bot: A virtual participant that joins online meetings (Zoom, Google Meet, Teams, etc.) through platform APIs to capture audio, video, or captions. Recall.ai provides the bot and handles joining, recording, and transcript generation.
Webhook: An HTTP callback from Recall.ai to your backend that reports bot lifecycle events (e.g., joined, done). Used to trigger transcript retrieval and post-meeting processing without polling.
Transcript artifact: The finalized meeting transcript returned by Recall.ai via GET /bot/{id}/transcript. Contains speaker-attributed text segments that serve as input for summarization.
SSE (Server-Sent Events): A one-way, HTTP-based streaming protocol from server to browser. The backend uses SSE to push meeting summaries to connected clients in real time without manual refresh or polling.
LLM summary: A structured output generated by a large language model (e.g., GPT-5) that converts the transcript into machine-readable notes, action items, or decisions, defined by the prompt in extractActionItems().
