


.avif)

Building a Chrome extension that records a Google Meet tab sounds straightforward, until you try to build it. Chrome doesn’t let webpages capture system audio for all OSes, and background scripts can’t hold active media streams. If you want to record the actual video and audio your user experiences in the Google Meet tab without a picker, there is exactly one supported path: a Chrome extension using chrome.tabCapture.
This guide walks through that implementation step-by-step. When you’re done, you’ll have a working extension that records:
- Video from the Google Meet tab
- System/tab audio (everyone else)
- Microphone audio (the user speaking)
All mixed together and saved as a clean .webm.
To make that possible, we have to use extension-only media capture APIs because Chrome doesn’t grant standard JavaScript websites without special privileges access to tab audio without a picker.
However, those APIs come with a couple of important rules we need to design around:
- The recording stream is tied to the Google Meet tab and will stop if the tab is closed or Chrome revokes capture
- Microphone access must come from a user-initiated action
The good news? Every one of these constraints has a solution. In this tutorial, we’ll build a recorder that respects Chrome’s rules while still capturing everything the user sees and hears. You can follow along and test out the extension for yourself by cloning my chrome recording extension repo.
Extension architecture
A Chrome extension can only record reliably if you structure it around Chrome’s media-capture rules which can be found in API docs and the Chrome extension documentation created by Google. Three specific constraints shape my design:
- Microphone access only succeeds inside a user-visible extension page triggered by a user gesture.
- Media streams must be handled in a DOM-enabled environment, not in the background.
- The captured stream is bound to the Google Meet tab and may end immediately if the tab is reloaded or permissions change.
Those rules are non-negotiable, so I architected the extension to respect them rather than attempting to hack around them. The division of responsibility looks like this:
| Component | Why it exists | What runs there |
|---|---|---|
| Popup | User-visible gestures | Start/Stop recording button, mic enable button |
| Background Service Worker | Long-lived coordinator | Creates/destroys offscreen document, state management, saving files |
| Offscreen Document | DOM + MediaRecorder environment | Tab capture, mic capture, audio mixing, encoding |
This gives me a clean control flow:
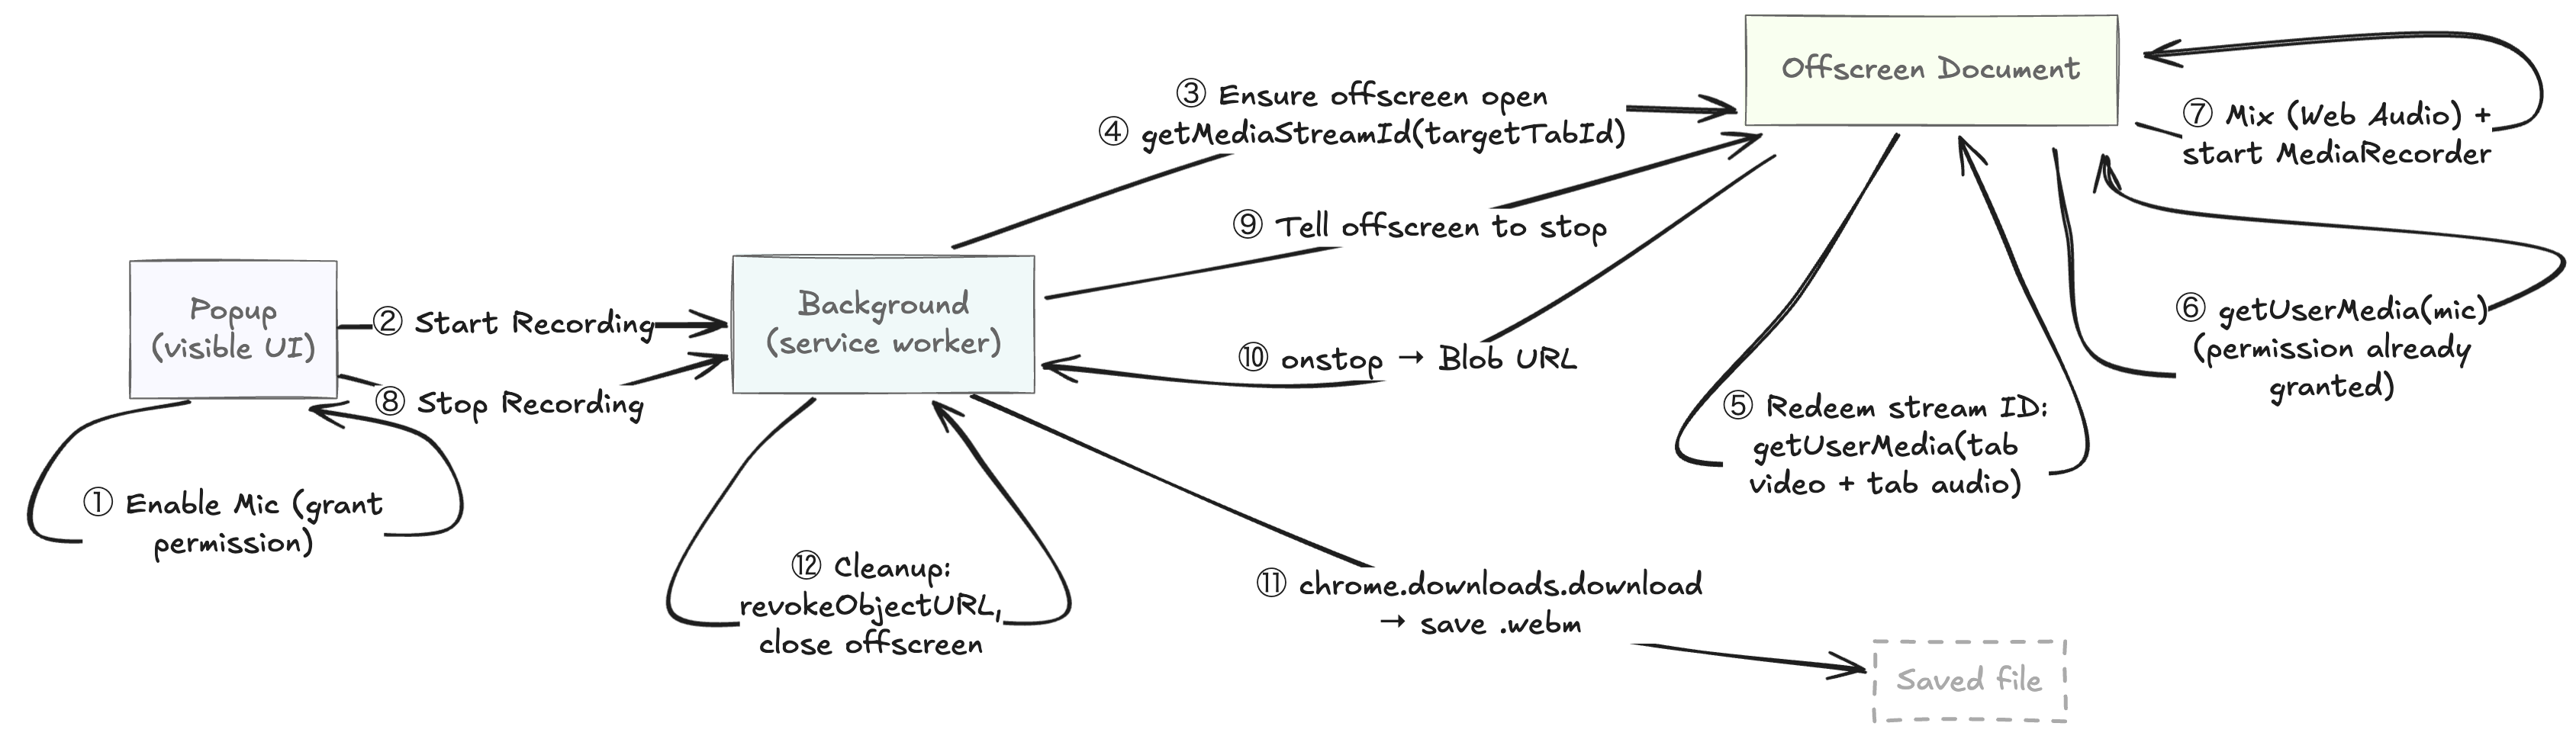
When implemented correctly, the user clicks Start Recording, continues their conversation normally in Google Meet, clicks Stop Recording, and the file downloads locally. Everything else happens behind the scenes.
To improve the user experience, you can automate stop behavior by injecting a content script into the tab where the meeting is taking place (in this case the Google Meet tab). The script can detect the standard end-of-meeting state (for example, the “You left the call” screen) and signal the background service worker to stop recording automatically. That is not covered in this tutorial as it is an extension of the core functionality.
Code: File overview
I built core files that we’ll walk through together:
| File | Purpose |
|---|---|
popup.ts / popup.html |
User actions and mic permission priming |
background.ts |
Recording orchestration and saving |
offscreen.ts / offscreen.html |
Actual A/V capture and MediaRecorder logic |
All the supporting files (manifest, build config) exist solely to enable this architecture.
With the structure laid out, we can move on to the fun part: capturing the Google Meet tab itself.
How to capture video + system audio from a specific tab
Chrome doesn’t hand your extension a media stream directly. Different parts of an extension have different powers:
- The background context, which runs as a service worker, can run logic even when no windows are open, but it has no DOM and can’t hold active media streams
- The offscreen document, a hidden, DOM-enabled page, does have a DOM and can record audio/video, but only while it’s explicitly opened
So I split responsibilities between two scripts I wrote:
background.tsruns in the background context. It requests tab-capture permission and coordinates state.offscreen.tsruns inside the offscreen document. This file actually captures audio/video usinggetUserMedia()(which requires a DOM) andMediaRecorder.
Chrome enforces this separation as a security boundary. The background script can ask for access to a tab, but it can’t touch the stream itself. This split ensures that only a visible, user-initiated extension component can handle real media, preventing background or webpage code from spying.
How tab capture actually works
Chrome’s tabCapture works in two stages:
- The
background.tsrequests a temporarystream ID. Chrome only grants this after a user gesture (a direct user action like clicking a button). Thestream IDis not media, it only works inside extension contexts. Think of it as a user permission token: it proves the user approved capturing the given tab, and it can’t be reused elsewhere. - The
offscreen documentredeems thestream IDfor the actual tab audio and video that you can mix and record usinggetUserMedia(). This exchange is only possible in a DOM-enabled environment becausegetUserMedia()requires a visible, user-authorized page where Chrome can safely manage permissions and security indicators.
Everything else in the flow builds on this division of responsibility:
- The service worker (
background.ts) asks Chrome for permission and coordinates the session. offscreen.tsturns that permission into real audio/video and records it.
//@title background.ts - getting the stream ID
async function getStreamIdForTab(tabId: number): Promise<string> {
  return new Promise((resolve, reject) => {
    chrome.tabCapture.getMediaStreamId(
      { targetTabId: tabId },
      streamId => streamId ? resolve(streamId) : reject(new Error('Failed to get streamId'))
    );
  });
}
The offscreen document then requests the actual stream:
//@title offscreen.ts - using the stream ID
const baseStream = await navigator.mediaDevices.getUserMedia({
  audio: {
    mandatory: {
      chromeMediaSource: 'tab',
      chromeMediaSourceId: streamId,
      // Attempt to keep audio audible while recording
      googDisableLocalEcho: false
    }
  },
  video: {
    mandatory: {
      chromeMediaSource: 'tab',
      chromeMediaSourceId: streamId,
      maxWidth: 1920,
      maxHeight: 1080,
      maxFrameRate: 30
    }
  }
});
At this point, we have video tracks and remote/system audio, but we’re still missing a key piece: microphone audio. Because Google Meet does not loop the local mic output back into the tab, we’ll have to come up with a way to get the audio for the user(s) running the Chrome extension another way.
How to capture your microphone
If you speak into your microphone in a Google Meet call, you will not hear yourself, and neither will the tab capture stream. Google Meet deliberately suppresses local voice playback to prevent echo. But for this extension, I need the user’s voice just as much as everyone else’s, so I capture the mic directly:
const micStream = await navigator.mediaDevices.getUserMedia({ audio: true });
Microphone access must be granted from a visible, user-initiated extension page. The most reliable UX involves:
- Showing an
Enable Microphonebutton in the popup - If the permission prompt doesn’t appear, automatically opening a dedicated setup page in a visible tab and retrying there
Chrome may deny microphone prompts from the popup due to system settings or permission blocks. The fallback UI prevents silent failures and allows users to capture microphone audio if the happy path isn’t hit.
We’ll put the full permission UX in the appendix. For now, the key takeaway is that if the popup request fails silently, fall back to a visible tab.
Once we have the mic stream and the tab stream, we can merge them.
Merging tab audio and microphone audio using Web Audio API
Now that I have audio from the tab and the mic, I’ll use the Web Audio API as my audio mixer. Because MediaRecorder, the browser API that turns a MediaStream into a recorded file, can only record one audio track per stream, I’ll mix the tab and mic audio together. First I convert each audio source into a MediaStreamSource node which the browser can route. Then I mix the mic and tab audio into a single track (MediaStreamDestination). Finally, I attach that mixed audio to the original tab’s video track.
When we’re done, we’ll have one MediaStream that includes:
- Google Meet tab video
- Google Meet tab audio
- Local microphone audio
all ready to send into MediaRecorder.
//@title offscreen.ts - mixing tab and mic audio
function mixAudio(tabStream: MediaStream, micStream: MediaStream) {
  const ctx = new AudioContext();
  const dst = ctx.createMediaStreamDestination();

  ctx.createMediaStreamSource(tabStream).connect(dst);
  ctx.createMediaStreamSource(micStream).connect(dst);

  return new MediaStream([
    ...tabStream.getVideoTracks(),
    ...dst.stream.getAudioTracks()
  ]);
}
Make sure not to mute or stop the MediaStream in your code. Chrome interprets a disabled audio track as no sound/silence, so your recording won’t include remote voices.
With a single combined MediaStream in hand, I can move on to recording everything the user sees and hears.
Recording and saving the .webm using Chrome recording APIs
Once we’ve mixed the tab and microphone audio into a single MediaStream, the offscreen document handles recording using the MediaRecorder API. This is the only part of the extension that continuously receives raw audio/video, so keeping that work inside the offscreen document prevents interruptions when Chrome suspends background service workers under Manifest V3.
Manifest V3 (MV3) replaces background pages (which were used in Manifest V2) with service workers. Service workers are essentially scripts that can wake, do short tasks, and then sleep. These workers can’t access the DOM, can be paused by Chrome at any time, and sometimes suspend when idle, which is why all live media work has to happen inside a DOM-enabled context like the offscreen document.
Here’s the minimal setup for recording inside offscreen.ts:
//@title offscreen.ts
recorder = new MediaRecorder(finalStream, {
  mimeType: 'video/webm; codecs=vp8,opus'
});

const chunks: BlobPart[] = [];

recorder.ondataavailable = e => chunks.push(e.data);

recorder.onstop = () => {
  const blob = new Blob(chunks, { type: recorder.mimeType });
  const blobUrl = URL.createObjectURL(blob);
  port.postMessage({ type: 'OFFSCREEN_SAVE', blobUrl, filename });
};
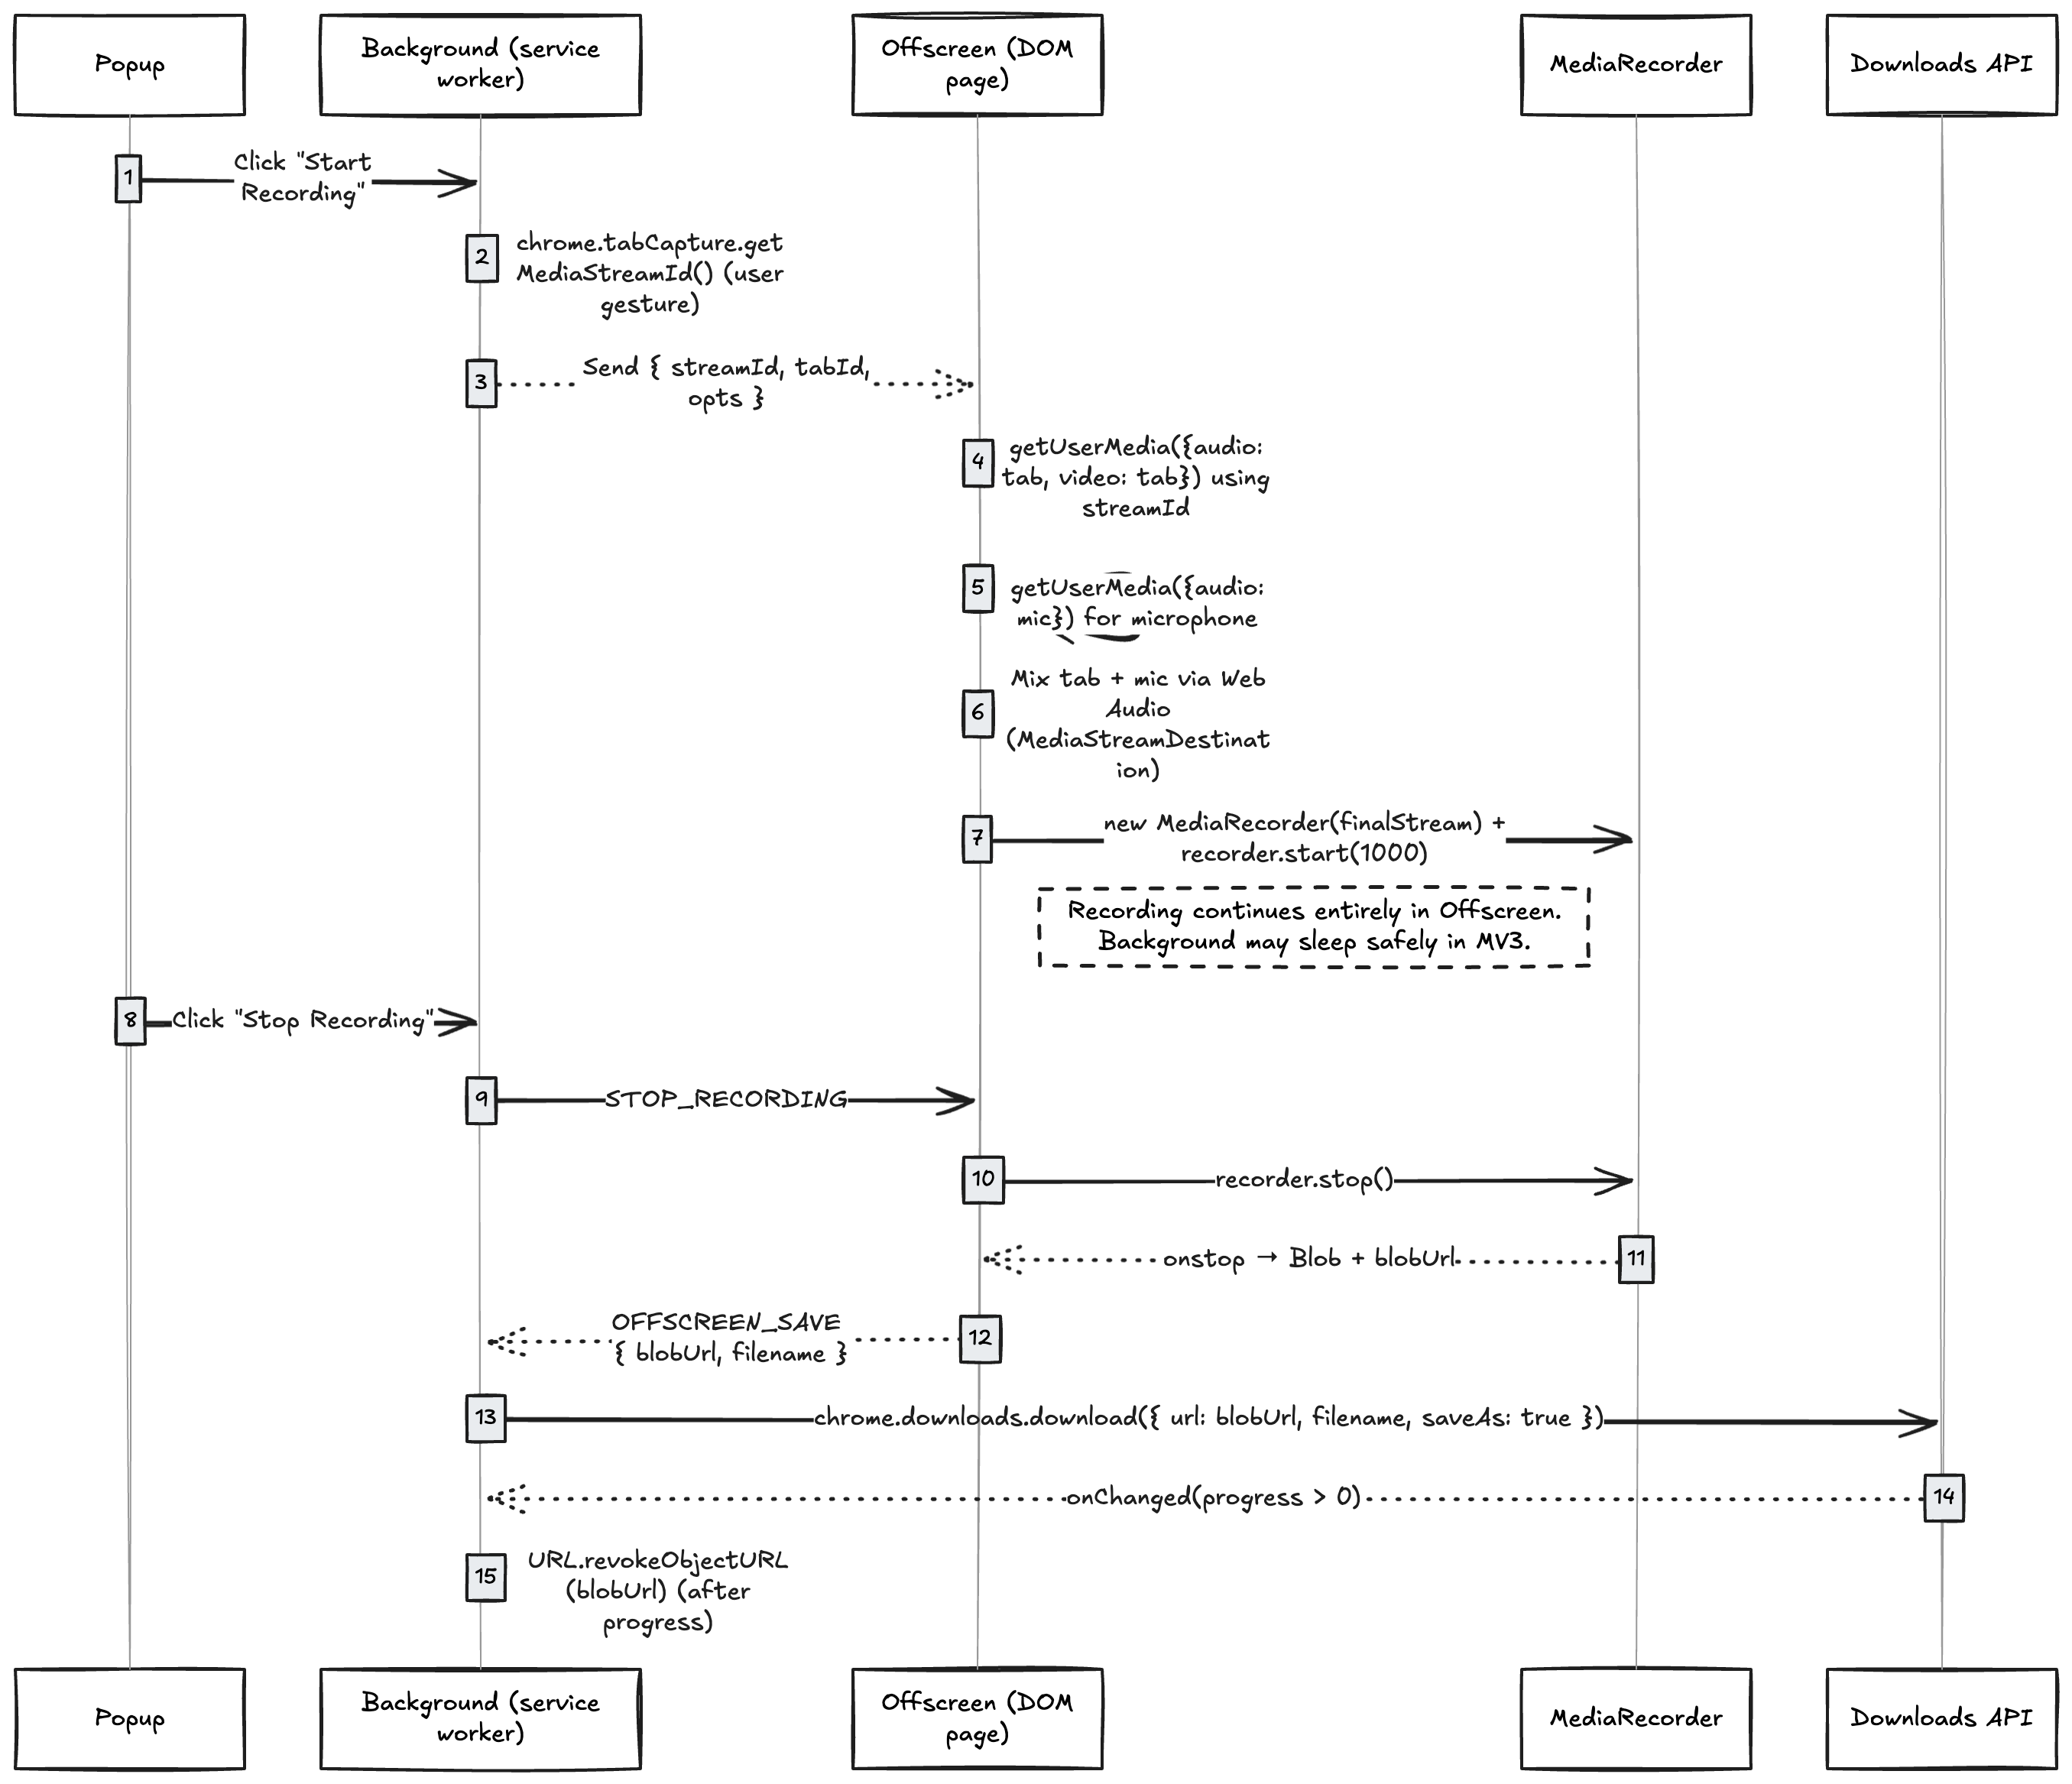
When the user clicks Stop Recording in the popup, the message travels through the same chain we established earlier. The popup script (popup.ts) captures the user’s click and sends a message to the background service worker (background.ts). The background forwards that message to the offscreen document (offscreen.ts), which is the only context with access to the live MediaRecorder. Once the offscreen script receives the stop signal, it calls recorder.stop(), compiles the recorded chunks into a single Blob, creates a temporary Blob URL, and sends that back to the background worker. The background then uses Chrome’s downloads API to save the file locally:
//@title background.ts
chrome.downloads.download({
  url: blobUrl,
  filename,
  saveAs: true
});
This flow keeps the long-lived media work isolated inside the offscreen document, while the background service worker handles coordination and saving. That separation prevents lost recordings when Chrome suspends the background worker and ensures only user-initiated actions control capture.
A subtle but important detail: I do not call URL.revokeObjectURL(blobUrl) immediately. If the Blob URL is revoked before Chrome’s download stream begins, you will end up with a corrupted or empty file. The safest pattern is:
- Trigger the download
- Wait for the
onChangeddownload-state event - Revoke the URL only after Chrome reports progress
We’ll include the full cleanup function in the appendix.
With recording and download wired up, the full session lifecycle is now in place. The user clicks Start Recording, continues using Google Meet normally, and then clicks Stop Recording to receive a clean .webm that includes everything they saw and heard including the tab’s video, the remote participants’ audio, and their own microphone.
All of this processing happens inside the offscreen document so the background worker can sleep without interrupting the recording. Still, Chrome’s recording APIs can be unpredictable, Chrome’s rules are strict, permissions change, and tabs do unexpected things. I’ll walk through some failure modes and go over how to handle them gracefully.
What can go wrong (and how not to panic)
Even with a well-structured architecture, Chrome’s tab-capture APIs come with quirks and edge cases that can look alarming the first time you hit them.
If you clone this repo (or build a similar extension using Chrome’s capture APIs), here are the issues you’re most likely to see and what they actually mean:
| Symptom | Meaning |
|---|---|
| Audio level meters (RMS) show 0.000 or silence | Audio is muted: Google Meet is silent or mixing broke |
| You cannot hear Google Meet audio during recording | tabCapture redirected the tab’s audio to the capture stream |
| Recording stops early | The captured tab was closed, capture was revoked, or Chrome throttled background rendering |
| The recording process appears stuck while stopping or finalizing (for example, the popup button may get stuck on “Stop & Download”) | Background worker suspended / offscreen closed |
Each of these can be mitigated by the way I structured the extension:
- Keep recording logic inside the offscreen document, so background sleep doesn’t interrupt capture.
- Communicate state changes via messages, not polling.
- Route the captured audio back to
AudioContext.destinationso that the user can hear the Google Meet audio. - Listen for
onendedevents on video tracks and stop and save cleanly if Chrome terminates the stream.
Chrome extension constraints
Some issues can’t be fixed because they stem from Chrome’s security and UX model in Manifest V3:
- Users must click to start: Chrome requires a user gesture to request tab capture and microphone access. There’s no compliant, reliable way to auto-start when a meeting begins.
- Capture is bound to one tab: If the user closes the Google Meet tab, capture ends permanently. You must request a new stream ID and start a new recording.
- Switching tabs can cause gaps: If the user switches away, Google Meet’s video and tab audio may freeze or go silent until they return (the microphone continues) due to Chrome throttling the background rendering. When they come back, capture resumes, but the missing segment is gone.
- No cross-app or multi-tab recording: Extensions can’t record multiple meetings at the same time. Each recording session must be user-initiated and tied to one active tab.
- Browser-only recording: Chrome extensions can only capture media that plays inside the browser. This makes them a good fit for Google Meet, which runs in Chrome, but not for Zoom, Microsoft Teams, or Slack, which most users join through their desktop apps rather than in a web tab.
- Limited to Chromium-based browsers: This architecture relies on Chromium’s
chrome.tabCaptureand Manifest V3 APIs, so it works only in Chrome, Edge, Brave, and other Chromium browsers. Firefox supports screenshots only, not live tab capture, and Safari lacks the APIs I used entirely. For true cross-browser recording, you’ll need to rely on desktop recording, a meeting bot, a picker-based UX, or use APIs native to the various meeting platforms. - Codec support depends on browser version: The
MediaRecorderAPI supports only the codecs that Chrome’s current build exposes. For example, most versions record reliably withvideo/webm; codecs=vp8,opus, while newer releases add VP9 or AV1 support. Testing your target machines and Chrome versions is essential before depending on a specific codec.
Tip: You can check codec support directly in code before starting the recorder:
const type = 'video/webm; codecs=vp8,opus';
if (!MediaRecorder.isTypeSupported(type)) {
  console.warn(`${type} not supported on this browser`);
} else {
  console.log(`${type} supported`);
}
If your preferred codec isn’t supported, default to vp8,opus, which is available on nearly all Chrome builds and compatible with most WebM players.
When you outgrow an extension
If the constraints above are deal breakers, and you need recordings that survive tab changes, start automatically, or record meetings joined through a desktop client, you’ve reached the boundary of what Chrome extensions can do.
At that point, the solution isn’t another workaround; it’s a different architecture.
For situations where you need to survive tab changes or have recording start automatically, a meeting bot API or a desktop recording SDK. Both options run outside the browser and avoid tab focus and Manifest V3 constraints entirely.
The implementation above delivers a reliable, compliant Chrome recorder.
From here, you can refine it further by adding auto-stop handlers, performance tuning, or better UX feedback.
See the appendix for code examples and optimization tips.
Conclusion
A Chrome extension reaches the practical limit of what Chrome’s recording APIs allow: capturing a single Google Meet tab on-device with system/tab audio and microphone mixed into a clean .webm. It works well when someone clicks Start Recording and stays in the tab until the meeting ends.
The problem is that people forget. They miss the button, refresh the tab, or close the extension mid-meeting. And because Chrome extensions only capture media inside the browser, they can’t record calls running in desktop apps like Zoom, Teams, or Slack.
For situations that require more flexibility, using Recall.ai’s Meeting Bot API and Desktop Recording SDK can be great solutions. Both can capture the same data as a Chrome extension and more, but they run outside the browser, and can automatically start and stop recording meetings. Both products work with Zoom, Google Meet, Microsoft Teams, Webex, Slack and more. While you can’t fully automate away human error in most cases, a meeting bot form factor or a desktop app form factor significantly reduce the chances of missed or incomplete recordings.
Whether or not a Chrome extension fits your use case, hopefully this tutorial and the accompanying GitHub repo are helpful resources in finding a solution that works for you. Good luck building and, as always, feel free to reach out if you have any questions.
Appendix: Key concepts and next steps
Key terms
Extension page
A webpage that is part of the extension bundle and runs with extension privileges granted in the manifest. It can use Chrome extension APIs and can't be loaded by external websites.
chrome.tabCapture
Chrome API that exposes video + system audio from a specific tab via a restricted stream ID.
getUserMedia()
Required to:
-
convert the stream ID into a real media stream
-
capture the microphone separately
Background context
The long-lived part of a Chrome extension. In Manifest V3, it runs as a service worker without a DOM or direct media access and it can sleep unexpectedly. Good for orchestration and saving files.
Offscreen document
A hidden, DOM-enabled page Chrome allows extensions to create in MV3. It stays alive while needed, can access media devices, and can run MediaRecorder. Required for capturing and processing audio/video.
Port messaging
Long-lived communication required for background \<→ offscreen coordination.
Picker
The native Chrome dialog that appears when a webpage calls getDisplayMedia(). It lets the user manually choose what to share whether that’s an entire screen, application window, or specific browser tab, and optionally whether to include system audio. Regular webpages must use this picker to start capture; Chrome extensions using chrome.tabCapture can bypass it when targeting a known tab after a user gesture.
Mic permission UX
Must be user-gesture initiated inside a visible extension UI page. Popup may fail silently; fallback to a dedicated setup tab recommended.
Common questions
Why not use getDisplayMedia()?
getDisplayMedia() lets webpages capture the screen or a tab, but always through Chrome’s user picker, or picker, which is a dialog where the user manually chooses what to share. It can’t be preselected or automated, even by your own app.
That makes it unsuitable for an extension that needs one-click or reload-proof capture. Other limitations include:
- No programmatic targeting: You can’t specify which tab to record.
- Requires a visible page: It won’t run in the background or offscreen.
- Separate mic capture: You must call
getUserMedia()again and mix audio manually. - Stops when the user navigates or closes the tab.
chrome.tabCapture avoids all of these by letting an extension capture a known tab directly after a user gesture — no picker, unified audio, and safe offscreen recording.
Is there a Chrome recording extension API?
There are APIs that enable Chrome recording extensions like the chrome.tabCapture API and chrome.desktopCapture API.
Is there a Chrome transcription extension API?
There are several Chrome extensions that allow you to transcribe audio. There are also APIs that enable audio capture, however, there is no single extension API.
Suggested enhancements
The extension as built captures a tab, mixes system and microphone audio, and saves a .webm reliably. It’s solid for functionality, but not yet optimized for production UX or runtime efficiency. The following enhancements make it more robust, user-friendly, and performant.
1. Auto-stop on tab change
Chrome can end tab capture, but your popup/background may not notice immediately. Add an auto-stop handler so the UI stays in sync.
//@title offscreen.ts — detect stream end from the captured tab
finalStream.getVideoTracks().forEach(track => {
  track.onended = () => {
    port.postMessage({ type: 'STREAM_ENDED' });
  };
});
//@title background.ts — propagate a single stop signal to the UI
port.onMessage.addListener(msg => {
  if (msg.type === 'STREAM_ENDED') {
    chrome.runtime.sendMessage({ type: 'STOP_RECORDING' });
  }
});
//@title popup.ts — reflect the real state to the user
chrome.runtime.onMessage.addListener(msg => {
  if (msg.type === 'STOP_RECORDING') {
    updateUI({ state: 'stopped', reason: 'Tab closed or navigated' });
  }
});
Purpose: prevents “ghost recordings,” avoids corrupted files, and gives users immediate feedback when Chrome terminates the stream.
2. Better UX and feedback
Small UX upgrades make the extension feel trustworthy and easier to monitor.
2.1 Recording indicators
Use Chrome’s badge API to show when recording is active.
//@title background.ts
chrome.action.setBadgeText({ text: 'REC' });
chrome.action.setBadgeBackgroundColor({ color: '#e74c3c' });
Purpose: a persistent, glanceable signal reduces accidental double-starts and confusion about current state.
2.2 Progress display
Show elapsed time or approximate file size as chunks arrive.
Purpose: visible progress reassures users that capture is ongoing and helps them judge when to stop.
2.3 Error logging and analytics
Send lightweight events for diagnostics.
//@title background.ts
async function logEvent(type, details) {
  await fetch('https://your-analytics-endpoint.example.com/log', {
    method: 'POST',
    headers: { 'Content-Type': 'application/json' },
    body: JSON.stringify({ type, details, timestamp: Date.now() })
  });
}
Purpose: structured signals like "mic_denied" or "stream_ended" make field issues reproducible and reduce support time.
2.4 Persistent settings
Store user preferences (resolution, filename, audio input) with chrome.storage.sync.
//@title popup.ts
chrome.storage.sync.set({ preferredResolution: '1080p' });
Purpose: fewer prompts and reconfigurations \= smoother repeat use and fewer user errors.
3. Performance tips
Keep memory and CPU usage manageable during long recordings.
3.1 Use smaller chunks
//@title offscreen.ts
recorder.start(1000); // emit data every second
Purpose: lowers peak memory in the offscreen document and reduces data loss if the page crashes.
3.2 Limit resolution/frame rate
1080p at 30 fps is sufficient for most meetings.
//@title offscreen.ts
video: { mandatory: { maxWidth: 1920, maxHeight: 1080, maxFrameRate: 30 } }
Purpose: caps CPU usage and encoder load without noticeable quality loss for slides/faces.
3.3 Reuse AudioContext:
Avoid creating a new context for every session.
Purpose: reduces startup latency and CPU churn; fewer audio graph allocations.
3.4 Close the offscreen document promptly
//@title background.ts
chrome.offscreen.closeDocument();
Purpose: frees encoder, audio nodes, and DOM resources; improves battery and thermals.
3.5 Watch for memory leaks
Release tracks immediately after stopping.
Purpose: dangling MediaStreamTracks keep hardware pipelines alive and grow heap/GC pressure.
4. Seamless reload recovery
Automatic recovery after a tab reload keeps recording continuity without user action. When Chrome ends a stream because of a reload or navigation, your offscreen script can immediately request a new streamId for the same tab and resume recording.
4.1 Auto-resume in segments
When the video track ends, the offscreen script finalizes the current part and immediately starts a new recording with a fresh stream ID.
//@title offscreen.ts — onended handler
videoTrack.onended = async () => {
  const { streamId } = await chrome.runtime.sendMessage({ type: 'REACQUIRE_STREAM_ID' });
  const next = await captureWithStreamId(streamId);
  await prepareAndRecord(next); // creates next .webm segment
};
Purpose: Reliable, minimal changes. Produces multiple files (part-1.webm, part-2.webm) that can be stitched later if desired.
4.2 Continuous recorder with canvas + audio graph
Keep a single MediaRecorder alive and swap only the inputs when the tab reloads. A persistent <canvas> draws frames from the current tab stream, while an AudioContext mixes audio from the tab and mic into one stable destination track.
// Replace the tab’s input on reload
const newTab = await captureWithStreamId(newId);
currentVideo.srcObject = newTab;
tabAudioNode.disconnect();
tabAudioNode = ctx.createMediaStreamSource(newTab);
tabAudioNode.connect(audioDst);
Purpose: Produces one seamless file with only a brief blank frame during reloads which is ideal for long, multi-hour sessions.
Together, these enhancements make the recorder more resilient, efficient, and ready for real-world use.
