


Several months ago, I built a botless meeting recorder from scratch using Electron and native macOS APIs. It worked, but implementing audio and video capture, mute detection, and support for switching browser tabs was more complicated than I expected.
This time, I wanted to use Recall.ai's Desktop Recording SDK to handle the recording and build the app with Tauri instead of Electron.
In this tutorial, I'll show how I integrated the SDK into Tauri using a Node.js sidecar to detect Google Meet meetings, start and stop recording, and retrieve the completed video.
You can follow along with the Recall.ai Tauri Desktop Recording sample app.
This sample targets Apple Silicon Macs running macOS 13 or later, with Google Meet in Chrome. I've tested it in Tauri development mode, but haven't verified a code signed, distributable macOS build.
Tauri Desktop Recording App Architecture
In Electron, you can load Recall.ai's Desktop Recording SDK directly into the main process because Electron includes Node.js. However, Tauri's frontend runs in a webview and its backend is written in Rust, so there's no Node.js runtime where the SDK can run.
I used a Node.js sidecar to get around this. A sidecar is a separate process launched alongside the app. It's more work than integrating the SDK with Electron because I also have to bundle Node.js and set up communication between Rust and the sidecar.
I split the application into four components:
| Component | Responsibility |
|---|---|
| Tauri frontend | Displays meetings, recording controls, and status |
| Tauri Rust backend | Launches Node.js and relays commands and events |
| Node.js sidecar | Runs Recall's SDK for meeting detection and recording |
| Application backend | Creates SDK uploads, verifies webhooks, and retrieves recording URLs |
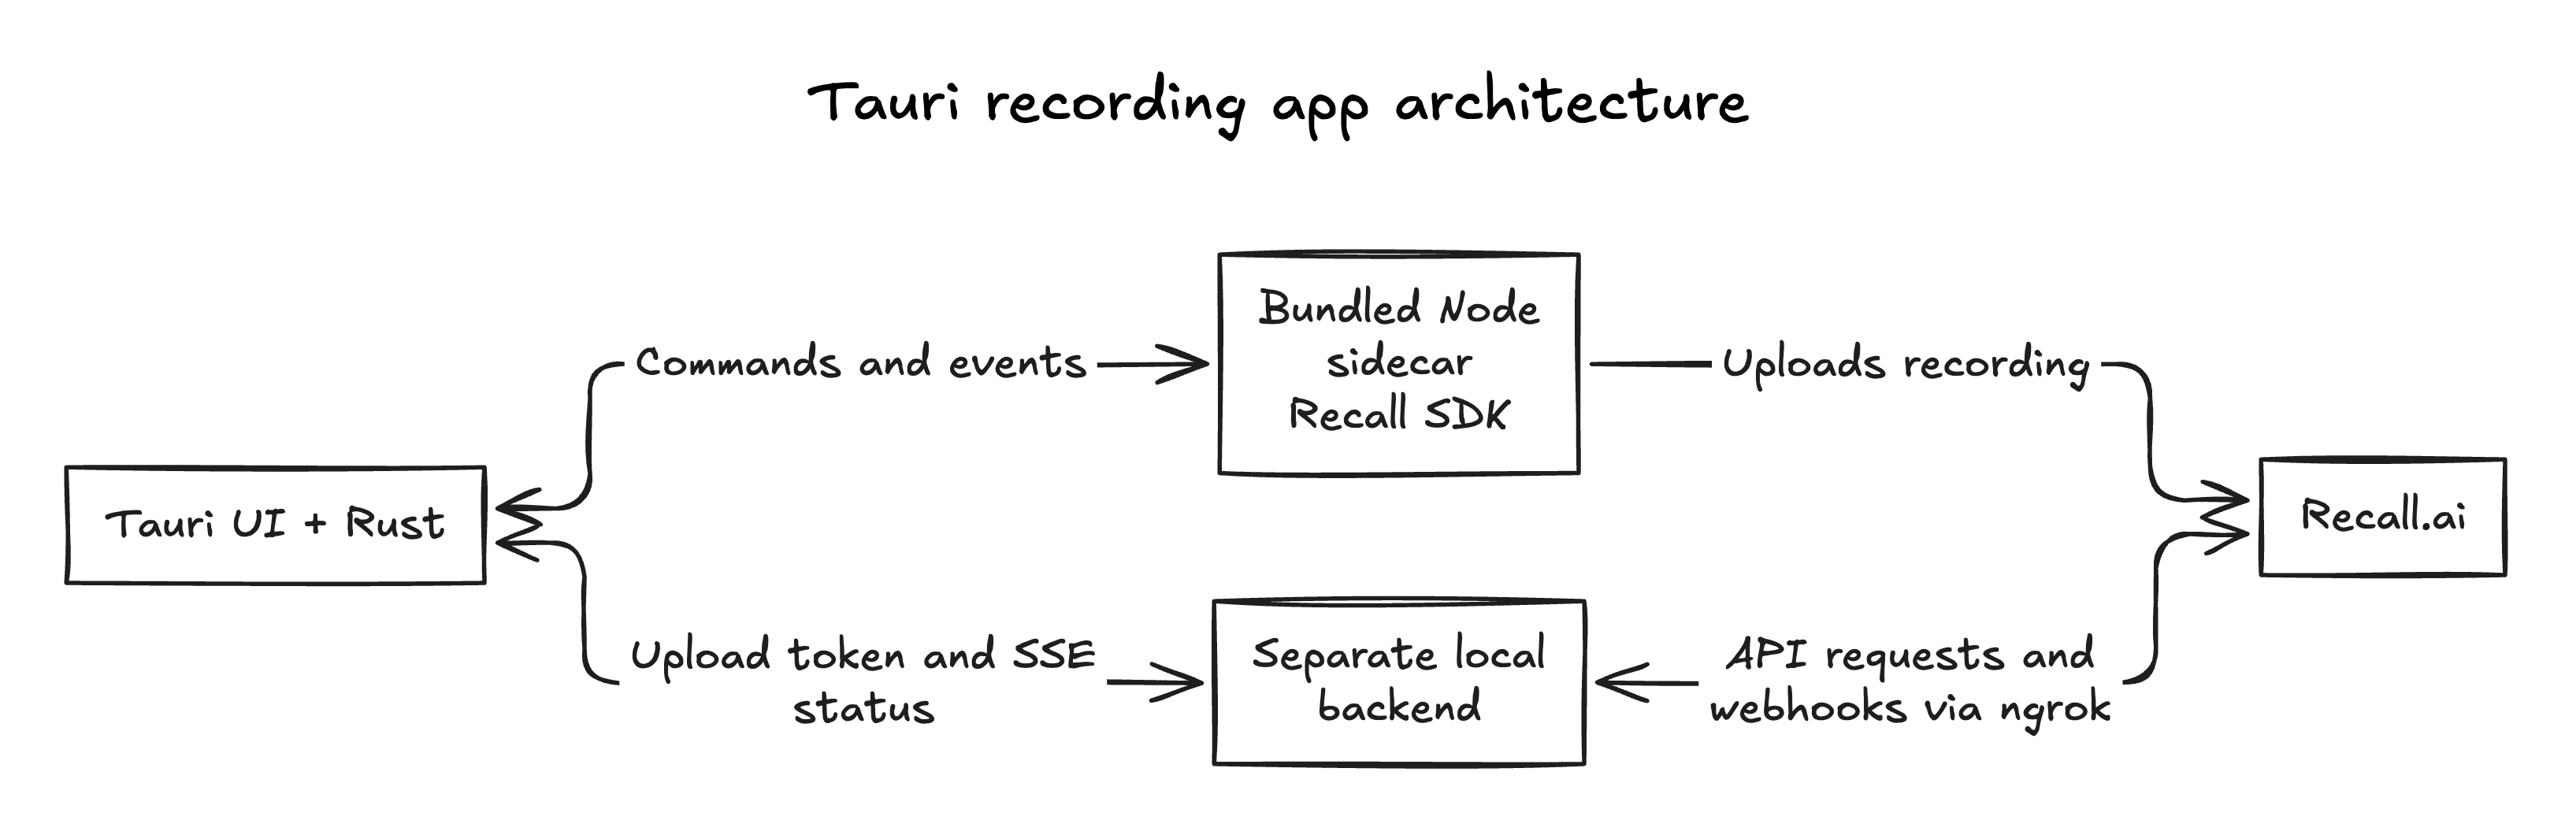
Rust and Node.js exchange messages through standard input and output (stdin and stdout) using newline-delimited JSON. For example, Rust can send {"command":"init"}, and the sidecar responds with SDK events and command results. I'll show how that connection works in Steps 2 and 4.
I kept the Recall API key on the application backend because credentials bundled with a desktop app can be extracted. The backend creates uploads and returns tokens the SDK can use without exposing the workspace API key.
For local development, I used ngrok to expose the backend's webhook endpoint to Recall. In production, you'd use a publicly accessible HTTPS endpoint on your backend.
For more information on running the SDK outside Electron, see Recall's non-Electron integration guide.
With that approach in mind, let's jump in and walk through how I built the app.
Step 1: Set up the Tauri project and Recall Desktop Recording SDK
Before starting, you'll need:
- An Apple Silicon Mac running macOS 13 or later
- Node.js 22 or later and npm
- Rust and Cargo
- Xcode Command Line Tools
- Rust and Cargo
- Node.js 22 or later and npm
- Google Chrome
- A Recall.ai workspace and API key
- ngrok v3 with an authenticated account
Start by cloning the sample repository and installing its dependencies:
git clone https://github.com/recallai/tauri-desktop-recorder-sample-app
cd recall-tauri-meet-sample
npm ci
If you already have a Tauri app, you can integrate Recall's Desktop Recording SDK into your existing project. You'll need to install @recallai/desktop-sdk, add tauri-plugin-shell and serde_json to your Rust dependencies, and configure a Node.js sidecar as shown in the following steps.
Configure your Recall credentials
Copy the sample environment file:
cp .env.example .env
Then add your Recall credentials:
RECALL_API_URL=https://your-region.recall.ai
RECALL_API_KEY=your-recall-api-key
RECALL_WEBHOOK_SECRET=your-webhook-signing-secret
Make sure the API URL matches your Recall workspace's region. The webhook signing secret lets the backend verify incoming events from Recall, including recording completion.
Keep .env out of version control.
Step 2: Run Recall's SDK in a Node.js sidecar
The SDK is an npm package, but Tauri can't load it directly into Rust or the webview. I put the SDK integration in sidecar/index.cjs and gave Rust a small set of commands it could send to the running Node.js process.
The sidecar initializes the SDK, requests macOS permissions, forwards meeting and recording events, and handles start and stop commands. Here's the implementation:
const readline = require('node:readline');

let sdk;
let initialized = false;

// stdout is reserved for JSON messages to Tauri.
function send(message) {
  process.stdout.write(JSON.stringify(message) + '\n');
}

const events = [
  'permissions-granted',
  'permission-status',
  'meeting-detected',
  'meeting-updated',
  'meeting-closed',
  'recording-started',
  'recording-ended',
  'media-capture-status',
  'network-status',
  'error'
];

async function dispatch(message) {
  const { command, windowId, uploadToken } = message;

  try {
    if (command === 'init') {
      if (initialized) return;

      sdk = require('@recallai/desktop-sdk');

      sdk.init({
        apiUrl: process.env.RECALL_API_URL
      });

      for (const name of events) {
        sdk.addEventListener(name, (data) => {
          send({ type: 'event', name, data });
        });
      }

      initialized = true;

      for (const permission of [
        'accessibility',
        'microphone',
        'screen-capture'
      ]) {
        sdk.requestPermission(permission);
      }

      send({ type: 'ready' });

    } else if (!initialized) {
      throw new Error('SDK is not initialized');

    } else if (command === 'start') {
      await sdk.startRecording({
        windowId,
        uploadToken
      });

      send({
        type: 'command-result',
        command,
        ok: true,
        windowId
      });

    } else if (command === 'stop') {
      await sdk.stopRecording({ windowId });

      send({
        type: 'command-result',
        command,
        ok: true,
        windowId
      });

    } else {
      throw new Error(`Unknown command: ${command}`);
    }

  } catch (error) {
    send({
      type: 'command-result',
      command,
      ok: false,
      windowId,
      error: String(error?.message ?? error)
    });
  }
}

const lines = readline.createInterface({
  input: process.stdin
});

lines.on('line', (line) => {
  try {
    void dispatch(JSON.parse(line));
  } catch (error) {
    send({
      type: 'protocol-error',
      error: String(error)
    });
  }
});
The init command gives Tauri control over when the SDK starts. In my sample app, the frontend registers its event listener before initializing the SDK, so the app is ready to receive meeting detection and recording events as soon as they arrive. Initialization also triggers the macOS permission requests needed for detection and capture.
One of the reasons I used Recall's SDK was to avoid building meeting detection myself. By using the Desktop Recording SDK, I no longer had to manually figure out which browser windows contained Google Meet calls. The sidecar forwards the SDK's meeting-detected event to Tauri so the app can display the meeting and let the user select it for recording. I implemented manual recording controls for this sample, but you could also use these events to start recording automatically.
I also kept stdout exclusively for JSON messages. If the sidecar writes debug logs there, Rust might try to parse them as JSON and reject them. Sending logs to stderr keeps them separate from the messages Tauri needs to read.
Step 3: Package Node.js and the Desktop Recording SDK with Tauri
Initially, I used Rust to launch whichever version of Node.js was installed on the user's machine. While this worked for local development, it meant users would need to install Node.js themselves, and I couldn't guarantee they'd have a version compatible with the SDK.
I opted for Tauri's official sidecar API to bundle Node.js with the app. By bundling the runtime, I could use a consistent Node.js version without requiring users to install it themselves.
Register the sidecar with Tauri
To use Tauri's sidecar API, we first need to tell Tauri which program to launch and which files to include with the application.
In src-tauri/tauri.conf.json, configure externalBin to register Node.js as the sidecar executable and resources to include the sidecar script and Recall SDK files:
{
  "bundle": {
    "active": true,
    "externalBin": [
      "binaries/node"
    ],
    "resources": {
      "resources/sidecar/": "sidecar/"
    }
  }
}
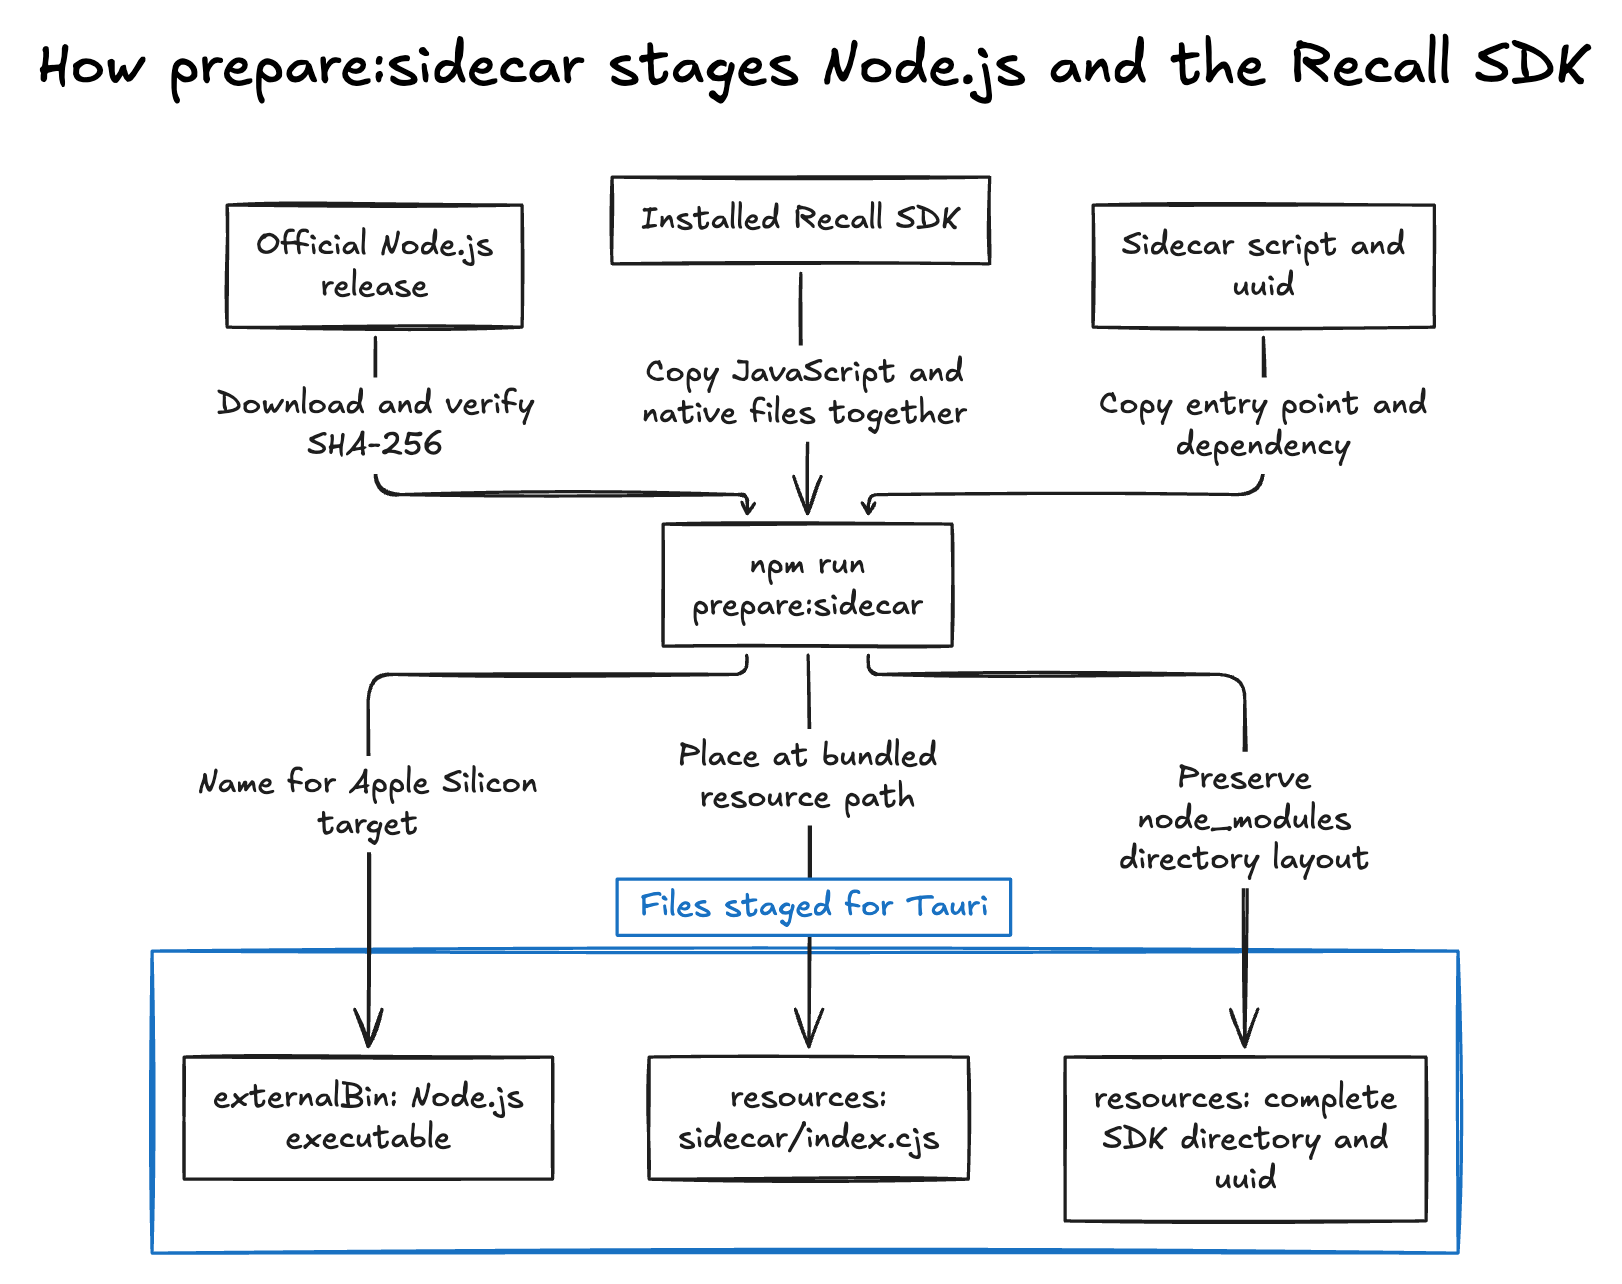
This configuration tells Tauri what to bundle, but it doesn't download Node.js or copy the SDK files into place. I needed to prepare those files separately.
Prepare Node.js and the Desktop Recording SDK files
Tauri expects sidecar executable filenames to include the operating system and processor architecture they're built for. Since this sample targets Apple Silicon Macs, Node.js needs to be placed at:
src-tauri/binaries/node-aarch64-apple-darwin
I used scripts/prepare-sidecar.mjs to automate this rather than downloading Node.js manually. It downloads the official Apple Silicon version from nodejs.org, checks its SHA-256 checksum against Node.js's published value, and puts the executable at the expected path.
Why check the checksum?
A SHA-256 checksum is a value calculated from a file's contents. By comparing the downloaded file's checksum with the one published by Node.js, we can check whether the file was corrupted or modified during download. This helps prevent an unexpected or altered executable from being bundled into the app. The check assumes the published checksum was obtained from a trustworthy source.
Getting Node.js into the bundle wasn't enough. Recall's SDK includes JavaScript code, a separate program that runs on macOS to handle meeting detection and recording, and supporting macOS framework files. Copying only the JavaScript files could leave the recording components behind.
In prepare-sidecar.mjs, I copied the installed SDK, its required JavaScript dependency, and the sidecar script into Tauri's resource directory:
await cp(
  sdkSource,
  join(resources, 'node_modules/@recallai/desktop-sdk'),
  { recursive: true }
);

await cp(
  uuidSource,
  join(resources, 'node_modules/uuid'),
  { recursive: true }
);

await copyFile(
  join(root, 'sidecar/index.cjs'),
  join(resources, 'index.cjs')
);
I kept the SDK's directory structure intact so the SDK could locate its native recording components when the app runs.
Run the preparation script automatically
I also didn't want developers to have to remember to prepare the sidecar every time they cloned or changed the project. In src-tauri/tauri.conf.json, I configured Tauri to run the preparation script before starting the development app or building the frontend:
{
  "build": {
    "beforeDevCommand": "npm run prepare:sidecar && npm run vite -- --host 127.0.0.1",
    "beforeBuildCommand": "npm run prepare:sidecar && npm run build"
  }
}
The prepare:sidecar command runs scripts/prepare-sidecar.mjs, which downloads Node.js if the expected version isn't already available and prepares the SDK files. By running the script automatically, developers can clone the project and start the app without manually downloading Node.js, copying the SDK's recording components, or remembering to prepare the sidecar after making changes.
Step 4: Connect the sidecar to Tauri
With Node.js and the SDK files bundled, I needed a way for Rust to keep the SDK running and pass messages between it and the frontend. I used Tauri's shell plugin for this in src-tauri/src/lib.rs.
Keep Node.js running
Inside Tauri's setup() function, I used the shell plugin to launch Node.js and pass it the sidecar script:
let script = if cfg!(debug_assertions) {
    std::path::Path::new(env!("CARGO_MANIFEST_DIR"))
        .parent()
        .unwrap()
        .join("sidecar/index.cjs")
} else {
    app.path()
        .resource_dir()?
        .join("sidecar/index.cjs")
};

let (mut events, child) = app
    .shell()
    .sidecar("node")?
    .arg(script)
    .spawn()?;
The script lives in a different location during development and after packaging. During development, Rust can load it directly from the repository; for release builds, cfg!(debug_assertions) selects the bundled resource path.
I used spawn() rather than the shell plugin's output() method. output() runs a command and waits for it to finish, which works for short-lived tasks but not for an SDK that needs to keep detecting meetings and receiving commands. spawn() starts Node.js without blocking Tauri and gives Rust access to the running process through events and child.
I also chose to start Node.js when Tauri launches rather than starting a new process for each recording. Otherwise, the SDK would need to initialize each time, and the app couldn't detect meetings before the user pressed Record.
To send commands to the same process later, I stored child in Tauri's managed state:
struct SdkBridge {
    child: Mutex<CommandChild>,
}

// Inside setup(), after launching the sidecar:
app.manage(SdkBridge {
    child: Mutex::new(child),
});
I wrapped the process handle in a Mutex because the last thing I wanted was two Rust commands writing to Node.js at the same time and mixing up their messages.
Send commands without exposing shell access
In Step 2, I configured the sidecar to read JSON commands from stdin. I used a Rust command called sdk_command to send them:
#[tauri::command]
fn sdk_command(
    bridge: tauri::State<'_, SdkBridge>,
    payload: serde_json::Value,
) -> Result<(), String> {
    let command = payload
        .get("command")
        .and_then(|v| v.as_str())
        .unwrap_or("");

    if !matches!(command, "init" | "start" | "stop") {
        return Err("Invalid SDK command".into());
    }

    let mut child = bridge
        .child
        .lock()
        .map_err(|_| "Sidecar lock failed")?;

    child
        .write(format!("{payload}\n").as_bytes())
        .map_err(|error| error.to_string())
}
Because Node.js stays running, the newline in format!("{payload}\n") tells its readline interface when a command is complete rather than waiting for the input stream to close.
I limited the accepted commands to init, start, and stop because those were the only operations the frontend needed. I also kept shell access in Rust rather than giving frontend JavaScript permission to launch programs on the user's computer. The frontend can call sdk_command through Tauri's invoke() API, but it can't run arbitrary shell commands. The command is registered with Tauri's invoke_handler() in lib.rs.
Forward events back to the frontend
Sending commands is only half the communication. The frontend also needs to know when the SDK detects a meeting, starts recording, or encounters an error.
In Step 2, I configured the sidecar to send these events as JSON messages through standard output (stdout). Here, Rust reads those messages and forwards them to the frontend using Tauri's event system:
let handle = app.handle().clone();

tauri::async_runtime::spawn(async move {
    while let Some(event) = events.recv().await {
        match event {
            CommandEvent::Stdout(line) => {
                match serde_json::from_slice::<serde_json::Value>(&line) {
                    Ok(message) => {
                        let _ = handle.emit("sdk-message", message);
                    }
                    Err(error) => {
                        eprintln!("Invalid sidecar JSON: {error}");
                    }
                }
            }

            CommandEvent::Stderr(line) => {
                eprintln!(
                    "sidecar: {}",
                    String::from_utf8_lossy(&line)
                );
            }

            CommandEvent::Error(error) => {
                eprintln!("Sidecar read failed: {error}");
            }

            CommandEvent::Terminated(_) => break,
            _ => {}
        }
    }

    let _ = handle.emit(
        "sdk-message",
        serde_json::json!({"type": "sidecar-exit"})
    );
});
I also wanted the app to handle the sidecar disappearing unexpectedly. Tauri can remain open after Node.js exits, so Rust sends a sidecar-exit event that the frontend uses to disable recording and tell the user to restart the app.
The tradeoff is that Tauri now has another process to manage. The sample detects unexpected exits, but I haven't implemented cleanup that stops an active recording and terminates the sidecar when Tauri closes. I'd address that before distributing the app.
Step 5: Build the recording interface
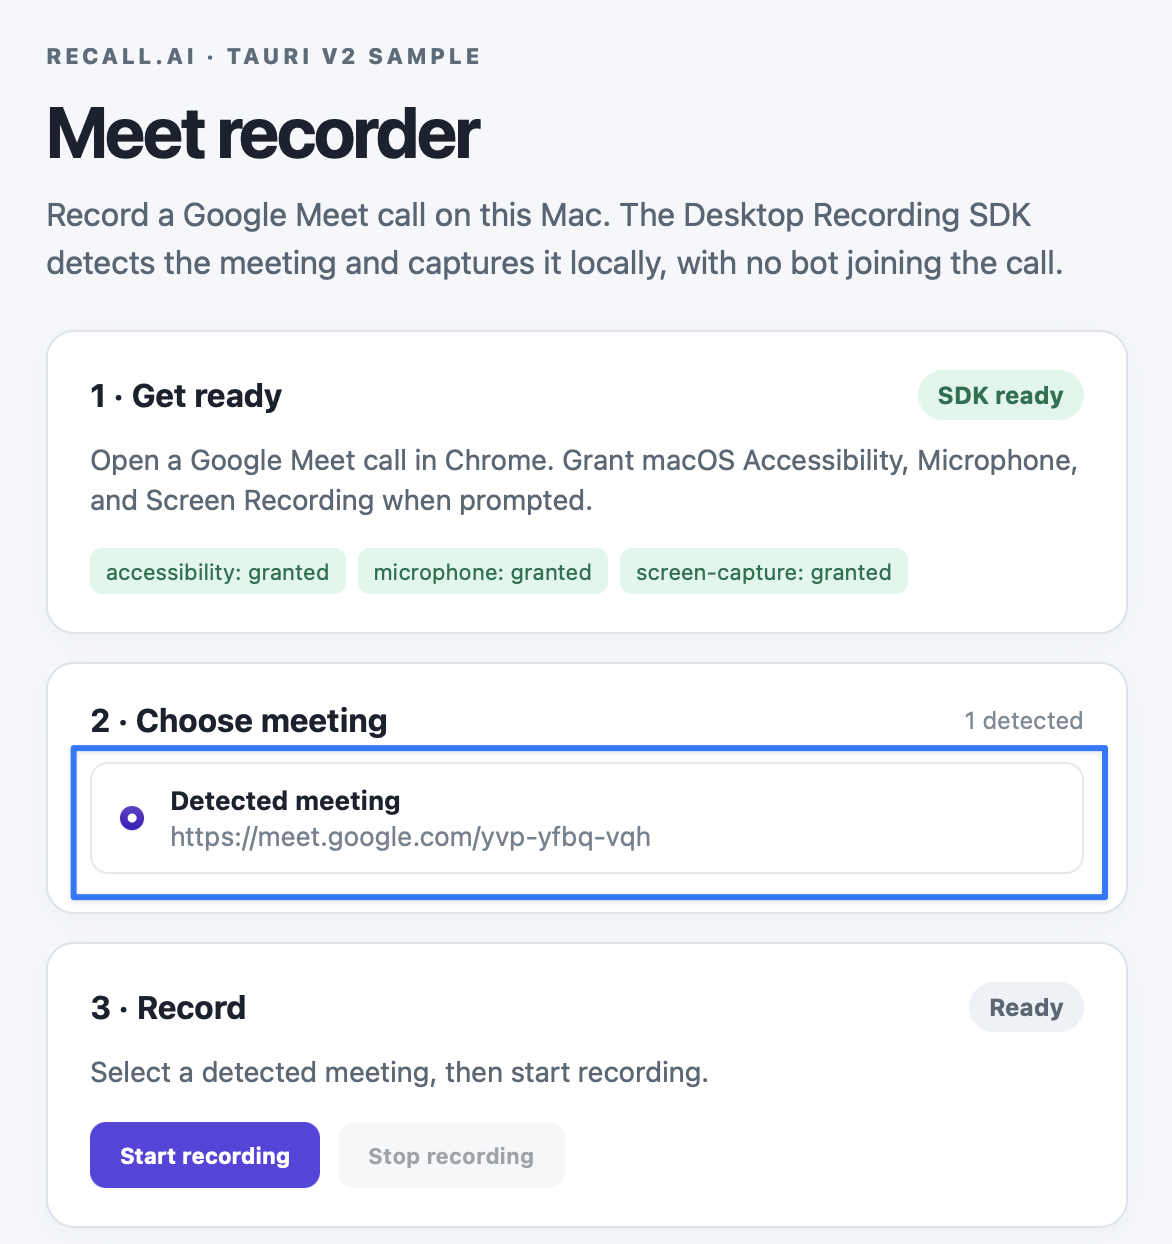
With the SDK handling meeting detection, I didn't need to figure out which Chrome tabs contained Google Meet calls. I just needed to show the meetings the SDK found, let the user choose one, and keep track of recording status.
Keep the meeting list up to date
The SDK can send multiple updates for the same meeting, so I used a Map keyed by window ID in src/main.ts. By using the ID as the key, I could update an existing meeting without adding duplicates and remove it when the SDK reports that it closed:
if (
  (message.name === 'meeting-detected' ||
   message.name === 'meeting-updated') &&
  event?.window?.id
) {
  meetings.set(event.window.id, {
    ...meetings.get(event.window.id),
    ...event.window
  });

  if (!selectedId) selectedId = event.window.id;
}

if (
  message.name === 'meeting-closed' &&
  event?.window?.id
) {
  meetings.delete(event.window.id);

  if (selectedId === event.window.id) {
    selectedId = meetings.keys().next().value ?? '';
  }
}
The same window ID tells the SDK which meeting to record, so I also use it to track the meeting selected in the interface.
Keep the selected meeting separate from the active recording
One thing I wanted to avoid was stopping the wrong meeting if the user changed their selection during a recording. I kept selectedId for the meeting selected in the interface and activeWindowId for the meeting actually being recorded. The Stop button uses activeWindowId, regardless of what the user selects afterward.
Starting a recording requires that window ID and an upload token from the backend. I didn't want to put the Recall API key in a desktop app that users could inspect, so the frontend requests the token from /api/uploads before sending the start command. I'll show the backend endpoint in Step 6.
Once the frontend has the token, it can start recording through the Rust bridge:
const windowId = selectedId;
const upload = await createUpload();

uploadId = upload.id;
activeWindowId = windowId;
recordingState = 'starting';

subscribeToUpload(uploadId);

await invoke('sdk_command', {
  payload: {
    command: 'start',
    windowId,
    uploadToken: upload.uploadToken
  }
});
I also subscribe to backend updates before starting the recording so the app is ready to receive upload status changes. Stopping is a smaller operation: the frontend sends a stop command with activeWindowId.
Don't confuse stopping capture with a completed video
I used the SDK's recording events to update the UI when capture actually starts and ends. A successful start command alone isn't enough to know recording has begun:
if (
  message.name === 'recording-started' &&
  event?.window?.id === activeWindowId
) {
  recordingState = 'recording';
}

if (
  message.name === 'recording-ended' &&
  event?.window?.id === activeWindowId &&
  !['complete', 'failed'].includes(recordingState)
) {
  recordingState = 'processing';
  activeWindowId = '';
}
The important distinction is what happens after recording-ended. Recall might still be uploading and processing the media, so I didn't want to show an Open completed recording button before the video was ready.
I opted for EventSource to receive status updates from the backend without having the app repeatedly check for a download URL:
function subscribeToUpload(id: string) {
  uploadStream?.close();

  uploadStream = new EventSource(
    `${api}/api/events?uploadId=${encodeURIComponent(id)}`
  );

  uploadStream.onmessage = (event) => {
    try {
      applyUpload(JSON.parse(event.data) as Upload);
    } catch (error) {
      errorText = `Invalid backend event: ${String(error)}`;
      render();
    }
  };
}
The SDK events tell the frontend about capture. The backend tells it when the processed recording is ready to open. That second part is what we'll connect next.
Step 6: Get the completed recording
After recording stops, Recall processes the uploaded media and sends an sdk_upload.complete webhook when processing is complete. I used a small backend to create uploads, receive and verify Recall's webhooks, retrieve the finished video URL, and notify Tauri.
Create an upload without exposing the API key
When the user clicks Start recording, the frontend first sends a POST request to /api/uploads. The backend creates an SDK upload using Recall's API and returns a token the desktop app can use without having access to the workspace API key:
if (req.method === 'POST' && req.url === '/api/uploads') {
  const result = await recall('sdk_upload/', {
    method: 'POST',
    headers: { 'content-type': 'application/json' },
    body: '{}'
  });

  if (!result.id || !result.upload_token) {
    throw new Error('Recall response lacked an upload id or token');
  }

  uploads.set(result.id, emptyUpload(result.id));

  return json(res, 201, {
    id: result.id,
    uploadToken: result.upload_token
  });
}
The recall() helper authenticates the request using the API key stored on the backend. Recall returns an upload ID to track the recording and an upload token for the SDK.
Receive and verify Recall webhooks
The SDK tells the frontend when recording starts or stops, but Recall sends a webhook to the backend when the uploaded video has finished processing.
For local development, I used two HTTP servers:
- Port 8787 handles upload creation and status updates for the Tauri frontend.
- Port 3000 receives Recall webhooks.
I kept them separate so I could expose the webhook receiver through ngrok without also exposing the endpoint that creates uploads.
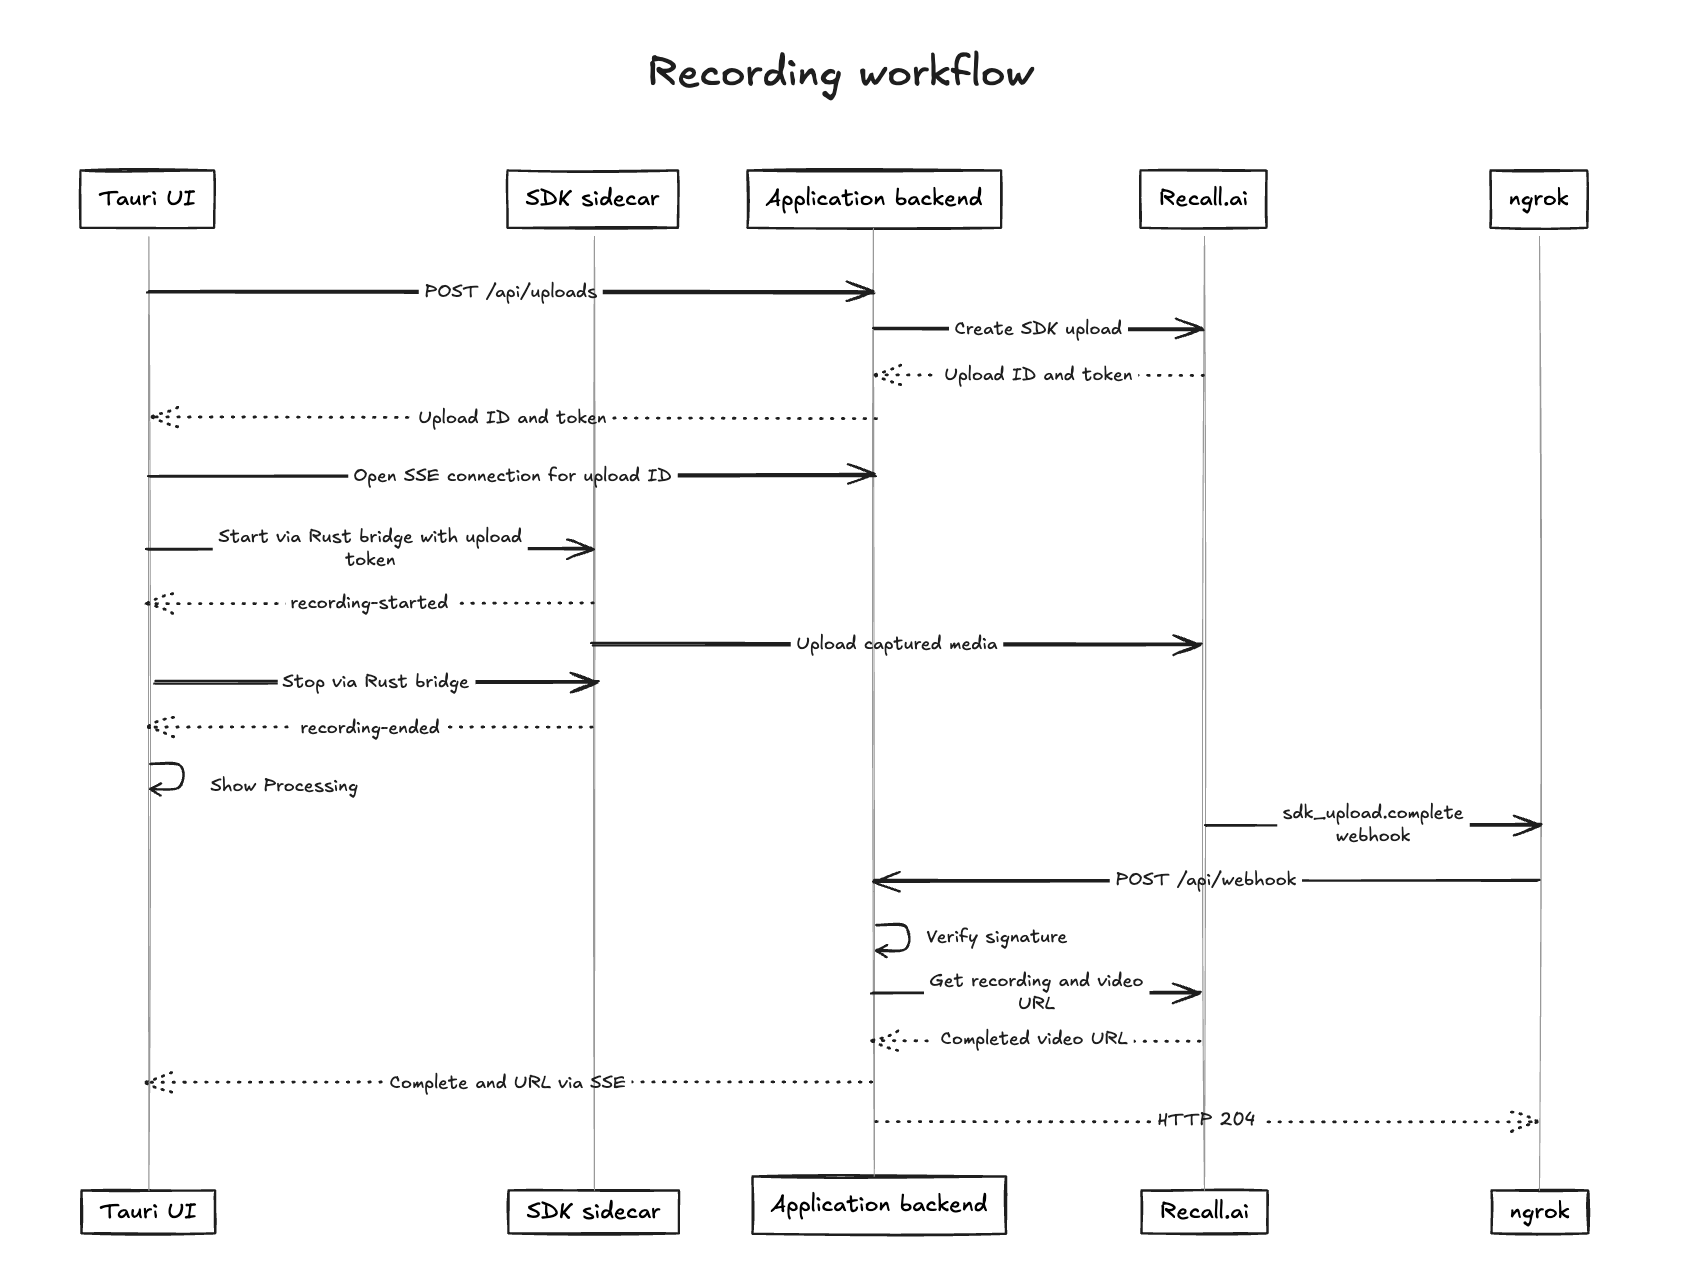
In the Recall webhook dashboard, subscribe to sdk_upload.recording_started, sdk_upload.recording_ended, sdk_upload.complete, and sdk_upload.failed. My sample receives them at /api/webhook; the URL you register with Recall needs to match that path.
Because the webhook receiver is accessible through ngrok, I verify each request's signature before using its contents:
const body = Buffer.concat(chunks).toString('utf8');

if (!verifyWebhook(req.headers, body, webhookSecret)) {
  res.writeHead(401).end('Invalid signature');
  return;
}

const event = JSON.parse(body);
The verification helper in backend/verify.mjs checks the exact request body against the webhook signing secret configured in Step 1. Without that check, anyone who could reach the endpoint could send a fake completion event or an untrusted recording ID.
Retrieve the completed video
When the backend receives a verified sdk_upload.complete event, it takes the recording ID from the webhook and uses Recall's Recording API to find the finished video. In backend/server.mjs, I used the video_mixed media shortcut:
async function refreshRecording(upload) {
  if (!upload.recordingId) {
    throw new Error(
      'Completion webhook did not include a recording id'
    );
  }

  const recording = await recall(
    `recording/${encodeURIComponent(upload.recordingId)}/`
  );

  const media = recording.media_shortcuts?.video_mixed;

  const url =
    media?.status?.code === 'done'
      ? media.data?.download_url
      : null;

  if (!url) {
    throw new Error(
      'Recall has not returned a completed video link'
    );
  }

  upload.downloadUrl = url;
}
Even after Recall sends sdk_upload.complete, the download URL might not be available on the first request. I check that the video's status is done before saving the link. If it isn't ready, the webhook handler returns HTTP 503 so Recall can retry. Otherwise, it marks the upload as complete.
Send the result back to Tauri
I used Server-Sent Events (SSE) because the backend knows when a webhook changes a recording's status. The frontend keeps a connection open and receives an update when the backend processes the event, without having to poll for changes.
In backend/server.mjs, the status endpoint subscribes the frontend to updates for the requested upload:
if (req.method === 'GET' && req.url?.startsWith('/api/events?')) {
  const id = new URL(req.url, 'http://localhost')
    .searchParams.get('uploadId');

  if (!id || !uploadIdPattern.test(id)) {
    return json(res, 400, { error: 'Invalid upload id' });
  }

  let upload = uploads.get(id);

  if (!upload) {
    upload = emptyUpload(id);
    uploads.set(id, upload);
  }

  uploadEvents.subscribe(res, upload);
  return;
}
After processing a verified webhook, the backend publishes the updated upload through the uploadEvents helper in backend/stream.mjs:
uploadEvents.publish(upload);
When the upload is complete, the update contains downloadUrl, and Tauri displays the Open completed recording button.
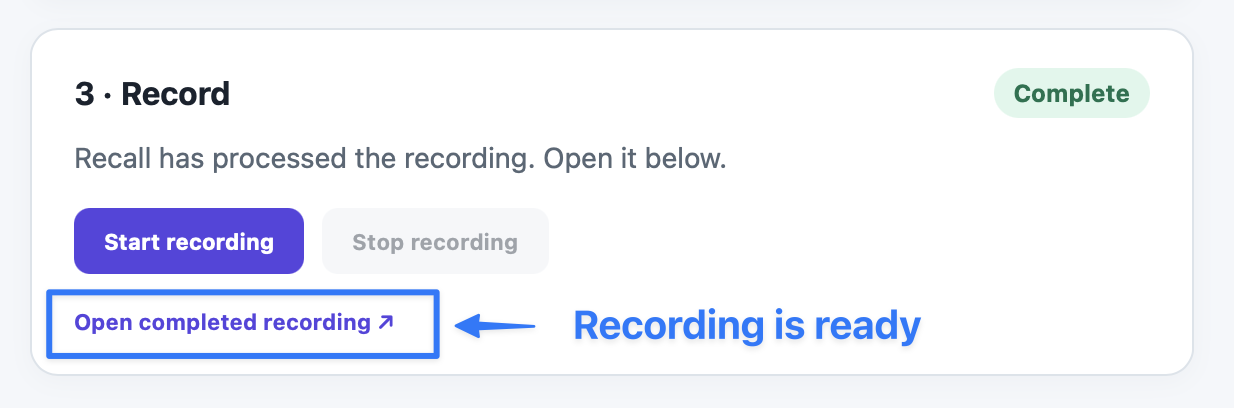
I kept upload statuses in a JavaScript Map for this sample, so they aren't saved across backend restarts. A production app would need persistent storage if users should be able to return to previous recordings.
Step 7: Run the desktop recording sample app
If you're using the sample app, the integration is ready to test with Google Meet in Chrome. Development requires three processes: the backend, an ngrok tunnel, and Tauri.
Start the backend
In the first terminal, run:
npm run backend
This starts the local API on port 8787 and the webhook receiver on port 3000.
Configure the webhook tunnel
In a second terminal, expose the webhook receiver through ngrok:
npm run tunnel
Copy ngrok's public HTTPS URL, append /api/webhook, and register that address in the Recall webhook dashboard. For example:
https://your-domain.ngrok-free.dev/api/webhook
Subscribe to the four sdk_upload events listed in Step 6. If you're using a reserved ngrok domain, set PUBLIC_API_BASE_URL in .env to the HTTPS origin without /api/webhook.
Launch Tauri
In a third terminal, run:
npm run dev
Tauri will prepare the sidecar, launch the app, and initialize the SDK. Grant macOS Accessibility, Microphone, and Screen Recording permissions when prompted. Then join a Google Meet call in Chrome, select it in the app, and start recording. After you stop recording, the app will display the video link once Recall finishes processing it.
In my previous recorder project, most of the work went into dealing with macOS capture APIs, audio mixing, and browser behavior. With Recall's Desktop Recording SDK, I didn't have to handle any of the audio or video edge cases or deal with browser behavior myself. Most of the work here was getting a Node.js SDK running inside Tauri and connecting the finished recording back to the app.
Appendix: Additional implementation details
How the Rust command bridge is registered
The sdk_command function needs to be registered with Tauri before the frontend can call it.
In src-tauri/src/lib.rs, the builder installs the shell plugin, configures the sidecar during setup, and registers the command:
tauri::Builder::default()
    .plugin(tauri_plugin_opener::init())
    .plugin(tauri_plugin_shell::init())
    .setup(|app| {
        // Launch the sidecar, forward events,
        // and register SdkBridge state.
        Ok(())
    })
    .invoke_handler(tauri::generate_handler![sdk_command])
    .run(tauri::generate_context!())
    .expect("error while running Tauri app");
The setup body is abbreviated here because its implementation is covered in Step 4. The complete function is in the sample repository.
Why the frontend doesn't get shell access
Tauri also provides a JavaScript API for launching sidecars, but I didn't expose that capability to the frontend.
The Rust backend launches Node.js, while the frontend can only call the sdk_command interface. This keeps process management on the Rust side and limits the commands available to the application UI.
The sample's src-tauri/capabilities/default.json doesn't grant JavaScript shell permissions.
Handling the sidecar exiting
The Rust event loop sends a sidecar-exit message when Node.js terminates.
In src/main.ts, the frontend handles that message:
if (message.type === 'sidecar-exit') {
  sdkReady = false;
  errorText = 'SDK sidecar exited. Restart the app.';
}
This prevents the UI from silently continuing as though the SDK were available.
For a production application, I'd also handle cleanup when Tauri closes and consider whether a failed sidecar should be restarted automatically. Restarting isn't always harmless: the application would need to restore SDK state and avoid losing track of an active recording.
Common troubleshooting issues
Google Meet isn't detected: Check that the meeting is open in a visible Chrome tab and that macOS Accessibility, Microphone, and Screen Recording permissions are granted. Restart the app after changing permissions if necessary.
Recording doesn't start: Make sure the backend is running and the Recall API key and regional API URL are correct. Check the local health endpoint at http://127.0.0.1:8787/api/health.
Recording stays in Processing: Confirm that ngrok forwards to port 3000, the webhook URL ends in /api/webhook, and all four SDK upload events are subscribed. Check the backend logs and ngrok's request inspector at http://127.0.0.1:4040.
The recording has no video: Keep the Google Meet window on the current macOS desktop space. The SDK may capture audio without video if the meeting window is on another space.
Before distributing the app: The sample configures Tauri to bundle Node.js and Recall's SDK files, but I haven't verified a signed, notarized macOS build. A production application also needs proper sidecar shutdown, persistent recording state, and an authenticated backend.


