


In a previous tutorial, we built an agent using LiveKit that could join video meetings, answer questions, share webpages, and interact with participants through Recall.ai.
This time, we're building something similar with Pipecat, an open-source framework for building real-time voice and multimodal agents. We'll use OpenAI Realtime for conversation, Simli for an animated avatar, Deepgram for transcription, and Recall.ai to bring everything into Google Meet.
The end result is an agent that can speak, share content, send messages in chat, and respond to commands like muting itself or leaving the meeting. We’ll also be able to follow the conversation through a live transcript displayed in the launcher.
In this tutorial, I'll walk through how we connected Pipecat to Google Meet, how the audio and video move between the two, how we added real-time transcription with Deepgram, and how we gave the agent tools to interact with the meeting.
You'll notice quite a few similarities between this demo and our earlier LiveKit tutorial. We wanted to show how developers can build meeting agents using either LiveKit or Pipecat, with Recall.ai handling the meeting connection in both cases. The frameworks take different approaches to building agents, but on the Recall.ai side, connecting them to a meeting only requires a small amount of framework-specific configuration.
You can find the complete implementation in our Pipecat demo repository.
How Recall.ai and Pipecat work together
In our first tutorial, we used Recall.ai's direct LiveKit integration to connect an agent to a meeting. This time, we're using the Pipecat integration.
The idea is similar: Recall.ai handles joining the meeting and sending audio and video between the meeting and the agent, while Pipecat handles the conversation, speech processing, and tool calling.
For our Pipecat demo, we're using a few different components:
- Pipecat manages the agent's pipeline, connecting its speech model, avatar generation, and function tools.
- OpenAI Realtime handles speech understanding, language generation, and spoken responses.
- Simli generates the animated avatar that speaks in the meeting.
- Deepgram transcribes meeting audio in real time so we can display the conversation in the launcher.
- Recall.ai connects the agent to Google Meet and provides APIs for meeting-specific actions.
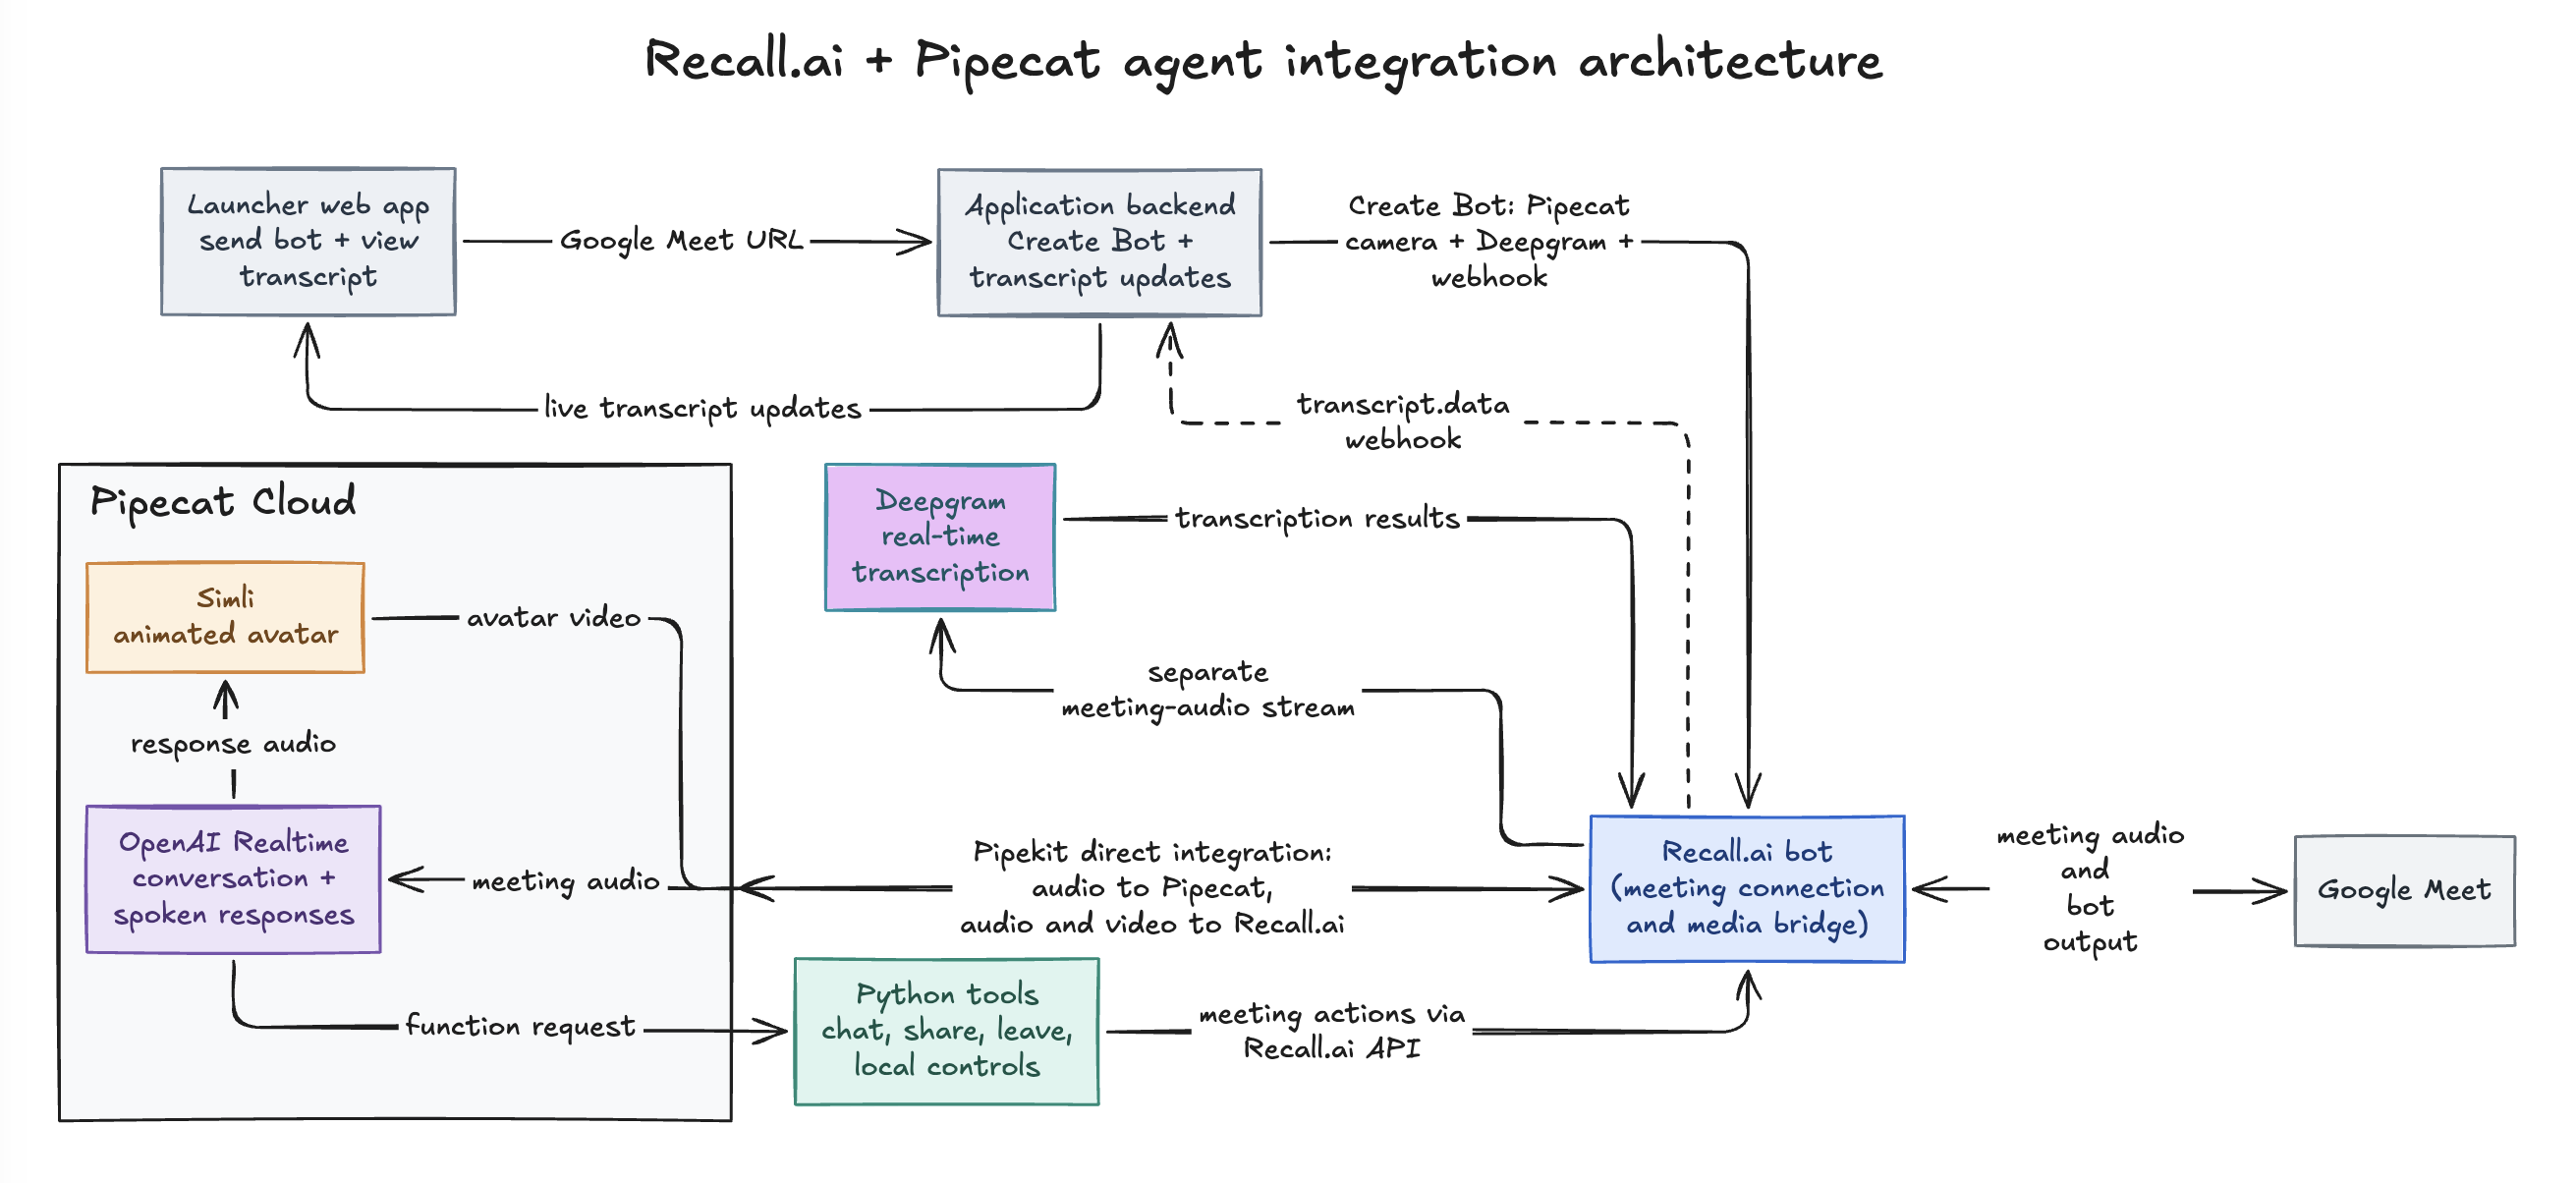
The main difference from our LiveKit example is how we connect the agent.
Recall.ai's Pipecat integration uses SmallWebRTC, a transport built into Pipecat for sending audio and video over WebRTC. In Pipecat, a transport handles communication between the agent and whatever it's connected to. In our case, SmallWebRTC lets Recall.ai send meeting audio to the Pipecat agent and receive the agent’s spoken responses and avatar video, without requiring us to build a separate media streaming service.
For this sample, we're running the agent locally. A small Python server exposes an HTTP endpoint where Recall.ai can establish the WebRTC connection. Once connected, meeting audio flows into the Pipecat pipeline, and the agent's generated speech and avatar video flow back through Recall.ai into Google Meet.
The application also includes a local launcher that accepts a Google Meet URL and creates the Recall.ai bot.
That gives us two main pieces: the launcher for starting meeting sessions and the Pipecat application for handling the agent's conversation.
Step 1: Connect the Pipecat agent to Google Meet
First, we need to create a Recall.ai bot and tell it where to find our Pipecat agent.
To make our bot, we'll use Recall.ai's Create Bot API. We'll configure the bot to connect to Pipecat for its audio and video, while using Deepgram to handle transcription separately.
In app/recall_client.py, the Pipecat configuration looks like this:
{
    "meeting_url": meeting_url,
    "bot_name": BOT_NAME,
    "variant": {"google_meet": "web_4_core"},
    "recording_config": {
        "transcript": {
            "provider": {
                "deepgram_streaming": {"model": "nova-3"}
            },
            "diarization": {
                "use_separate_streams_when_available": True
            },
        },
        "realtime_endpoints": [{
            "type": "webhook",
            "url": transcript_url,
            "events": ["transcript.data"],
        }],
    },
    "output_media": {
        "camera": {
            "kind": "pipecat",
            "config": {
                "url": offer_url,
                "body": {"session_token": session_token},
            },
        }
    },
}
Setting output_media.camera.kind to "pipecat" tells Recall.ai to use its direct Pipecat integration for the bot's camera output.
The url points to the agent's SmallWebRTC offer endpoint, while body passes a session token that the application uses to identify the connection.
When Recall.ai connects, it sends a WebRTC offer to that endpoint. The Python application validates the session token, establishes the connection, and starts the corresponding Pipecat agent session.
The meeting audio and agent media then travel over WebRTC.
In the LiveKit sample, we identified the agent using its registered agent_name. Here, we're using the self-hosted Pipecat option, so we provide the agent's endpoint URL.
Recall.ai also supports connecting to agents deployed on Pipecat Cloud using a deployment name. You can find both options in the Pipecat integration documentation.
The sample launcher uses Google Meet, but the integration also supports Zoom and Microsoft Teams. Adapting the launcher to another platform would require updating its meeting URL handling and any platform-specific bot configuration.
Step 2: Give the agent a voice and animated avatar
Now that Recall.ai can connect to our Pipecat agent, we need to decide what happens when someone speaks to it.
In our LiveKit demo, we used LiveKit Agents to manage the conversation and Runway to generate the avatar. For this version, we're using Pipecat to connect OpenAI Realtime and Simli.
OpenAI Realtime handles the conversation using a speech-to-speech model. It processes incoming audio and generates spoken responses, so we don't need to build separate speech-to-text and text-to-speech stages for the main conversation.
Why use speech-to-speech instead of speech-to-text-to-speech?
Traditional voice agents typically use three steps: convert speech to text (STT), generate a response with a language model, and convert that response back into speech (TTS).
Speech-to-speech models process audio directly, without requiring those separate stages. This can reduce latency and preserve conversational cues like tone, pacing, and emotion that might otherwise get lost during transcription.
Traditional pipelines give developers more control over each component. Speech-to-speech can be a good fit for agents that need faster, natural conversations.
Simli takes the agent's audio and generates a talking avatar.
Here's the relevant pipeline from app/agent.py:
pipeline = Pipeline([
    transport.input(),
    aggregators.user(),
    llm,
    speech,
    avatar,
    IdleFrameProcessor(
        callback=on_avatar_stalled,
        timeout=15,
        types=[OutputImageRawFrame],
    ),
    AudioGate(state),
    transport.output(),
    aggregators.assistant(),
])
The llm is our OpenAI Realtime service, avatar is the Simli video service, and transport is the SmallWebRTC connection that carries audio and video between Pipecat and Recall.ai.
The pipeline also includes audio controls for muting the agent, which I'll come back to later.
When someone speaks to the agent, Pipecat processes the incoming audio and generates a response. Simli produces the corresponding avatar video, and the audio and video travel back through SmallWebRTC.
Recall.ai then delivers that media into Google Meet, where participants can see and hear the agent.
The demo uses Simli to generate the animated avatar, but an avatar isn't required to connect a Pipecat agent to a meeting through Recall.ai. You can also build an audio-only agent or use a different avatar provider if you prefer.
Step 3: Display a live transcript with Deepgram
So far, we've focused on what the agent can hear and say inside the meeting. But often, it is important to understand what was said by other meeting participants, too. In order to get that context, you must connect a transcription provider to output the meeting transcript either in real time or after the call.
For this demo, we're using Deepgram to transcribe meeting audio in real time and display the transcript in the launcher, the same webpage where we enter the Google Meet URL to send the bot. Recall.ai also supports several other transcription providers, so you can easily switch to a different one without changing how your Pipecat agent connects to the meeting.
Recall.ai sends meeting audio to Deepgram for transcription, then sends the transcript to our application through real-time webhooks. The app then stores the incoming utterances for the current session and displays them in the launcher, updating the transcript as participants speak.
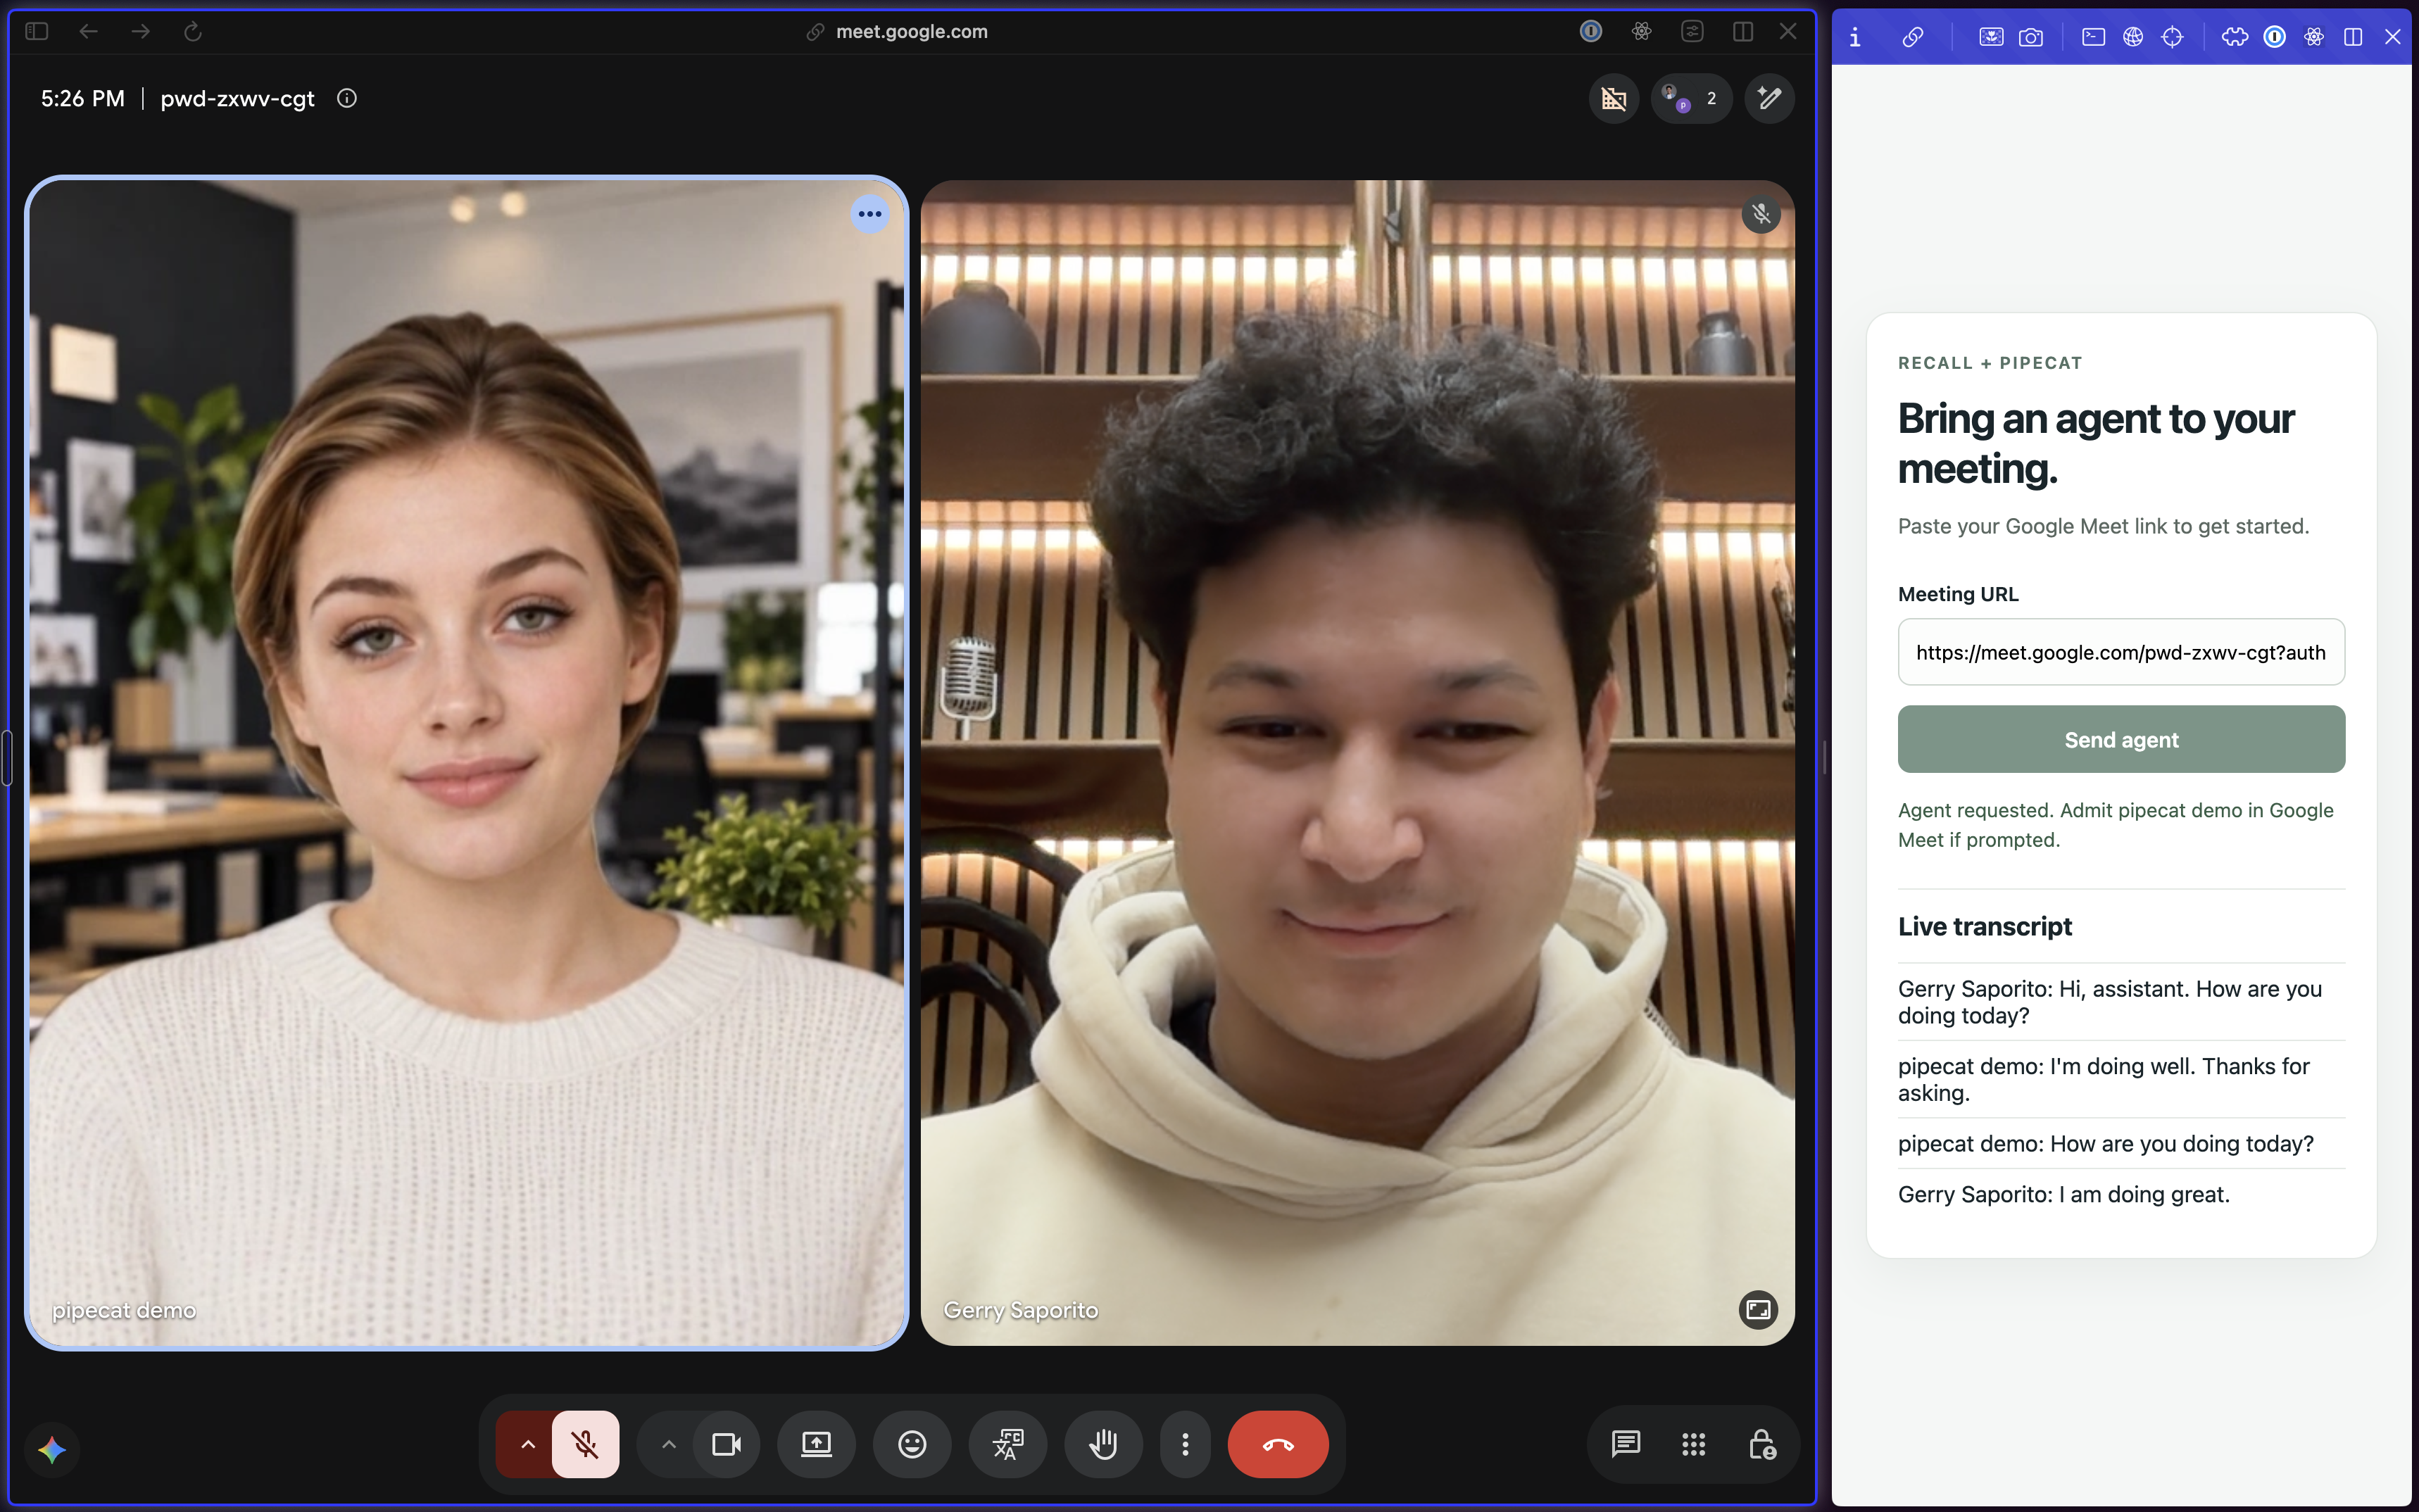
Deepgram handles the live transcript displayed in the launcher, while OpenAI Realtime continues to handle the agent's conversation and spoken responses.
This gives us a way to follow the meeting from the launcher without having to switch back to Google Meet to see what's being said.
Step 4: Let the agent take actions in the meeting
Now that the agent can join a meeting and hold a conversation, we need to give it some tools for interacting with the meeting.
The Pipecat demo includes nine function tools. Five interact with Recall.ai's meeting APIs, while four control the agent's local speech and listening behavior. Pipecat and Recall.ai also support additional tools for other tasks, like looking up documentation, retrieving information from a database, or interacting with external APIs.
Pipecat exposes these tools to the OpenAI model, which can request a tool based on what a participant says. The corresponding Python function then performs the action.
Sharing a webpage
Let's start with something we also tested in the LiveKit demo: asking the agent to share a webpage.
Someone can say:
"Assistant, show the Recall.ai homepage"
The agent calls the start_screenshare tool, which sends a request to Recall.ai.
In app/recall_client.py, that request looks like this:
async def start_screenshare(
    self, bot_id: str, url: str
) -> None:
    await self._request(
        "POST",
        self._bot_path(bot_id, "output_media"),
        "starting the screen share",
        {
            "screenshare": {
                "kind": "webpage",
                "config": {"url": url}
            }
        },
    )
Recall.ai then renders the requested webpage and displays it as the bot's screen share in Google Meet.
Earlier, we configured the bot's camera with "kind": "pipecat" to send the agent's audio and video into the meeting. For screen sharing, we're using "kind": "webpage" so Recall.ai can render and share the requested URL.
The camera uses the direct Pipecat integration to display the agent's avatar and play its speech. The screen share uses Recall.ai's webpage-based function for outputting media to show whatever content the participant requested.
Sending messages and links in meeting chat
Sharing a webpage is helpful, but there's a good chance someone will ask for the link in chat five seconds later.
The application keeps track of the most recent page the agent shared. After the agent starts sharing a webpage, someone can say:
"Assistant, send the shared webpage link in chat."
The agent calls send_current_page_link(), retrieves the saved URL, and posts it through Recall.ai's chat API.
That way, participants don't need to repeat a long URL, and the agent doesn't need to guess which page they're referring to.
The sample also posts feedback about tool actions in chat. For example, when Recall.ai accepts a screen-sharing request, the agent posts a message explaining that the webpage may take a few seconds to appear.
Making sure the agent doesn't blindly execute requests
As in the LiveKit example, there's an important distinction between the model requesting a tool and the Python application actually executing it.
The model decides when to call a function, but our code determines which inputs are valid and what requests get sent to Recall.ai.
For example, the screen-sharing tool checks that URLs use HTTPS and rejects local or private-network addresses.
We don't want a participant to be able to ask the agent to share an arbitrary internal URL and have it blindly send that address to a webpage renderer.
The code also validates chat message length and avoids automatically retrying meeting actions whose results are uncertain.
Another detail worth keeping is how the tool confirms a successful request.
When Recall.ai accepts a request to start screen sharing, the webpage might not be visible in the meeting immediately. So rather than telling the agent that the page is already being shown, the tool reports that the request was accepted.
The difference is subtle, but it's important when an agent is reporting the outcome of an API call.
Step 5: Control when the agent participates
As with our LiveKit demo, we need to make sure the agent knows when not to respond.
When multiple people are talking, not every question is intended for the agent. And nobody wants an AI assistant interrupting a conversation every time someone asks, "What do you think?"
For the Pipecat version, we kept the same basic approach: participants need to address the agent as "Assistant" or "pipecat demo" before making a request, otherwise the agent will not respond.
Filtering requests before responding
The application uses OpenAI Realtime's input transcription to inspect completed speech requests.
This is separate from the Deepgram transcription we display in the launcher. Here, we're using transcription to decide whether a request should reach the agent in the first place.
In app/request_filter.py, a regular expression checks whether the transcript starts with the agent's name, including greetings like "Hey Assistant."
This ensures that if someone is speaking to another participant, their conversation won't automatically trigger a response from the agent.
The application also controls when a completed request is allowed to interrupt the agent's current response.
Other applications might make a different choice. An AI interviewer or sales coach, for example, might need to participate without being addressed by name.
Muting isn't the same as ignoring requests
We also brought over another behavior from our LiveKit agent: separating muting from listening.
When the Pipecat agent is muted, it stops producing audible responses but can still perform meeting actions.
For example, someone can say:
"Assistant, mute."
And then:
"Assistant, post ‘Hello from the demo’ in chat."
The agent can still send the message, but it will do so without speaking.
To make this work, Pipecat's pipeline includes a custom processor called AudioGate that blocks outgoing speech when the agent is muted. The rest of the pipeline keeps running, allowing the agent to silently perform meeting actions like sending messages in chat or sharing webpages.
Telling the agent to stop listening is different. When listening is paused, the agent ignores requests until someone explicitly says:
"Assistant, start listening."
Any requests received while listening is paused are discarded rather than executed later.
Muting and listening are also independent. If the agent was muted before it stopped listening, it stays muted when listening resumes.
These aren't requirements of Pipecat or Recall.ai. They're behaviors we defined in the sample, and developers can change them depending on how they want their agents to participate in meetings.
Step 6: Run the demo
Now that I've covered the main pieces, let's get the agent into a meeting.
The complete application is available in the Pipecat demo repository.
For the Google Meet example, you'll need:
- Python 3.12 and uv
- A Recall.ai workspace and regional REST API key
- An OpenAI project API key with access to Realtime and
gpt-4o-mini-transcribe - A Simli API key and an available avatar face
- Deepgram configured in your Recall.ai workspace for real-time transcription
- An HTTPS tunnel, such as cloudflared, and a network that permits WebRTC connections
- A Google Meet meeting to test with
Install the application
First, clone the repository and install the dependencies:
git clone https://github.com/recallai/agent-demo-pipecat.git
cd agent-demo-pipecat
uv sync --locked
cp .env.example .env
Add your Recall.ai, OpenAI, and Simli credentials to .env, along with your chosen model and voice settings. You'll also need to configure Deepgram in your Recall.ai workspace to enable the live transcript.
Make the Pipecat endpoint accessible
Because we're running the agent locally, Recall.ai needs a way to reach its SmallWebRTC signaling endpoint.
We'll use cloudflared to expose that endpoint over HTTPS:
cloudflared tunnel --url http://127.0.0.1:7861
Copy the HTTPS origin generated by cloudflared into PIPECAT_PUBLIC_URL in .env.
The tunnel exposes the WebRTC signaling endpoint and the Recall.ai transcript webhook on port 7861. Audio and video travel separately over WebRTC.
The sample authenticates incoming offers with an expiring session token, so it doesn't require saved Pipecat credentials in Recall.ai. If you're deploying an authenticated Pipecat agent, check the integration setup guide for the corresponding workspace configuration.
Start the application
In another terminal, run:
uv run --locked python -m app.web
Open http://127.0.0.1:8001 in your browser.
Paste a Google Meet URL and select Send agent.
When the bot appears in the meeting's waiting room, admit it to the call. Once connected, it posts an introduction in chat explaining how to interact with it.
You'll also see a live transcript appear in the launcher as participants speak. You can leave the launcher open to follow the conversation while testing the agent's different commands.
You can try asking:
- "Hey Pipecat demo, could you please introduce yourself?"
- "Assistant, could you explain Pipecat to someone who's never built a voice agent?"
- "Assistant, could you share the Recall.ai docs page?"
- "Assistant, could you put that link in the chat, please?"
- "Assistant, please send a message in chat saying 'Thanks for joining the demo!'"
- "Assistant, could you stop sharing your screen, please?"
- "Assistant, please mute yourself for a bit."
- "Assistant, could you unmute yourself, please?"
- "Assistant, please stop listening for now."
- "Assistant, you can start listening again, please."
- "Assistant, could you leave the meeting now? Thanks!"
The sample also includes a configurable session timeout, set to 10 minutes by default.
A few limitations to keep in mind
This sample is intended for local development, not as a production-ready meeting agent.
The launcher doesn't include application authentication, so it should remain bound to localhost rather than being publicly exposed.
The agent can share webpages, but it doesn't inspect their contents or interact with them. Some websites may also prevent themselves from being displayed in the browser renderer.
The sample launcher is also specific to Google Meet, although Recall.ai's underlying Pipecat integration supports additional meeting platforms.
There are also a few security considerations in the sample code. The transcript webhook endpoint uses a session token and checks the bot ID, but doesn't verify webhook signatures. Without signature verification, the application can't independently confirm that an incoming transcript event actually came from Recall.ai. Similarly, the screen-sharing tool blocks private IP addresses and local-looking hostnames, but doesn't check where other hostnames resolve. A seemingly public URL could still point to an internal network resource. For production use, you'd want to add webhook signature verification and more thorough URL validation to address these risks.
For production use, you'll also need to think about authentication, session management, network connectivity, provider failures, monitoring, and which meeting actions the agent should be allowed to perform.
What else could you build?
Whatever agent framework you use, Recall.ai makes it possible to bring your agent into video meetings on Zoom, Google Meet, and Microsoft Teams without building the meeting integrations yourself.
For example, though LiveKit and Pipecat take different approaches to building agents, connecting them to meetings through Recall.ai follows a similar pattern. You configure the appropriate direct integration, create a Recall.ai bot, and let your agent handle the conversation and tools.
If you want to try it yourself, check out the Pipecat sample application, or learn more about Pipecat and Recall.ai's Pipecat integration.


