


Tl;dr: This article explains how the Recall Calendar v2 integration works, and how to add it to your own app. If you want a working sample of the integration, you can find the source code in the calendar sample GitHub repository. If you’re looking for an article about Recall.ai's most basic calendar integration check out our blog on the Recall Calendar v1 integration.
If you’re building a meeting recording product, connecting to your users’ calendars lets you automatically find and record their upcoming meetings. But trying to build your own calendar integration comes with a host of difficult edge cases. For example: if five customers using your product are all in the same meeting, should five notetakers show up?
Recall.ai’s free calendar integration handles this question and many other calendar complexities for you out of the box. In this article, I’ll explain how the calendar integration works, and how you can add it to your own application.
How to choose a calendar API?
The Recall.ai Calendar API allows you to connect to the Google and Microsoft Outlook calendars of your customers and schedule bots to join their calls automatically. There are two supported calendar API versions that you can choose from: Calendar v1 and Calendar v2.
We’ll primarily be discussing Calendar v2 in this article. Calendar v2 is the recommended integration for most use cases, but it’s worth learning about both before making a final decision.
Calendar v1 has an easier setup process and requires minimal additional code. With this integration, your application can give Recall’s backend a set of recording preferences, and Recall will handle all bot scheduling automatically.
Calendar v2 requires more work to set up, but gives you full control over which meetings get recorded and how the bots joining those meetings are configured. With this integration, your application is in charge of deciding when a meeting should be recorded.
Deciding which calendar version is right for your application
| Feaures | Calendar v1 | Calendar v2 |
|---|---|---|
| Supported Platforms | Google Calendar and Microsoft Outlook | Google Calendar and Microsoft Outlook |
| Scheduling Logic | Recall-managed based on preset recording preferences | Application-managed, on a per-meeting basis |
| Webhooks | No, scheduling is handled by Recall so webhooks are not necessary | Yes, scheduling is handled by your application, webhooks are required to react to calendar and event updates |
| Bot Configuration | All bots share the same workspace-level configuration. No configuration settings for individual bots | Bots can be uniquely configured on a per-meeting level |
| Bot Deduplication | Automatic, with platform-specific constraints | Customizable, controlled using a deduplication key |
The two calendar integration versions use completely different implementation paths, and there is not an easy way to migrate between them.
Let an agent set up your calendar integration
Recall.ai ships an MCP server that can help speed up your integration time considerably. The MCP includes several skills specifically designed to help you integrate Calendar v2 into an existing or new application. It is able to read the docs, inspect and debug resources, and even create and update webhook endpoints if given write permissions. I’d highly recommend installing the MCP and then asking your coding agent to use it when setting up your own repo or the calendar sample repo.
How to integrate a calendar API with Google Calendar and Microsoft Outlook
Recall.ai's calendar integration connects to your customer's Google Calendar or Microsoft Outlook account so that it can read their calendar event data. To make that connection, you'll need to register an OAuth client with each platform. This lets your customers grant your application access to their calendars without sharing their Google or Microsoft passwords.
Setting up OAuth clients
I’m speaking from experience when I say that setting up an OAuth client correctly can be one of the most frustrating parts of the calendar integration. Unlike the rest of the integration, this is the one part a sample app can’t do for you. The OAuth client has to be created and configured inside your own Google Cloud or Microsoft Azure account, and it’s very common to run into issues during the setup phase due to the confusing UI of these platforms. To help improve this experience, I’ve recorded video walkthroughs showing the exact steps required to set up your OAuth client correctly.
Google Calendar OAuth client setup
Outlook Calendar OAuth client setup
Generating an authorization URL
If you followed all the steps in the videos above, then you should have both a Google Calendar and Microsoft Outlook OAuth client that are configured correctly for the calendar integration. The next step is to send your user through the provider’s authorization flow so that they can give your application permission to read their calendar events.
To do this, you’ll construct an authorization URL and redirect the user to it. The exact URL will be different depending on whether you’re using Google or Microsoft, but both contain the same basic information. You’ll need an OAuth client ID, the scopes your application is requesting, and the URL that the provider should redirect the user back to after they’ve finished authorizing your app. You can find more detailed information about how to create an authorization URL for both Microsoft Outlook and Google Calendar in Recall’s documentation, and in the sample application associated with this article.
src/oauth.ts lines 16-31

export function buildAuthorizeUrl(
  provider: ProviderName,
  { clientId, redirectUri, state }: { clientId: string; redirectUri: string; state: string },
): string {
  const p = PROVIDERS[provider];
  const url = new URL(p.authorizeUrl);
  url.search = new URLSearchParams({
    client_id: clientId,
    redirect_uri: redirectUri,
    response_type: "code",
    scope: p.scopes.join(" "),
    state,
    ...p.extraAuthorizeParams,
  }).toString();
  return url.toString();
}
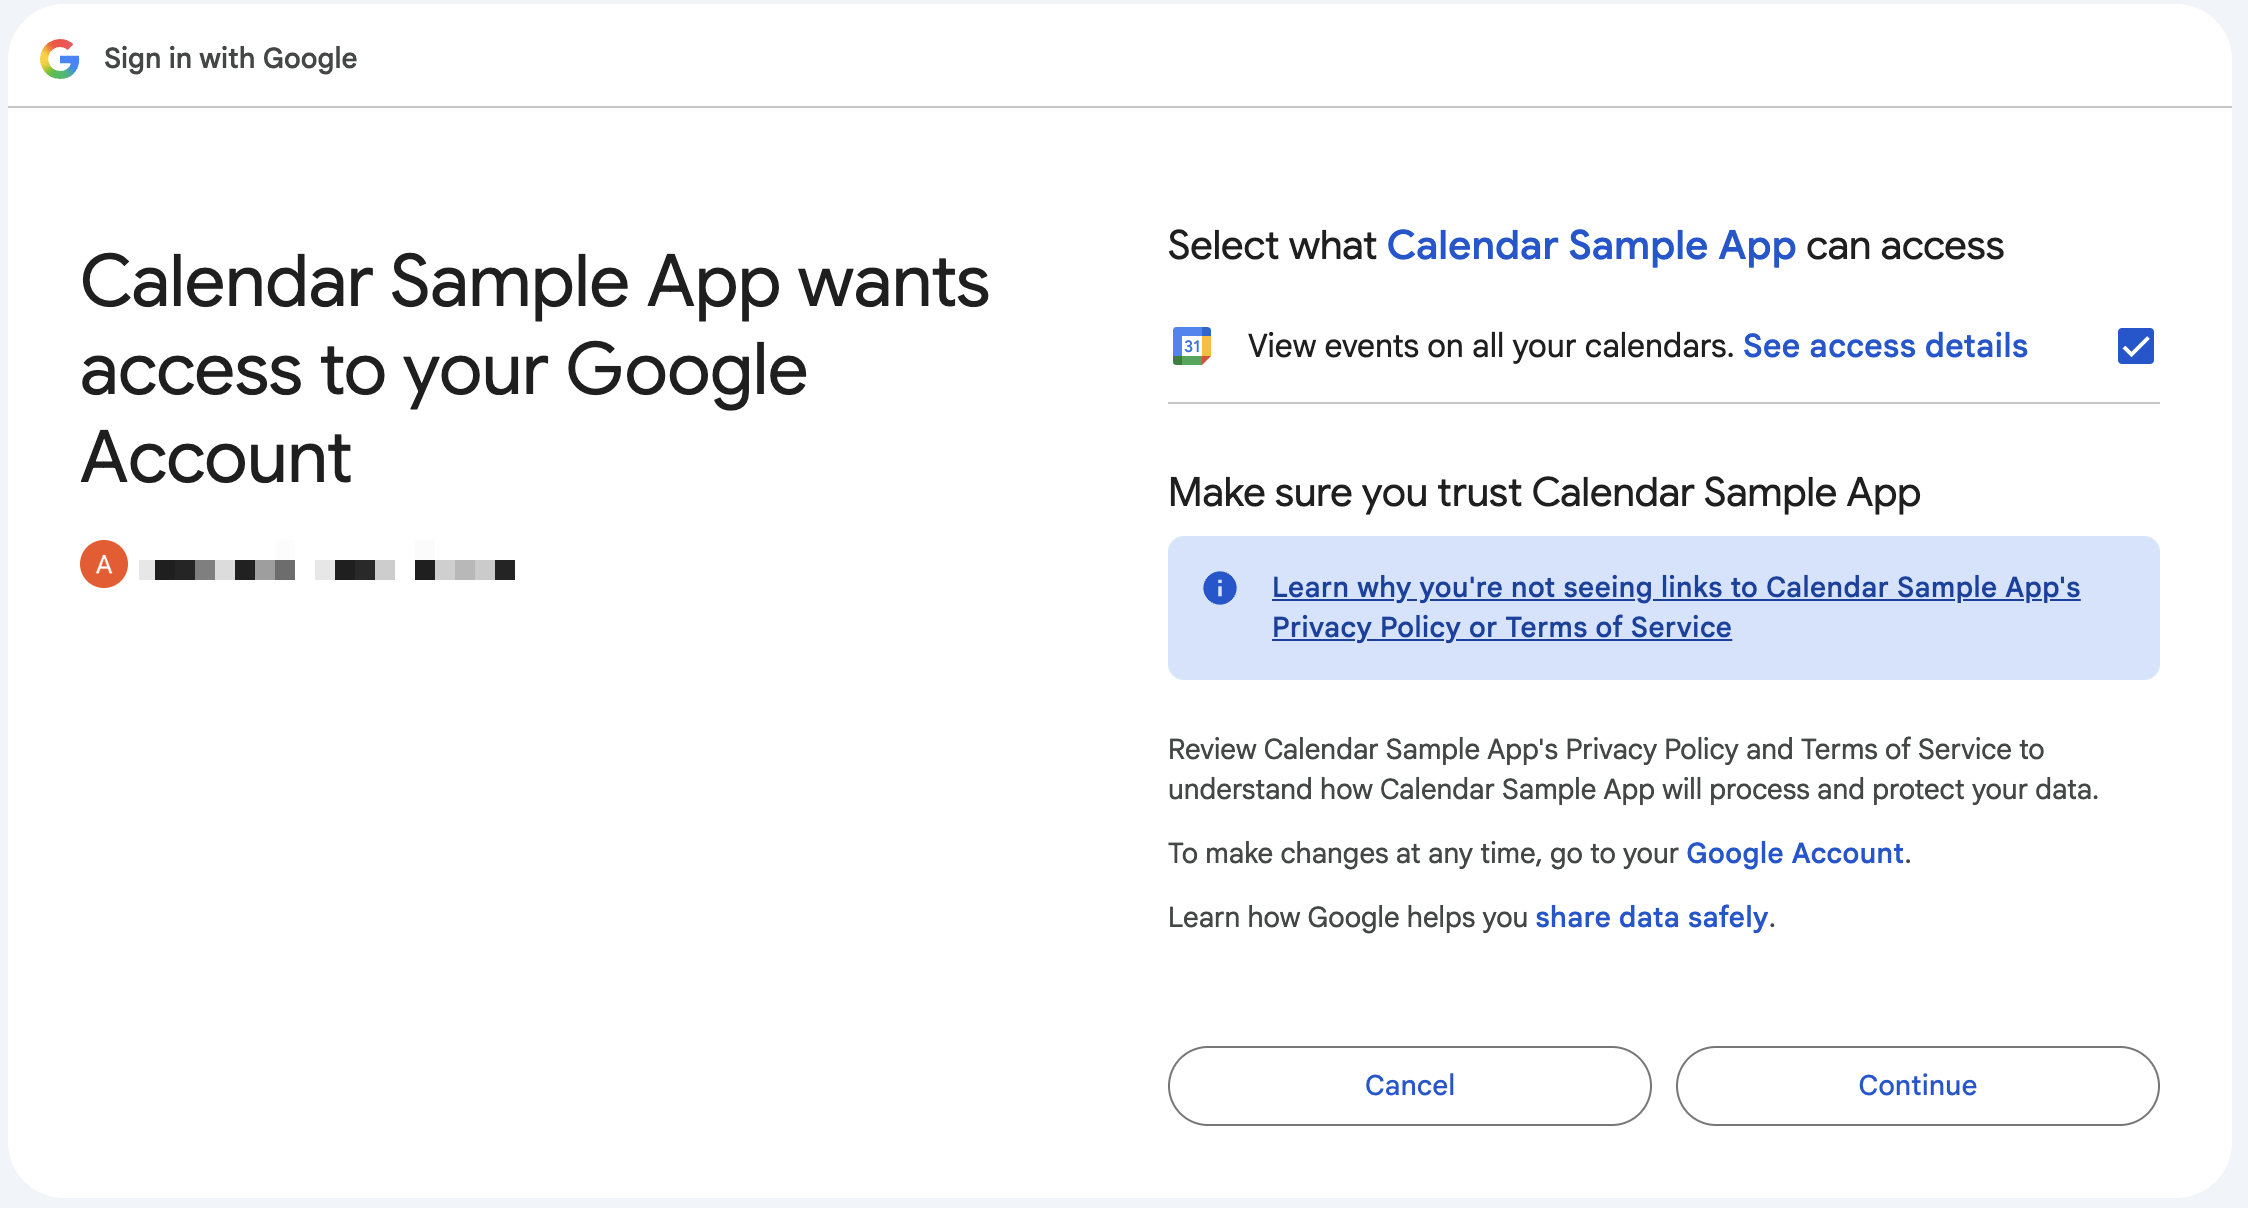
After clicking this URL, your user will be brought to a page like the one below, where they can give your OAuth application permission to access their calendar event data.
Handling the redirect
After the user successfully completes the authorization flow, Google or Microsoft redirects them back to the redirect_uri you included in the authorization URL. The returned URL should look something like this:
https://yourapp.com/oauth/callback?code=abc123&...
From here, you’ll need to grab the code parameter (I’ve bolded it above) from the URL. You can exchange this code with Google or Microsoft for a refresh token. This is what you pass to Recall to complete the OAuth process. Once this is done, Recall will have read access to your customers’ calendars and can automatically sync meetings for you to see.
How to sync calendar data into your app with Calendar V2
Calendar v2 requires your application to implement the scheduling layer instead of delegating scheduling to Recall. The basic flow of this integration is: receive calendar updates from Recall, fetch the affected events, apply your recording logic, and schedule or remove bots accordingly.
That means you need to implement more infrastructure than you do with calendar v1: an OAuth authorization-code flow, a webhook handler, recording logic, and a deduplication strategy. In exchange, your application gets access to the underlying event data and can make essentially arbitrary scheduling decisions.
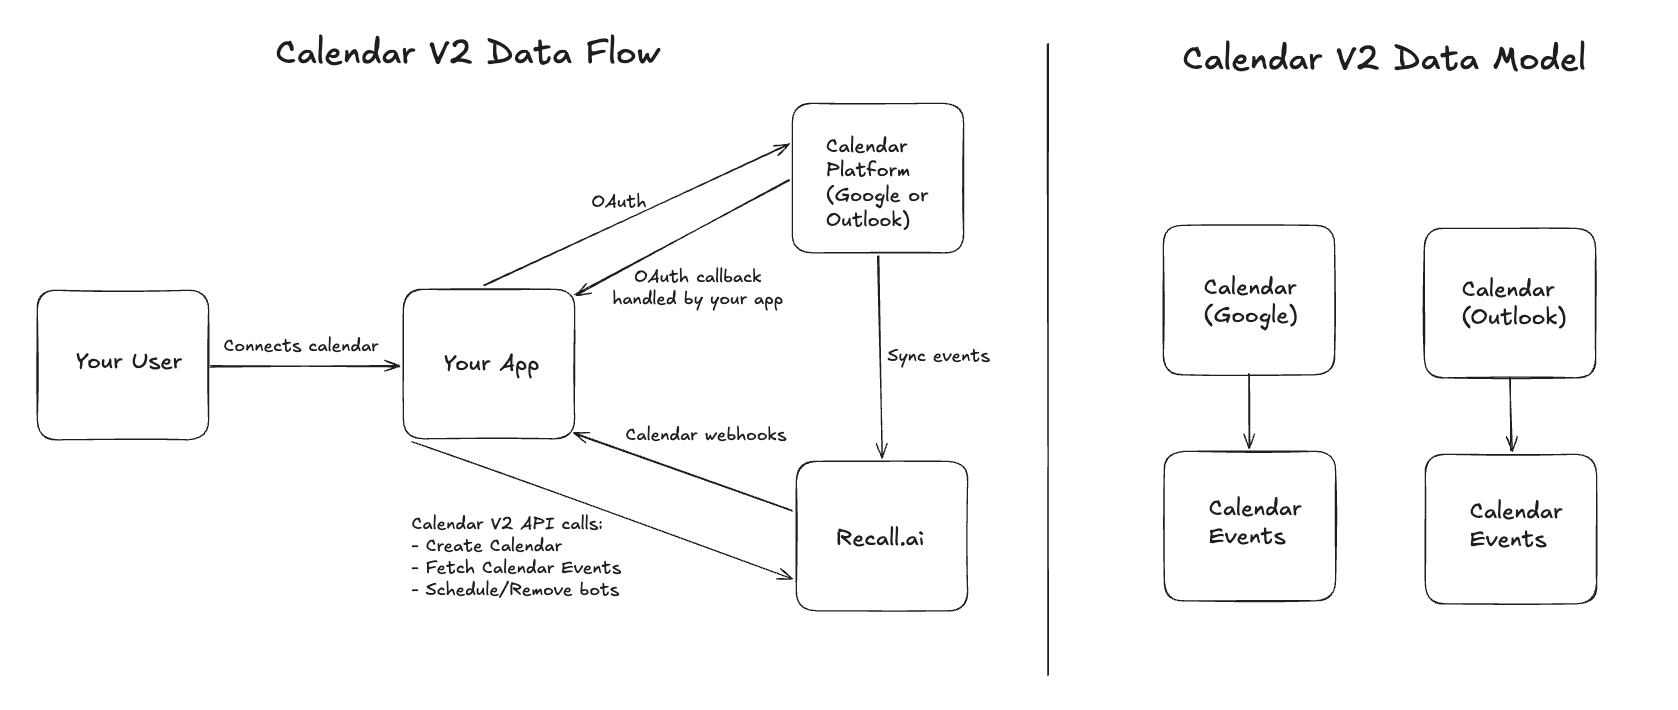
Unlike v1, Calendar v2 doesn't have a Calendar User object. The Calendar v2 integration revolves around two objects: Calendar and Calendar Event. A Calendar represents the primary calendar of a connected Google or Outlook account, and a Calendar Event represents an individual event that Recall has synchronized from that calendar.
Primary vs. secondary calendar
When you create a Google or Microsoft account, a primary calendar is created automatically. This is your default calendar, and all of your events typically live here. However, you have the option to create secondary calendars that live apart from your default calendar. Currently the Recall.ai calendar integration only supports syncing events from a primary calendar.
Create the calendar
After completing the OAuth flow and obtaining a refresh token, call the Create Calendar API endpoint:
curl --request POST \
  --url https://YOUR_RECALL_REGION.recall.ai/api/v2/calendars/ \
  --header 'Authorization: RECALL_API_KEY' \
  --header 'content-type: application/json' \
  --data '{
    "oauth_client_id": "...",
    "oauth_client_secret": "...",
    "oauth_refresh_token": "...",
    "platform": "google_calendar",
    "metadata": {"user_id": "user_123"}
  }'
This will create a Recall Calendar object for the user that just connected their calendar. Recall manages the connection from this point onward, so any events that are created on this user’s calendar will be automatically populated and queryable through the API.
I’d recommend attaching your own internal user ID to the Calendar’s metadata field when you create it. This gives you an easy and stable way to associate the Recall Calendar with a user in your own system.
Get webhook updates when calendar events change
Once a calendar is connected, you can subscribe to two distinct Calendar v2 webhook events from the Webhooks tab of the Recall dashboard.
calendar.update is sent when the state of the Calendar itself changes. For example, this event will fire when a calendar starts connecting, connects, and is disconnected.
{
  "event": "calendar.update",
  "data": { "calendar_id": "..." }
}
calendar.sync_events is sent whenever events on a connected calendar are created, updated, or deleted.
{
  "event": "calendar.sync_events",
  "data": {
    "calendar_id": "...",
    "last_updated_ts": "2026-08-01T12:00:00Z"
  }
}
Note that the calendar.sync_events webhook is simply a notification that something changed, and does not contain the changed event itself. When you receive a calendar.sync_events webhook, your application should query the Calendar Events API using the webhook's last_updated_ts field as a filter:
curl --request GET \
  --url 'https://YOUR_RECALL_REGION.recall.ai/api/v2/calendar-events/?calendar_id=CALENDAR_ID&updated_at__gte=LAST_UPDATED_TS' \
  --header 'Authorization: RECALL_API_KEY'
The curl request above returns Calendar Events updated at or after the timestamp included in the webhook. Here’s an example of what one of these events looks like, with some fields omitted for brevity:
    {
      "id": "8f8331c5-85dd-4716-a0a6-a423480fd25f",
      "calendar_id": "e419dea1-4416-428e-b283-be787d21656b",
      "start_time": "2026-08-27T16:30:00+00:00",
      "end_time": "2026-08-27T17:30:00+00:00",
      "platform": "google_calendar",
      "platform_id": "6jek0c9qg6ovlhcj0j2te5doqb",
      "ical_uid": "6jek0c9qg6ovlhcj0j2te5doqb@google.com",
      "meeting_platform": "google_meet",
      "meeting_url": "https://meet.google.com/qop-vxde-dif",
      "is_deleted": false,
      "bots": [
        {
          "bot_id": "16e34f3c-b7a9-4807-ab67-7f84b87b6af8",
          "start_time": "2026-08-27T16:30:00+00:00",
          "deduplication_key": "2026-08-27T16:30:00Z-https://meet.google.com/qop-vxde-dif",
          "meeting_url": "https://meet.google.com/qop-vxde-dif"
        }
      ],
      "raw": {...}
    }
You'll also receive a calendar.sync_events webhook when a Calendar is initially connected, so the same flow can be used to fetch its initial set of events. Recall only syncs events from one day in the past through 28 days into the future, so the initial connection won't hand you an overwhelming backlog. You don't need to poll for events beyond that window either. When an event moves into the 28-day range, Recall will send a calendar.sync_events webhook for it.
If you need to display upcoming events in your own UI, make sure to avoid showing deleted events. You can identify deleted events by filtering for is_deleted set to true. Deleted events are no longer visible on the user's calendar but will continue to be returned by the Calendar Events API.
Decide which meetings to record
Every Calendar Event includes a raw payload containing all the meeting information returned by the Google or Microsoft APIs for that event. Your application logic should use the information in this field when deciding whether to schedule a bot.
Before you look at anything in raw, check event.meeting_url. Recall will refuse to schedule a bot for an event that doesn't have a meeting URL (there’s nowhere to send the bot!), so any recording rule should return false when that field is null.
For example, you could:
- Record external meetings: inspect the attendee list and compare attendee domains with the connected calendar owner's domain.
- Record only confirmed meetings: inspect the connected calendar owner's RSVP response.
- Record meetings with specific attendees: check whether a particular email address appears in the attendee list.
- Record meetings matching a naming convention: inspect the event title for a particular keyword.
Here’s an example of how to record a meeting when at least one attendee has a different email domain from the connected calendar owner.
src/recording-rule.ts lines 58-106

function emailDomain(email: string): string {
  const value = email.trim().toLowerCase();
  const at = value.lastIndexOf("@");
  return at === -1 ? "" : value.slice(at + 1);
}

function attendeesFromEvent(event: CalendarEvent): Attendee[] {
  const attendees: Attendee[] = [];
  if (event.platform === "google_calendar") {
    const raw = event.raw || {};
    for (const attendee of raw.attendees || []) {
      if (!attendee?.email) continue;
      attendees.push({
        email: attendee.email.toLowerCase(),
        accepted: attendee.responseStatus === "accepted",
      });
    }
    if (raw.organizer?.email) {
      attendees.push({ email: raw.organizer.email.toLowerCase(), accepted: true });
    }
  } else if (event.platform === "microsoft_outlook") {
    const raw = event.raw || {};
    for (const attendee of raw.attendees || []) {
      const email = attendee?.emailAddress?.address;
      if (!email) continue;
      const response = attendee.status?.response;
      attendees.push({
        email: email.toLowerCase(),
        accepted: response === "accepted" || response === "organizer",
      });
    }
    const organizerEmail = raw.organizer?.emailAddress?.address;
    if (organizerEmail) {
      attendees.push({ email: organizerEmail.toLowerCase(), accepted: true });
    }
  }
  return attendees;
}

function isExternalEvent(event: CalendarEvent, calendarEmail: string): boolean {
  const calendarDomain = emailDomain(calendarEmail);
  if (!calendarDomain) return false;
  return attendeesFromEvent(event).some((attendee) => {
    const domain = emailDomain(attendee.email);
    return Boolean(domain) && domain !== calendarDomain;
  });
}
Notice that most of this code is just pulling the email addresses out of the raw field. Google stores attendees as raw.attendees[].email, while Outlook stores them as raw.attendees[].emailAddress.address, so my attendeesFromEvent function checks which platform the event came from and pulls the addresses out of the right place. Once you’ve extracted the list of emails in the event, the actual rule in isExternalEvent is a one-liner.
Every other recording rule follows the same shape: you will need to implement a small helper that pulls the field you care about out of raw for each platform, then write the rule against that helper's output instead of against raw directly.
Once your code decides that an event should be recorded, the next step is to associate a bot with that Calendar Event.
Schedule or remove the bot
Use the Schedule Bot For Calendar Event endpoint to add a bot to an event:
curl --request POST \
  --url https://YOUR_RECALL_REGION.recall.ai/api/v2/calendar-events/EVENT_ID/bot/ \
  --header 'Authorization: RECALL_API_KEY' \
  --header 'content-type: application/json' \
  --data '{
    "deduplication_key": "2026-09-01T10:00:00Z-https://meet.example.com/abc",
    "bot_config": { "bot_name": "Notetaker" }
  }'
Both deduplication_key and bot_config are required. bot_config accepts every option supported by the Create Bot endpoint, so this is where you should set the bot’s name, transcription provider, and other configurable fields. Two fields are filled in for you already: meeting_url comes from the calendar event, and join_at is set to the start time of the event. These can both be overridden by your request if necessary.
If your recording logic later decides that this event should no longer be recorded, you can make a request to the Remove Bot From Calendar Event endpoint.
curl --request DELETE \
  --url https://YOUR_RECALL_REGION.recall.ai/api/v2/calendar-events/EVENT_ID/bot/ \
  --header 'Authorization: RECALL_API_KEY'
If the underlying calendar event changes and you need to update the associated bot, call the Schedule Bot For Calendar Event endpoint again with the desired configuration. Use this endpoint for calendar-driven changes to scheduled bots rather than updating the bot through the Update Scheduled Bot endpoint.
Deleted calendar events are handled automatically. Recall will unschedule bots associated with an event when that event is removed. A declined invitation is different from a deleted event, so if your product should stop recording declined meetings, you need to make that part of your own recording logic.
Deduplicate bots across calendars
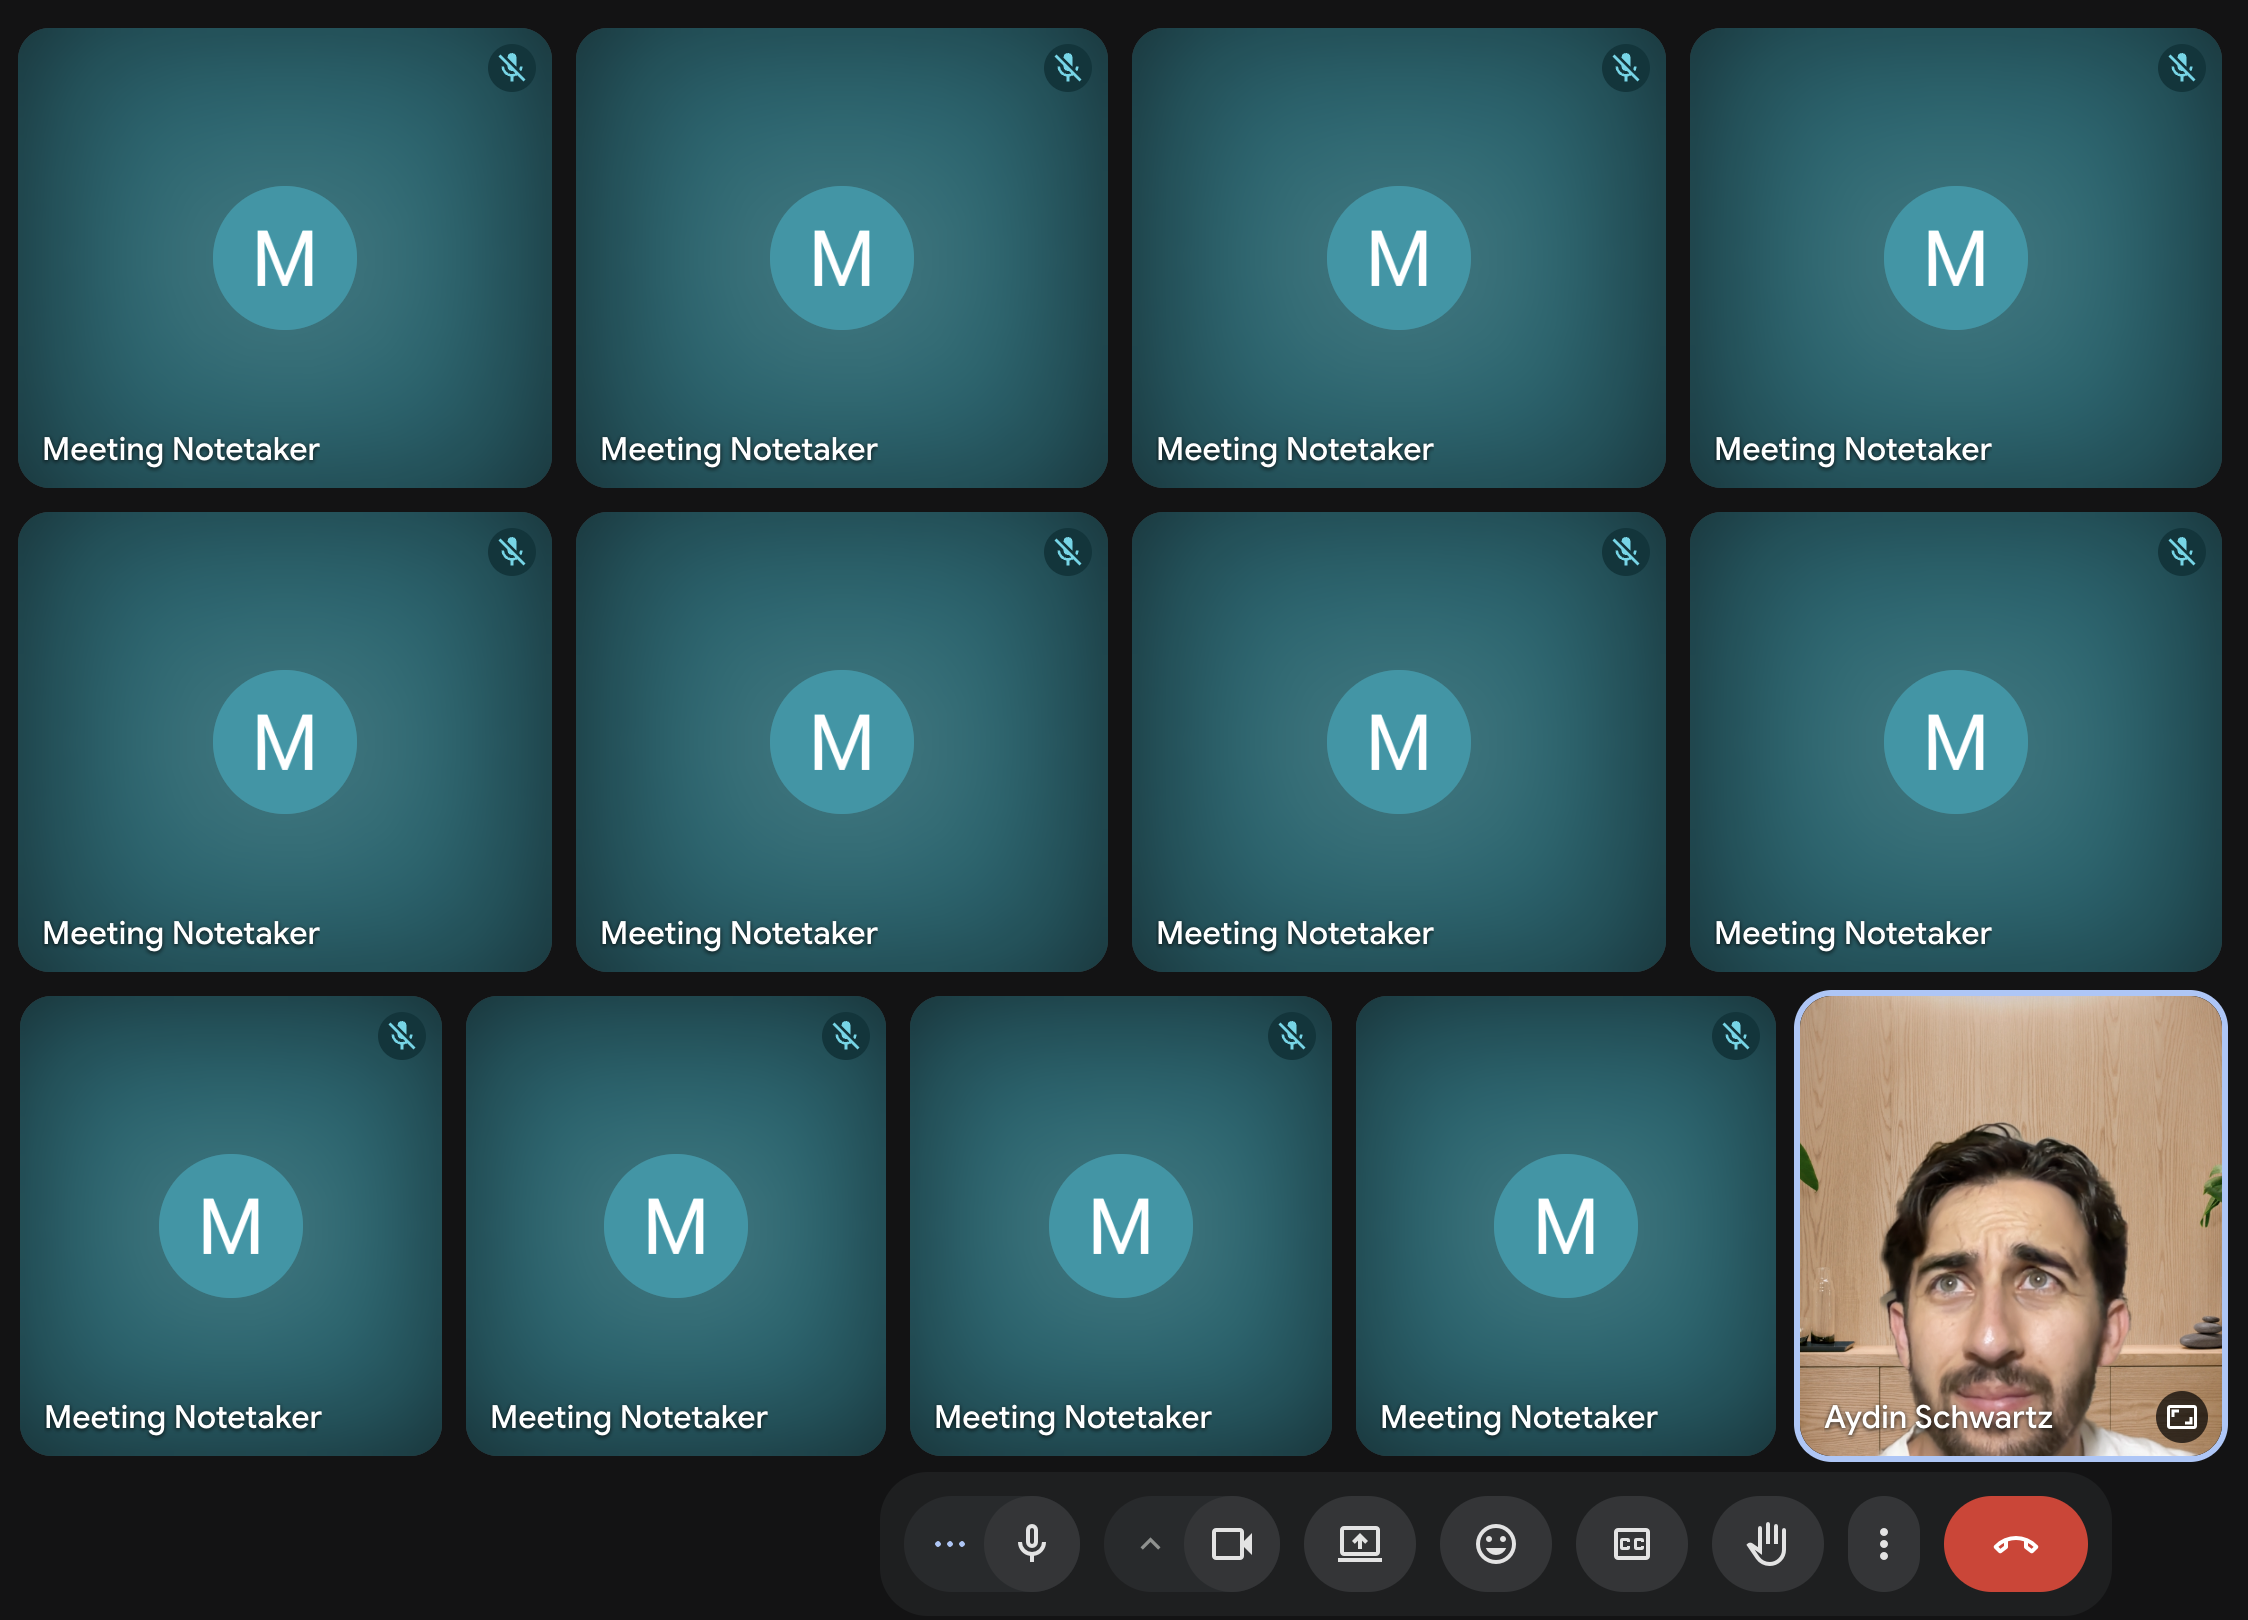
Suppose two customers using your product are invited to the same meeting. Without deduplication, your scheduling logic could send one bot on behalf of each customer's calendar.
Calendar v2 solves this using the deduplication_key parameter you provide when scheduling a bot. Calendar events that should share a bot should receive the same key.
For most applications, I recommend one of three patterns:
- One bot per meeting:
{event.start_time}-{event.meeting_url} - One bot per company per meeting:
{event.start_time}-{event.meeting_url}-{calendar_email_domain} - One bot per connected calendar:
{event.start_time}-{event.meeting_url}-{event.id}
You may be tempted to get clever with the deduplication key, but for most applications, enforcing one bot per meeting is the right default. Getting it wrong can lead to some embarrassing (and expensive) situations: I’ve seen companies accidentally send 1,000 bots to the same all-hands meeting because their deduplication logic was wrong. You do not want that to be you!
Conclusion
Calendar v2 is designed for applications that want automatic calendar-based recording with custom scheduling logic. When a user connects their calendar, you’ll be able to decide which meetings are recorded at a granular level.
If your product does not need granular scheduling logic, then Calendar v1 is the simpler integration. However, if you anticipate ever needing more advanced scheduling and bot configuration logic, then Calendar v2 is the correct choice.
If you want to test both integrations and see which one works best for your application, check out the calendar sample app on GitHub.
FAQ
How far into the future are calendar events synced in the API?
Recall syncs upcoming calendar events up to 28 days into the future. If an event you're expecting isn't showing up yet, it's probably outside that window. Once it enters the 28-day range, it will be picked up by the normal calendar sync flow.
Does Recall sync secondary or shared calendars?
No. Recall currently syncs the primary calendar of each connected Google or Outlook account. Events that live only on a secondary or shared calendar won't appear through the Calendar API.
Will my customers see Recall's name during the OAuth flow?
No. You're the one who registered the OAuth client, so your customer will see your application's name and logo on the consent screen, not Recall's.
Is Recall.ai's calendar API always free?
Yes, both Recall.ai's calendar API v2 and v1 are completely free, regardless of how many user calendars your platform needs to integrate with.


