


.avif)


Tl;dr: In this article, I’ll build an AI scribe that joins telehealth visits, records and transcribes the conversation, and generates notes in a standard clinical note format. If you want to jump straight to the code, you can find the complete sample app in this GitHub repository.
In telehealth, a lot of the work involved in a patient visit happens after the actual conversation has ended. Clinicians still need to write detailed notes on the visit, often while moving on to the next patient or catching up on documentation later in the day. AI scribes are designed to reduce that burden by handling documentation in the background, allowing clinicians to stay fully attentive to their patients during the appointment. This type of workflow is often referred to as ambient clinical documentation.
What is an AI scribe?
The primary purpose of an AI scribe is to record a telehealth visit, transcribe the conversation, and turn the transcript into structured clinical documentation, such as a draft clinical note. There are a few things that make this different from building a standard meeting notetaker.
Generally, clinicians don’t want a generic summary of their meeting. In the medical world, specialized formats like SOAP, DAP, and BIRP are common, and clinicians want their summary created in the format they already use and understand. Healthcare is also a highly regulated field, so any AI scribe will need to clearly announce that it’s recording the meeting and make it easy to pause or end the recording if the patient does not consent.
A preview of what we’re building
Recall.ai is HIPAA compliant and can sign a BAA. However, this sample application is not production-ready. You are responsible for evaluating your application’s own privacy, security, patient-consent, data-retention, and regulatory compliance requirements before handling production health data.
This application allows clinicians to schedule bots for their upcoming meetings and pick the specific format that they want their notes to take. The bot will join their call and record the video and audio of all participants on the call.
Once the visit is over, the app transcribes the call, generates a clinical note, and embeds all the data from the call into a single page. From there, the clinician can ask questions about the visit or regenerate the note in another format.
Telehealth scribe architecture
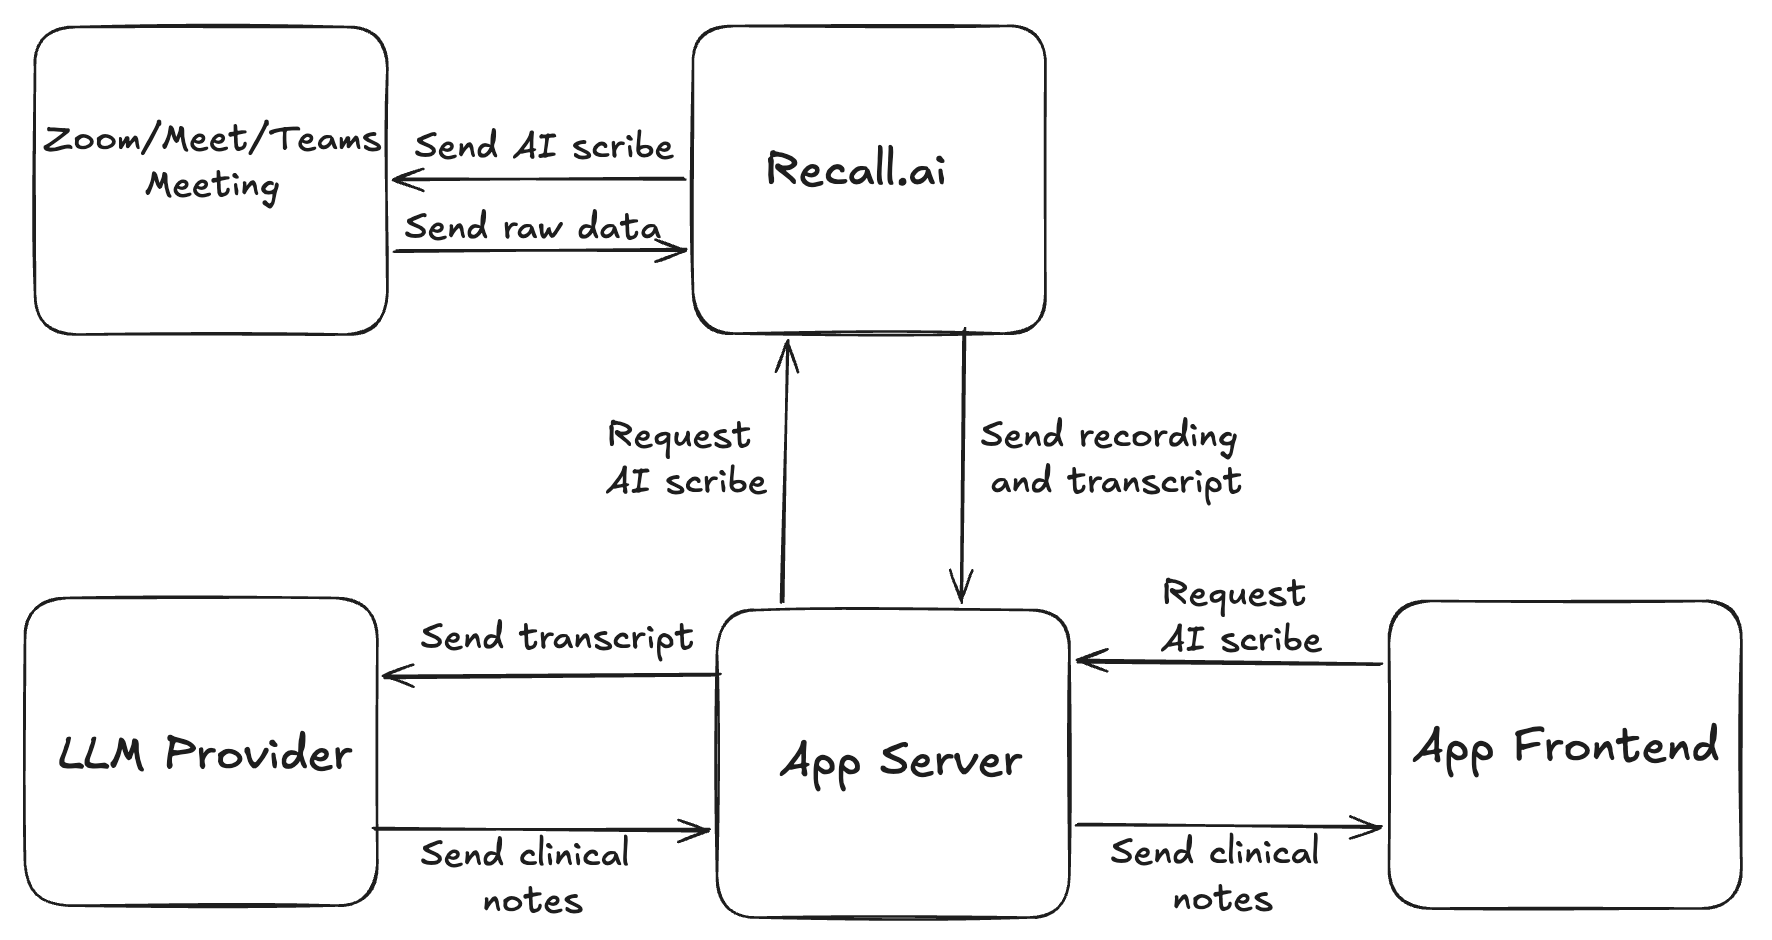
At a high level, an AI telehealth scribe needs four pieces: meeting capture, transcription, clinical note generation, and integration with downstream systems such as an EHR.
The backend of the application is an Express server written in TypeScript, using a simple SQLite database for storing patient and visit information. The frontend is React with Vite.
Does your application use a different tech stack?
Large language models are able to easily translate between different programming languages and frameworks. If you ask your coding agent to refactor this application to the programming language of your choice, it should be able to one shot the change!
The app uses the Recall.ai Meeting Bot API to send a bot to join and record the call. Once the recording finishes, I use Recall.ai Transcription to generate the transcript.
The clinical notes are generated with the AI SDK. This makes it easy to swap between models from different AI providers (e.g. Anthropic and OpenAI) depending on your preferences.
There’s nothing particularly special about the frontend of this application, as all of the Recall-specific components live in the backend. I’ll be discussing these components in depth in this article.
Let an AI agent automatically set up your Recall.ai integration
Recall.ai has an MCP server that can automate most of the setup for this project. It can search the documentation, inspect and debug bots, and create or update webhook endpoints if you give it write permissions.
I highly recommend installing the MCP and telling your coding agent to use it while you're setting up the sample repository.
Step 1: Use a meeting bot to join the meeting
To enable recording, transcription, and all the other downstream processing, the first thing we need to do is send a bot to the telehealth call. To create a bot, the only thing we need is a meeting URL. Then, we send a request to the Create Bot endpoint:
//@title src/recall.ts
{
  "meeting_url": "YOUR_MEETING_URL",
  "bot_name": "AI Scribe Sample Application",
  "metadata": { "visitId": "..." },
  "recording_config": {
    "video_mixed_mp4": null,
    "audio_mixed_mp3": {}
  },
  "chat": {
    "on_bot_join": {
      "send_to": "everyone",
      "message": "This visit is being recorded for clinical notes.",
      "pin": true
    },
    "on_participant_join": {
      "exclude_host": false,
      "message": "This visit is being recorded for clinical notes."
    }
  },
  "automatic_video_output": {
    "in_call_recording": {
      "kind": "jpeg",
      "b64_data": "/9j/4AAQSk..."
    },
    "in_call_not_recording": {
      "kind": "jpeg",
      "b64_data": "/9j/4AAQSk..."
    }
  }
}
There are a ton of different parameters being passed to this endpoint since it’s the main place where meeting bots are configured.
The first noteworthy (no pun intended) field is the metadata. You can write arbitrary data to this field, and it is typically used to associate IDs from your application’s backend with specific bots. In this sample, I store my application’s visitId in metadata. When Recall sends webhook events for the bot later, I can use that ID to associate them with the correct visit in my database.
Configuring the behavior and appearance of the meeting bot
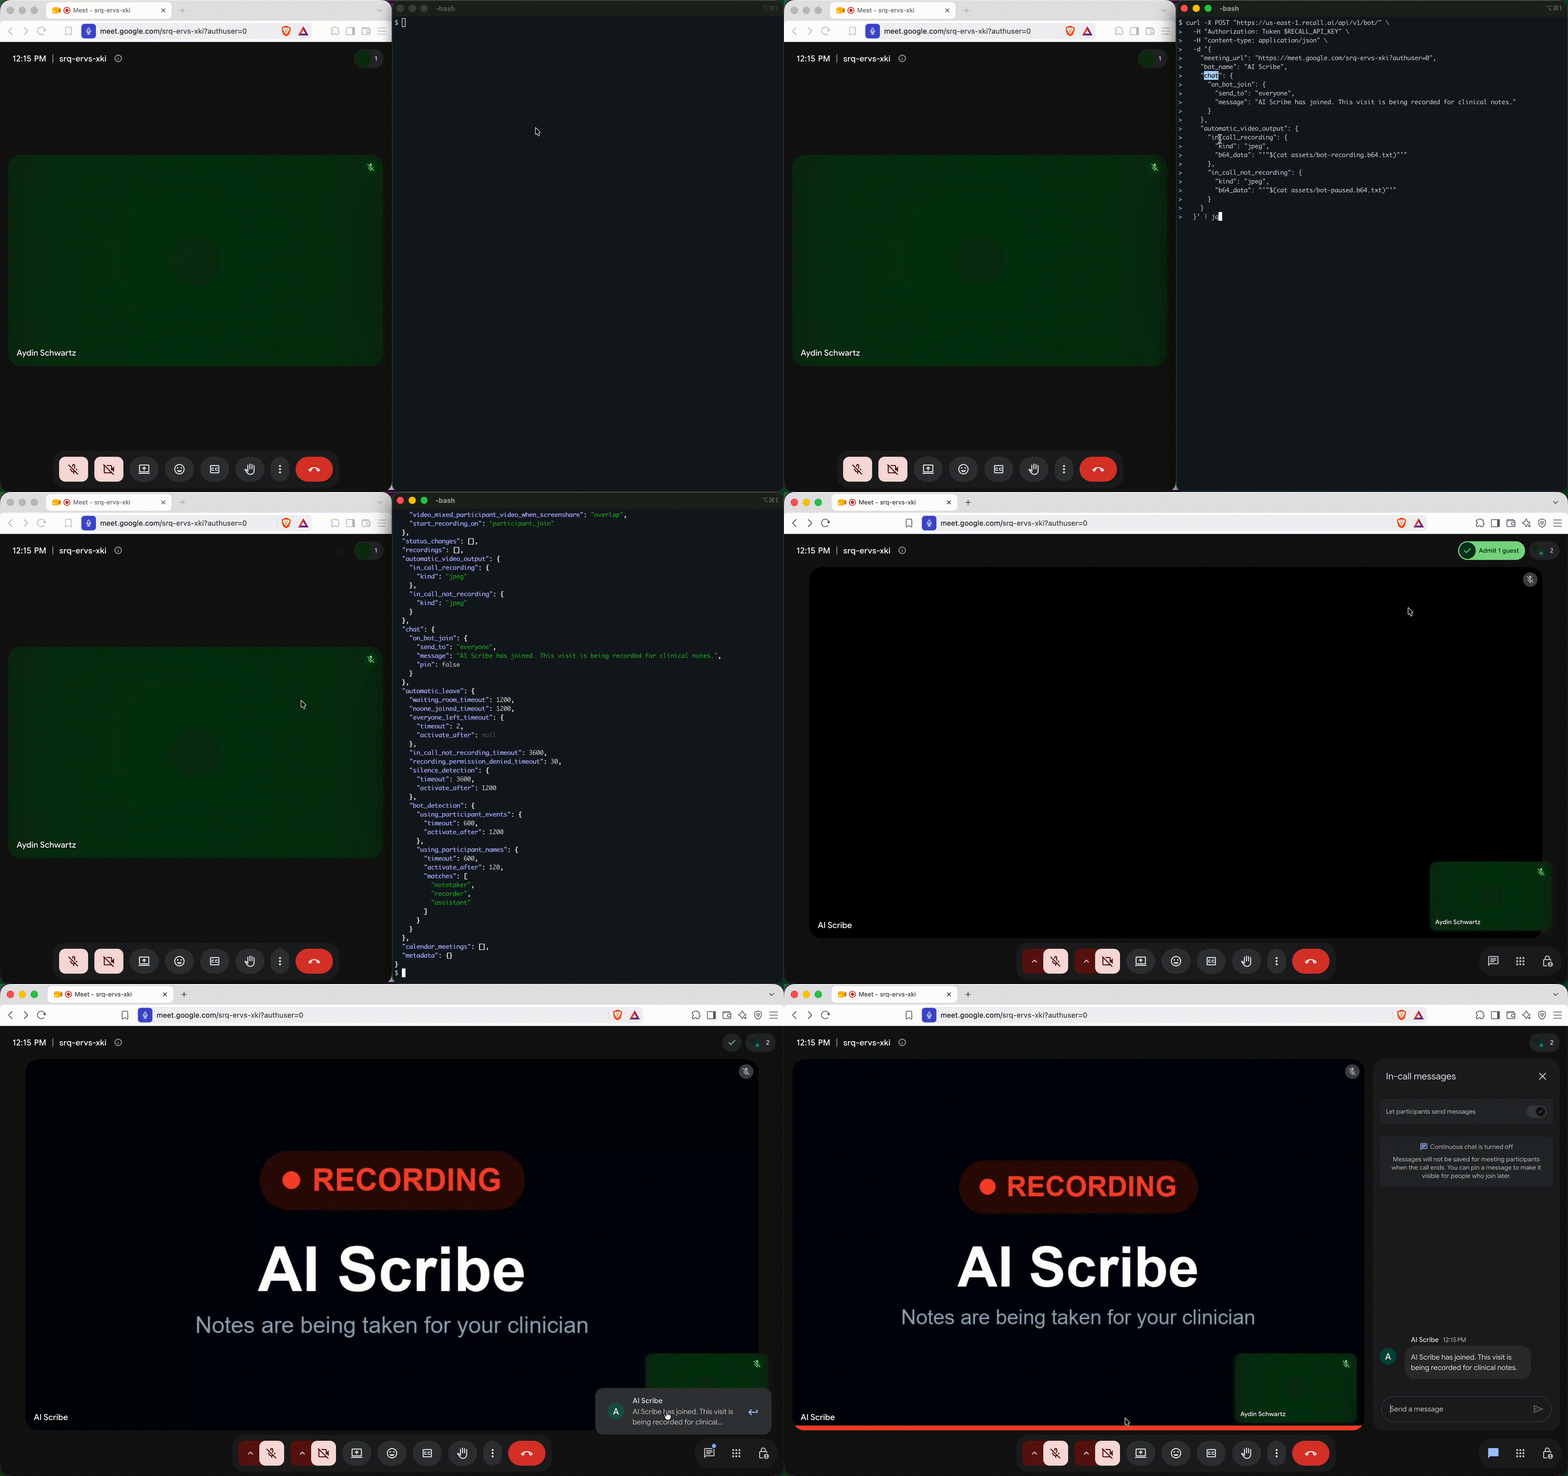
Recall.ai provides several ways to change the way the bot acts and appears in the meeting, which is useful for building patient consent and recording-disclosure flows into an AI telehealth scribe. For example, this bot has been configured to send a message notifying participants that the meeting is being recorded via the chat.on_bot_join field.
The bot can also be given a custom image via the automatic_video_output field. You can present different images depending on whether the bot is recording the meeting or in a paused state, giving the meeting participants an easy visual way to understand if they’re being recorded. Here’s what these fields look like when configured for a bot:
Configuring recording and transcription settings for the meeting bot
There are a few parts of the Create Bot request above that are specific to how I want the scribe to record data while it’s in the call.
Recall.ai bots record a full video MP4 of the conversation by default. In certain medical scenarios this can be helpful, for example if a patient shows a wound or rash on the call, the visual context may be useful to preserve alongside the visit. In other settings like virtual therapy appointments, a video might be seen as unnecessary and invasive. For this sample, I made the recording format configurable so you can choose between video and audio-only recording depending on your use case. The request body shown earlier uses the audio-only configuration.
To disable video recording and swap to an audio-only version, we can simply set video_mixed_mp4 to null and add the audio_mixed_mp3 key to the Create Bot request. If we decide we actually do want the bot to record video, we can just remove the video_mixed_mp4 key from the Create Bot request, since it is enabled by default. In either case, the method of recording does not affect the bot’s ability to generate a transcript.
You may have noticed that the Create Bot request we mentioned earlier didn’t actually configure transcription. Recall.ai supports both transcription that happens live during the call, as well as transcription that occurs after the call has finished. Since we don’t need live transcription, we don’t need to configure anything in the Create Bot request. Instead, once the meeting has finished and the recording is available, we can make a call to the Create Async Transcript endpoint:
//@title src/webhooks.ts
{
    "metadata": {
        "visitId": "..."
    },
    "provider": {
        "recallai_async": {
            "language_code": "auto",
            "key_terms": [
                "lisinopril",
                "metformin",
                "atorvastatin"
            ]
        }
    },
    "diarization": {
        "use_separate_streams_when_available": true
    }
}
language_code: auto lets the transcription service automatically detect the language of the conversation. This lets you transcribe conversations in different languages without needing to know the language ahead of time.
key_terms allows us to provide a list of words to the transcription model that are especially important. Typically these are words that are uncommon or frequently misspelled. Drug names are an obvious example, but acronyms and specific health conditions are also common choices to add here.
I’ve also set use_separate_streams_when_available to true. This is not strictly necessary since this mode (known as perfect diarization) is enabled by default. Perfect diarization allows Recall.ai to separately transcribe the individual audio streams of each participant in the meeting, rather than transcribing a single, mixed audio stream. Because each participant’s audio is transcribed separately, overlapping speech can still be attributed to the correct person. When Recall.ai's audio was passed to transcription providers, it output a lower word error rate (WER) than the transcription providers benchmarks due to the clean, separate stream audio. One caveat: if multiple people are sharing the same device (e.g. two people joining on the same laptop), Recall.ai will still see them as a single participant and won’t distinguish between them. If this is a situation you anticipate seeing frequently with your users, then I suggest looking into hybrid diarization.
Scheduling the meeting bot to join future meetings automatically
It’s very common for meeting notetaker applications to connect to the calendars of their users and automatically schedule bots to join their meetings. Recall.ai makes this easy via the free Calendar V2 integration. I won’t be going into depth on the integration here, but you can read more about it in the article linked above or look into how it was implemented in the sample application to learn more.
Step 2: Pull meeting data into your application
Subscribing to webhooks
After calling Create Bot, most of the information we’ll receive about this bot will be delivered via webhook. The bot will tell us its state (joining, in the waiting room, in the call, etc.) over webhook, and we’ll also be able to use webhooks to know when the recording and transcript are available.
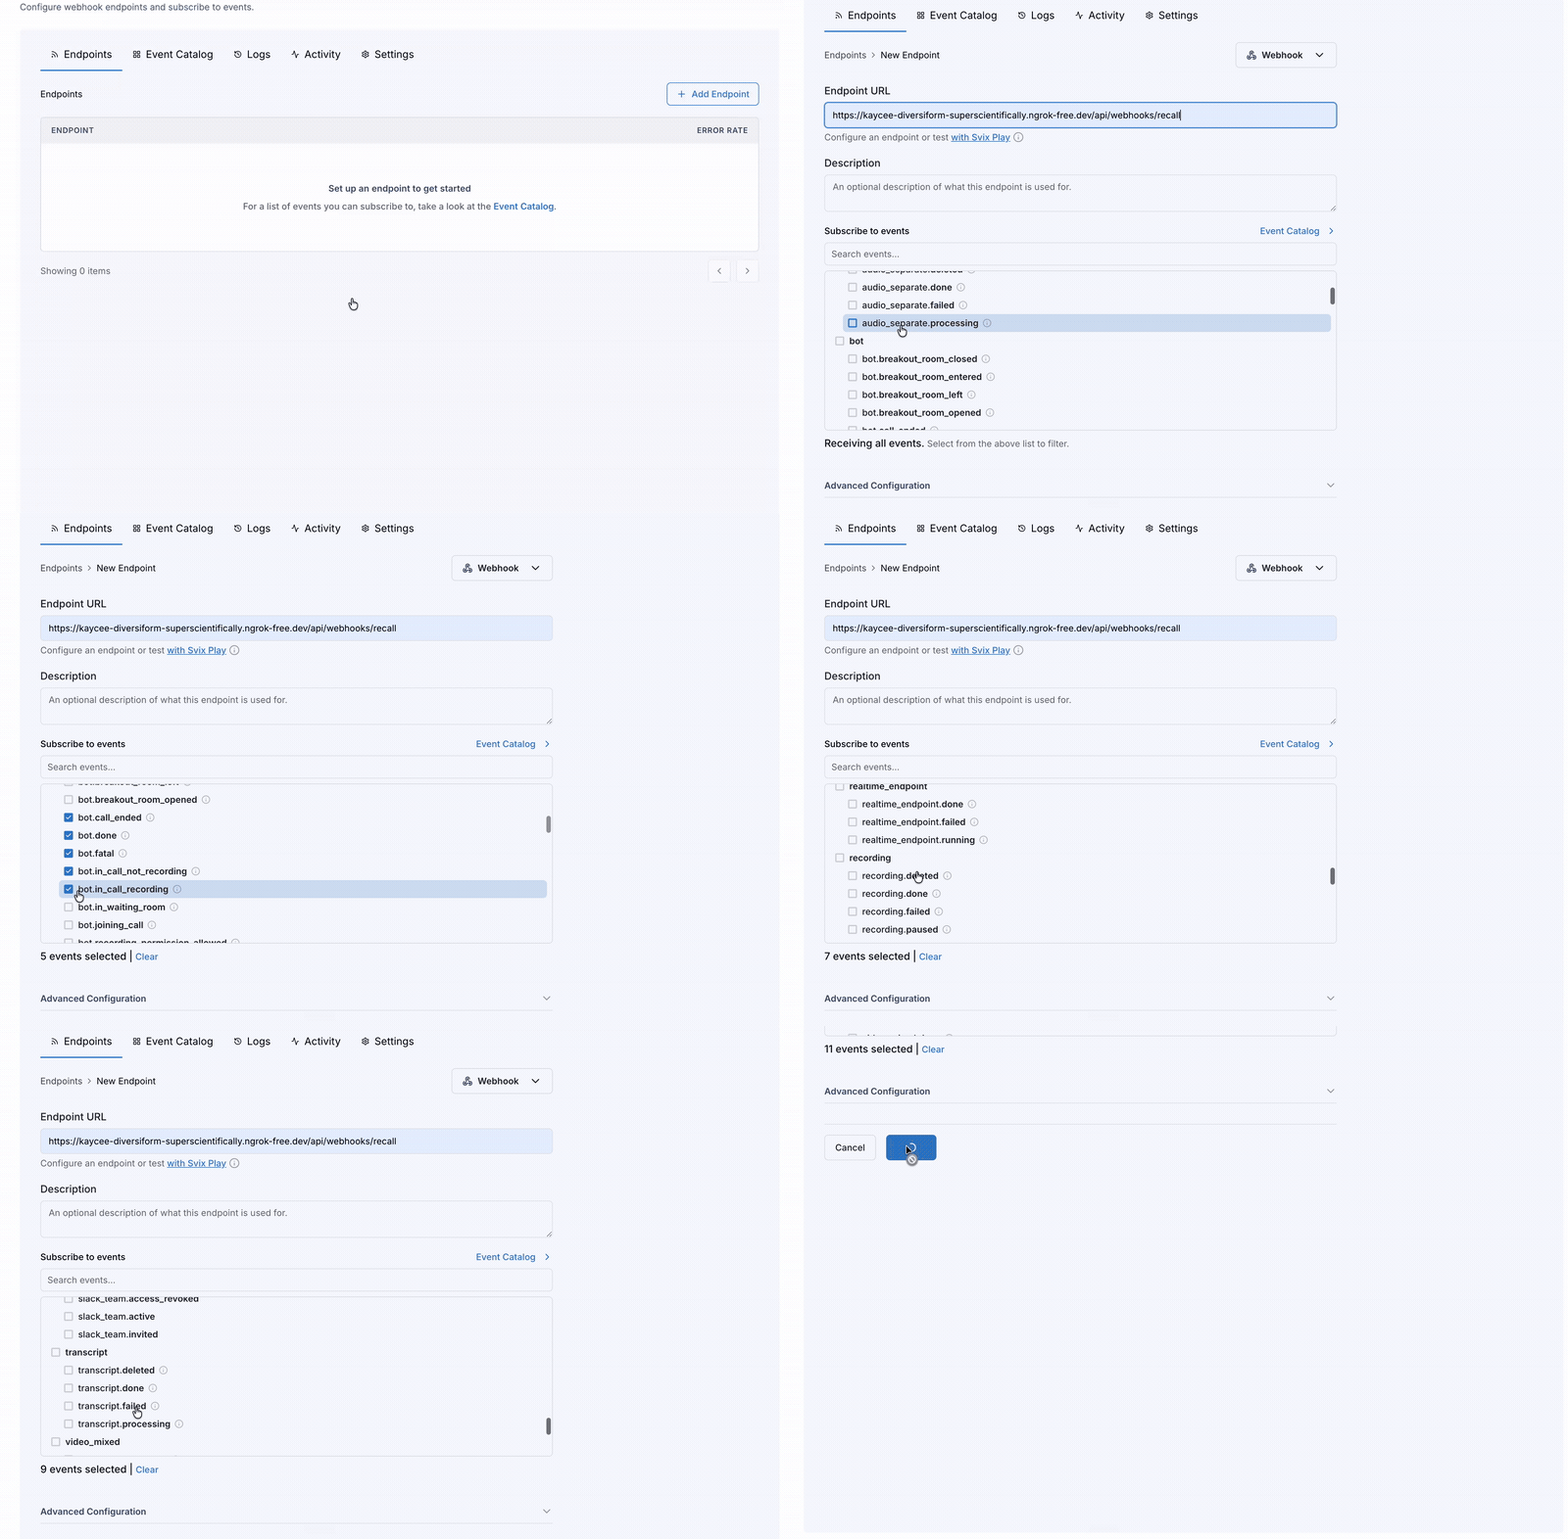
For local development, I’ve found that the easiest way to work with webhooks is via Ngrok with a reserved domain. Once you have an endpoint set up, you’ll want to register that URL in the Webhooks section of the Recall.ai dashboard and subscribe to:
- The
bot.*events (joining_call,in_waiting_room,in_call_not_recording,in_call_recording,call_ended,done,fatal) recording.doneandrecording.failedtranscript.doneandtranscript.failed.
If you installed the Recall.ai MCP with write permissions, you can just ask your coding agent to set this up for you. Otherwise, here’s a quick gif walking through the process manually:
Before processing a webhook, you must verify its signature using your workspace webhook verification secret. If you do not do this, you are introducing a security vulnerability. To learn more about how to implement verification, you can consult the Recall.ai documentation, the sample app, or ask the Recall.ai MCP to implement this for you.
Fetching recording data
The recording.done event is what kicks off transcription in this application. Once it arrives, I take the recording ID from data.recording.id and pass it to Create Async Transcript.
You may also want to make the original recording available in your application. The type of recording available depends on how the bot was configured earlier. For audio-only visits, the Retrieve Recording endpoint returns a media_shortcuts object containing the finished audio recording. The download URL for the mixed MP3 is available at media_shortcuts.audio_mixed.data.download_url.
If you chose to keep video recording enabled instead, you can retrieve the mixed MP4 from the same recording object. In the sample app, I use this media URL to let clinicians replay the original visit alongside the transcript and generated note.
Fetching transcript data
When transcription finishes, Recall.ai sends the transcript.done webhook. This contains a transcript ID at data.transcript.id. Using this ID, my sample app then calls the Retrieve Transcript endpoint. The response from this endpoint will include a data.download_url which points to the actual JSON transcript. An entry looks roughly like this:
[
  {
    "participant": {
      "id": 1,
      "name": "Aydin",
      ...
    },
    "words": [
      {
        "text": "Hello",
        "start_timestamp": {
          "relative": 0,
          "absolute": "2026-08-10T23:59:05.927163Z"
        },
        "end_timestamp": {
          "relative": 2.3542128,
          "absolute": "2026-08-10T23:59:08.281376Z"
        }
      }
    ]
  },
...
]
Step 3: Generate clinical notes
At this point, the application has the complete, labeled transcript. We can now pass this data to an LLM and have it generate a note with this information.
This sample uses the AI SDK, which gives the application one interface for several model providers. The repository supports Anthropic and OpenAI; you can select the provider and model through environment variables without changing the note-generation code.
The app supports SOAP, DAP, and BIRP notes. The definitions of those notes are stored as follows:
//@title src/ai.ts
export const NOTE_TEMPLATES = {
  soap: {
    label: "SOAP",
    sections: [
      {
        key: "subjective",
        heading: "Subjective",
        guidance: "What the patient reports: symptoms, history, concerns, in their own words.",
      },
      {
        key: "objective",
        heading: "Objective",
        guidance: "Measurable findings stated in the visit: vitals, exam findings, results.",
      },
      {
        key: "assessment",
        heading: "Assessment",
        guidance: "The clinician's assessment or working diagnosis.",
      },
      {
        key: "plan",
        heading: "Plan",
        guidance: "Next steps: medications, tests, referrals, follow-up, patient instructions.",
      },
    ],
  },
  dap: { /* ... */ },
  birp: { /* ... */ },
};
For the selected format, the app turns those section keys into a Zod schema. It then calls generateText with Output.object:
//@title src/ai.ts
const { output } = await generateText({
  model,
  instructions: [
    `You are a medical scribe drafting a ${template.label} note from a telehealth visit transcript.`,
    "Use only information stated in the transcript. Do not invent findings, vitals, or diagnoses.",
    'If a section has nothing to record, write "Not discussed."',
    ...template.sections.map(
      (section) => `- ${section.key}: ${section.guidance}`,
    ),
  ].join("\n"),
  prompt: `Transcript:\n\n${transcriptToDialogue(transcript)}`,
  output: Output.object({
    name: `${template.label}Note`,
    description: `A ${template.label} clinical note for one telehealth visit.`,
    schema: schemaFor(format),
  }),
  maxOutputTokens: 4000,
  abortSignal: AbortSignal.timeout(120_000),
});
Output.object asks the model to return data matching the schema I provided rather than free-form prose. That means the app receives a predictable object like this:
{
  subjective: "...",
  objective: "Not discussed.",
  assessment: "...",
  plan: "..."
}
By defining the note schema ahead of time, I can constrain the model’s output and ensure that it’s in the format that I want to work with. The model will fill in the various fields of the object based on the actual content of the transcript.
Accuracy is especially important for AI-generated clinical documentation, where hallucinations, omissions, or incorrectly inferred findings can significantly change the meaning of a clinical note. For sections such as objective findings or vitals, I explicitly tell the model to write "Not discussed." rather than inventing information simply because the schema contains the field.
Customizing note format
In the sample app, the note format is selected when the clinician creates the visit, but it doesn’t have to stay fixed. The sample app exposes an endpoint that will allow users to regenerate notes in a new format of their choice. This means that the same visit can be rendered using SOAP or DAP without needing to retranscribe the conversation.
Adding another format is fairly simple because the schema and prompt are both generated from the NOTE_TEMPLATES variable. If you add another template there, the rest of the note-generation path will automatically be able to reuse it.
If you aren't already familiar with the different formats, you can read more about SOAP, DAP, and BIRP in the Glossary.
Extending the capability of the telehealth scribe
Building a “chat with your notes” feature
Even a detailed clinical note won't contain every piece of information mentioned during a visit. Since we already have the full transcript, we can also let the clinician ask questions about the conversation directly.
The sample app implements this by sending the clinician's question along with the transcript and generated note to the LLM. For example, a clinician could ask which medications were discussed, whether the patient mentioned any side effects, or what they said about a particular symptom.
As with note generation, the model is instructed to answer only using information from the visit. Each answer includes the supporting transcript timestamp so the clinician can jump back to the relevant part of the visit.
Integrating generated notes with an EHR
In production, you will usually want the generated clinical note to end up in the clinician’s Electronic Health Record (EHR), rather than forcing them to copy it over manually from a separate application. Doing this typically means building an integration with the EHR itself, either through a vendor-specific API or standards such as Fast Healthcare Interoperability Resources (FHIR) and Substitutable Medical Applications and Reusable Technologies (SMART) on FHIR.
Real time use cases
All of the features we’ve discussed so far rely on a transcript that is generated after the meeting has ended. But what if you want your application to surface insights or react to something said by the patient before the meeting is over? Imagine that during a visit the patient says that they recently switched pharmacies. Instead of requiring the clinician to remember to update that information after the call, the application could recognize this from the transcript and surface an action like “Update preferred pharmacy to X”. The clinician could then confirm or dismiss it.
For this and similar use cases, we need to swap to using real-time transcription. This is as simple as modifying your Create Bot request:
{
    "recording_config": {
        "transcript": {
            "provider": {
                "recallai_streaming": {
                    "mode": "prioritize_low_latency",
                    "language_code": "en"
                }
            },
            "diarization": {
                "use_separate_streams_when_available": true
            }
        },
        "realtime_endpoints": [
            {
                "type": "webhook",
                "url": "YOUR_WEBHOOK_URL",
                "events": [
                    "transcript.data"
                ]
            }
        ]
    }
}
We’ve added recallai_streaming as a transcription provider, and specified that we want the transcript sent in chunks via webhook in the realtime_endpoints field. This will allow your application to read and process the conversation as words are being spoken.
Other options for building a telehealth scribe
Building your own bots in house
We’ve been discussing using Recall.ai’s hosted Meeting Bot API, but building your own meeting bots is always an option. In case this is something you’re interested in exploring, we’ve actually built open source meeting bot implementations and blogged about them for Zoom, Google Meet, and Microsoft Teams.
One word of caution: building and maintaining meeting bots is surprisingly difficult, and you will likely find yourself spending a significant amount of your time fixing these bots instead of working on other areas of your product. If your top priority is simple, reliable ingest, then I’d suggest using an API and spending the engineering time on the application built on top of it.
Alternative recording form factors
A visible meeting bot also isn't the only way to capture a telehealth visit.
Another increasingly common option is to record via a desktop application running on the clinician's computer. That avoids adding another participant to the call and can work with meeting platforms that a bot doesn't support.
Building that recording stack yourself has its own set of problems. We've written about building a botless meeting recorder from scratch if you're curious about what goes into it.
Recall.ai also has a Desktop Recording SDK that handles the recording side. It produces recordings and transcripts that can feed into essentially the same processing flow we built in Step 2.
Conclusion
There is some undeniable complexity in setting up a meeting notetaker, but I was able to defer the vast majority of it to Recall.ai when building this application. The Recall.ai API handles the automatic scheduling, recording, and transcription of all meetings, which freed me up to spend more time on the actual AI analysis. If you already have your own AI scribe, clinical note-generation pipeline, or EHR workflow, you can use the same Recall.ai APIs for the recording and transcription layer and keep the rest of your existing application.
If you want to try this sample out yourself or build on top of it, you can find the complete source code on GitHub. You can also sign up for a free Recall.ai account to test out the API yourself. Before using anything in production, make sure you’ve done the additional work required for your own privacy and compliance requirements.
FAQ
Is Recall.ai HIPAA compliant?
Yes. Recall.ai is SOC 2, ISO 27001, GDPR, CCPA, and HIPAA compliant and can sign a BAA.
What if a patient is uncomfortable with the bot? Can I remove or pause it?
Yes. You can remove a bot from the meeting using the Remove Bot From Call endpoint, or temporarily pause the recording during sensitive moments in the conversation via the Pause Recording endpoint. You can build this functionality so that both the patient and the clinician have the option to pause or remove the bot at will.
What if I only want a transcript and don’t want to store audio or video?
You can configure the bot to only produce the data you need. The bot records an MP4 by default, so you’ll need to set video_mixed_mp4 to null in your Create Bot request. You’ll need to use real-time transcription to transcribe the conversation, since in this mode Recall.ai will not save the necessary data to transcribe the conversation after it has ended.
How long does Recall.ai retain recordings and other meeting data?
Retention duration is completely configurable. You can set a custom retention duration in your Create Bot request, or delete a bot’s recording at any point after it has finished recording via the Delete Bot Media endpoint. Recall.ai also offers a zero data retention mode to ensure no data is retained at any point. When zero data retention is configured, the only way to access meeting data will be to stream it in real time while the meeting is occurring. This also makes debugging any issues that may have occurred with the recording more difficult since no data will be available.
Can I let patients know when the scribe is actively recording?
Yes. There are a variety of ways to let patients know when the scribe is recording. You can change the bot’s visual appearance, have it send a chat message, and even have it play an audible sound to let participants know that the call is being recorded.
Glossary
BAA (Business Associate Agreement) - A contract between a healthcare organization and a vendor that handles protected health information on its behalf.
BIRP (Behavior, Intervention, Response, and Plan) - A clinical note format commonly used in behavioral health. It organizes the note around the patient’s behavior, the clinician’s intervention, the patient’s response, and the plan going forward.
DAP (Data, Assessment, and Plan) - A clinical note format that groups information from the visit into the observed or reported data, the clinician’s assessment, and the next steps in the treatment plan.
FHIR (Fast Healthcare Interoperability Resources) - A healthcare data exchange standard published by HL7. It defines structured resources and APIs for exchanging information such as patient, encounter, and clinical data between healthcare systems.
HIPAA (Health Insurance Portability and Accountability Act) - A U.S. law that includes requirements around how certain healthcare information is handled and protected.
PHI (Protected Health Information) - Health information that can be linked to an identifiable individual.
SMART on FHIR - A framework for applications that connect to FHIR-based healthcare systems. It adds standards for authorization, authentication, and application launch so an app can securely access EHR data and receive context such as the current patient or encounter.
SOAP (Subjective, Objective, Assessment, and Plan) - A common clinical note format that separates what the patient reports, objective findings, the clinician’s assessment, and the treatment plan.


