


.avif)


Tl;dr: I’ll explain how to build an AI interview assistant that can join online meetings, record and transcribe them, and take notes on behalf of the interviewer. If you want to jump straight to the source code, you can find it in this GitHub repository.
A recruiter running six interviews a day generates several hours of conversation, and almost none of it is written down. Any notes consist of whatever the interviewer managed to type while also trying to hold a conversation, sometimes written up hours later from memory. That's the problem an interview notetaker solves, and it's why nearly every product in the recruiting space now ships one.
BrightHire built its whole product around interview intelligence, and ATS platforms like Greenhouse have added AI interview notes as a key component of their offering. If you’re building in this space, this is quickly becoming table stakes rather than a differentiator.
In this article, I built my own AI interview assistant using the Recall.ai Meeting Bot API, and I’ll show you exactly how I did it.
What is an interview notetaker?
An interview notetaker is generally described as an automated process that records online meetings, specifically for the purpose of transcribing and generating notes from the meeting. This frees up recruiters and interviewers to remain focused on the conversation, rather than trying to document everything while the interview is ongoing. Typically, the interview notetaker will at least produce a recording, transcript, and detailed notes after the meeting has concluded.
The interview use case has a few requirements that a more general-purpose notetaker doesn’t have. Instead of a generic meeting summary, interviewers often want one that’s informed by the job description and the candidate’s qualifications. They may also want an interview scorecard to be automatically filled out for them.
A preview of what we’re building
Here’s what the finished interview assistant looks like in action:
Let an agent do the setup
Recall.ai ships an MCP server that helped me cut the annoying parts of this build down considerably. It is able to read the docs, inspect and debug bots, and even create and update webhook endpoints if given write permissions. I’d highly recommend installing the MCP and then asking your coding agent to use it when setting up the sample repo.
Interview notetaker architecture
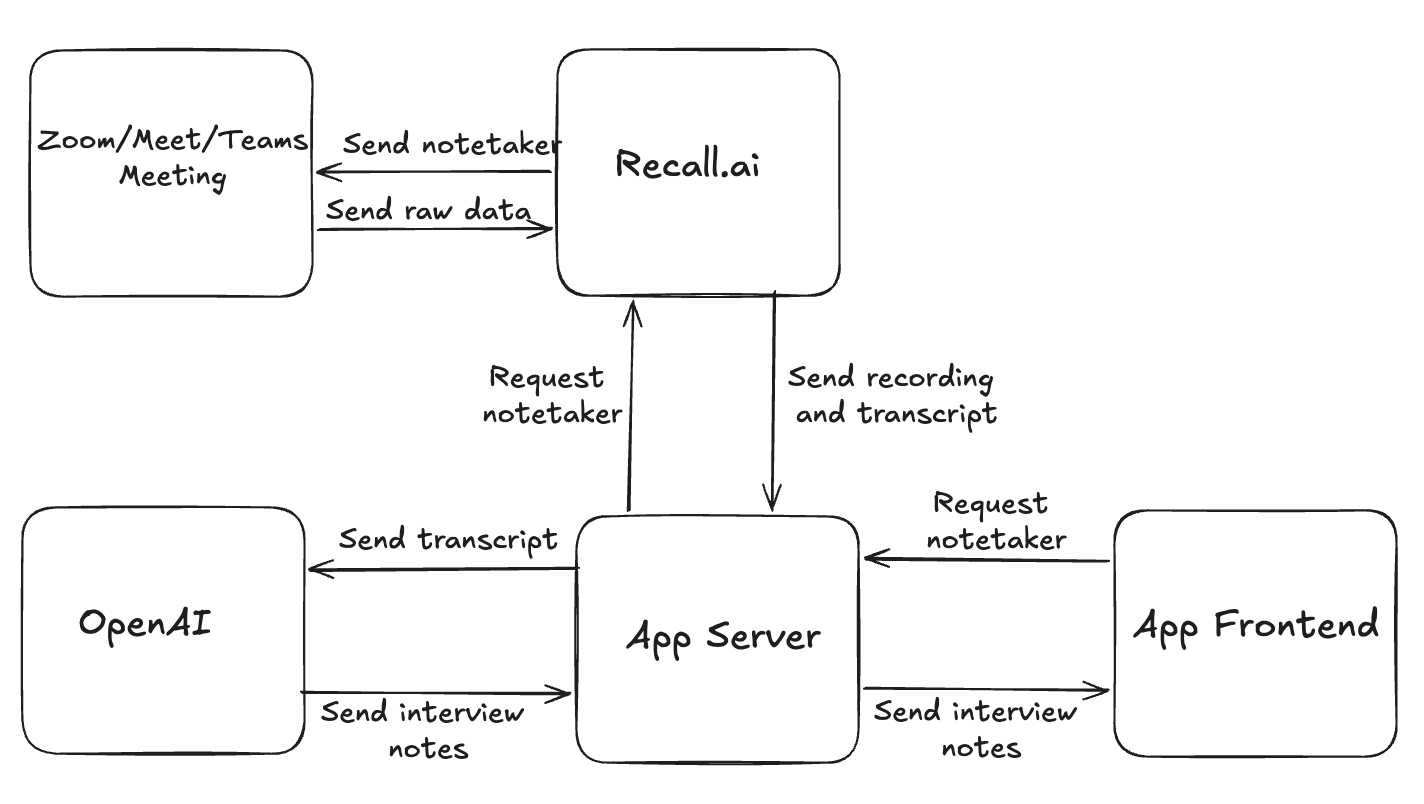 The frontend of this sample application is a Next.js app, and the backend uses Next.js API routes to handle bot creation and process webhooks.
For the meeting bot and transcription piece, I used the Recall.ai Meeting Bot API, which handles joining the call and producing a transcript with speaker labels. To turn those transcripts into structured notes I used the AI SDK with OpenAI’s GPT models, but it’s easy to swap to a different provider if you prefer.
The sample application also includes a complete frontend, but I won't be covering it here since it isn't essential to understanding how the notetaker works. I’ll be focusing on the components of the app that are required to record, transcribe, and summarize meetings. If you’re looking through the repository and want to get a better understanding of these concepts, you should focus your attention on the src/lib/recall.ts, src/lib/webhooks.ts , and src/lib/notes.ts files.
Step 1: Sending a bot to record the meeting
To capture any information from the meeting, we need to send a bot to record it. All that is required to do this is the meeting URL. Now I can create a bot using a single API call to the Create Bot endpoint.
//@title src/lib/recall.ts
// Request body of Create Bot request
// https://docs.recall.ai/reference/bot_create
{
  "meeting_url": "YOUR_MEETING_URL",
  "bot_name": "Interview Notetaker",
  "metadata": { "interview_id": "..." },
  "recording_config": {
    "transcript": {
      "provider": {
        "recallai_streaming": {
          "mode": "prioritize_accuracy",
          "language_code": "auto"
        }
      }
    }
  },
  "automatic_video_output": {
        "in_call_recording": {
           "kind": "jpeg",
           "b64_data": "/9j/4AAQSk..."
        }
      },
  "chat": {
    "on_bot_join": {
      "send_to": "everyone",
      "message": "This call may be recorded for interview notes."
    }
  }
}
This API call is highly configurable. I can use it to change the bot's name, appearance, and behavior. Transcription is requested in this API call as well, under recording_config.transcript. In this sample app I'm using Recall's own real-time transcription service in prioritize_accuracy mode, which is the higher quality of the two available modes, and setting language_code to auto so I don't need to know the interview's language in advance.
This app waits until the call ends and then downloads the finished transcript. If you want transcript events while the interview is still ongoing, you can also subscribe to real-time transcription webhooks. In prioritize_accuracy mode those events typically arrive 3–10 minutes after someone speaks, and prioritize_low_latency is usually 1–3 seconds. Live interviewer features need the low-latency path.
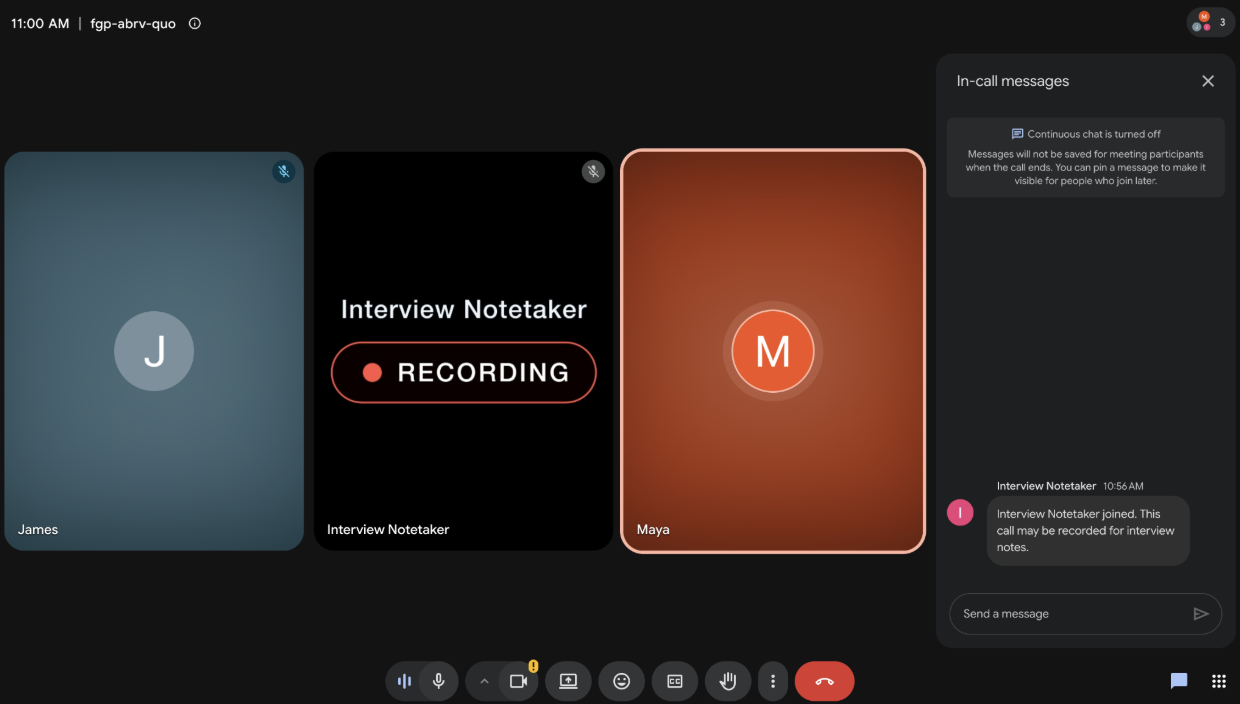
A few of the remaining configurations are optional but worth adding for this use case. automatic_video_output sets the bot's avatar to a custom image. chat posts a message to the meeting chat when the bot joins. And passing recording_config: null makes the bot join without recording at all. This can be useful if the interviewer wants to get the candidate’s consent before the recording starts. To start the recording once consent is given, you can call the Start Recording endpoint.
Scheduling your notetaker for upcoming interviews
The approach mentioned above instantly deploys a bot to a meeting. Interviews are almost always set up far in advance of when they happen, so what you usually want is to schedule the bot ahead of time. The sample application accomplishes this by setting the join_at field of the Create Bot request:
//@title src/lib/recall.ts
// Request body of Create Bot request
// https://docs.recall.ai/reference/bot_create

{
 "meeting_url": "YOUR_MEETING_URL",
  "join_at": "2026-08-14T17:00:00Z", // ISO 8601
  "recording_config": { ... },
}
While this approach does work for a sample app, it is not how we would typically recommend you implement bot scheduling in production. Recall.ai has a free calendar integration that allows you to connect directly to the calendars of your users and automate bot scheduling. This is the correct and preferred option for the vast majority of Recall.ai customers. I’ll discuss the calendar integration more later in this article.
Step 2: Extracting data from the meeting
Subscribing to webhooks
After the Create Bot request, the bot is deployed to the meeting and can start recording. However, without some additional setup the application has no idea what's happening inside the meeting. Webhooks are how the bot communicates its status, first as it joins and starts recording, then when the recording and transcript are ready to download. If you choose to use real-time transcription, you can also receive the transcript via webhook.
Before I can receive any webhooks, I need to register an endpoint in the Recall.ai dashboard. For local development I'm using Ngrok with a reserved domain, which keeps the webhook URL stable across restarts instead of forcing me to re-register every time I restart the tunnel.
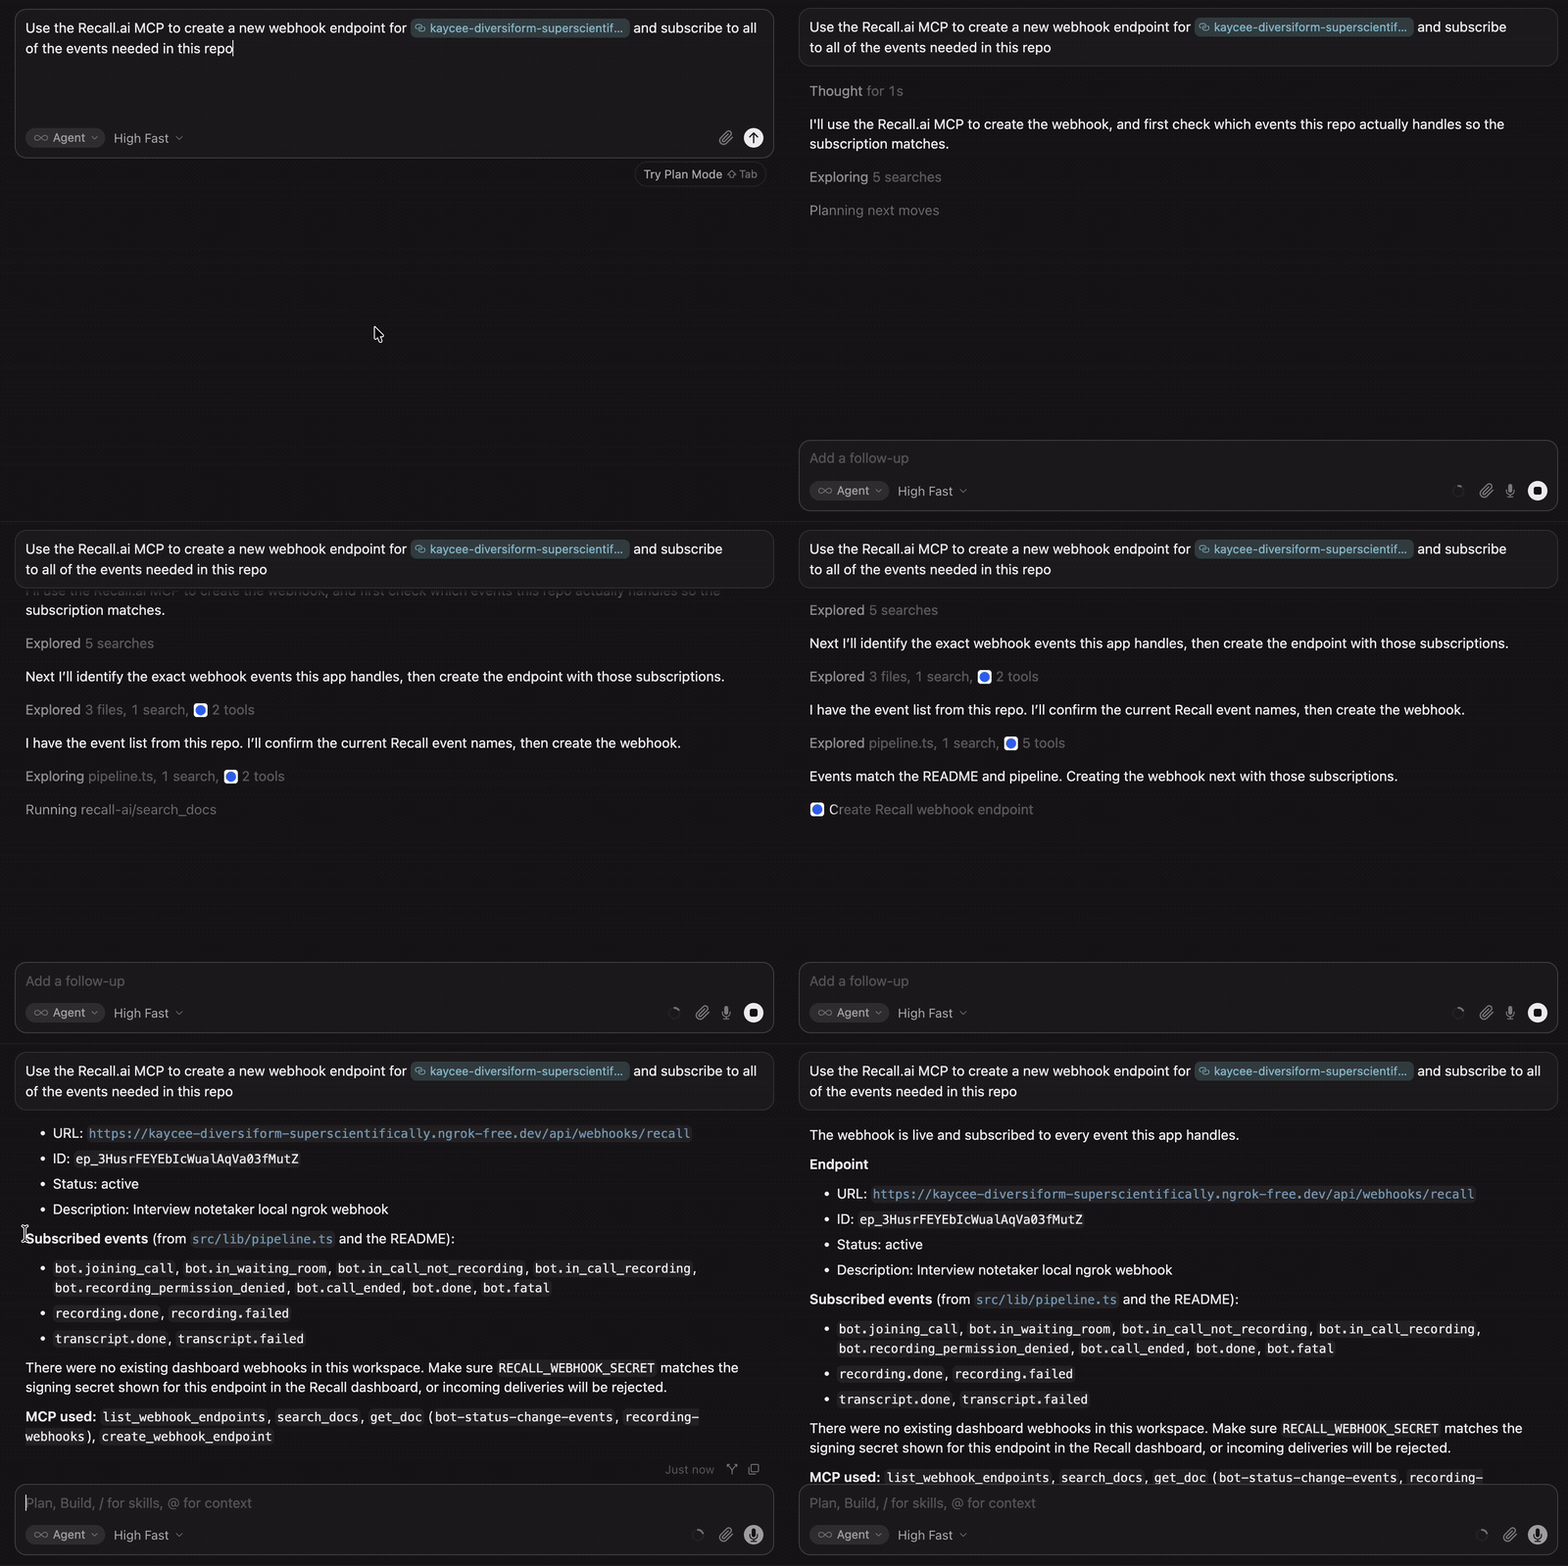
If you installed the MCP server earlier and gave it write permissions, you can have it set up your webhook listener automatically. Ask your coding agent to create the endpoint and subscribe to the required webhook events, and it will do it for you.
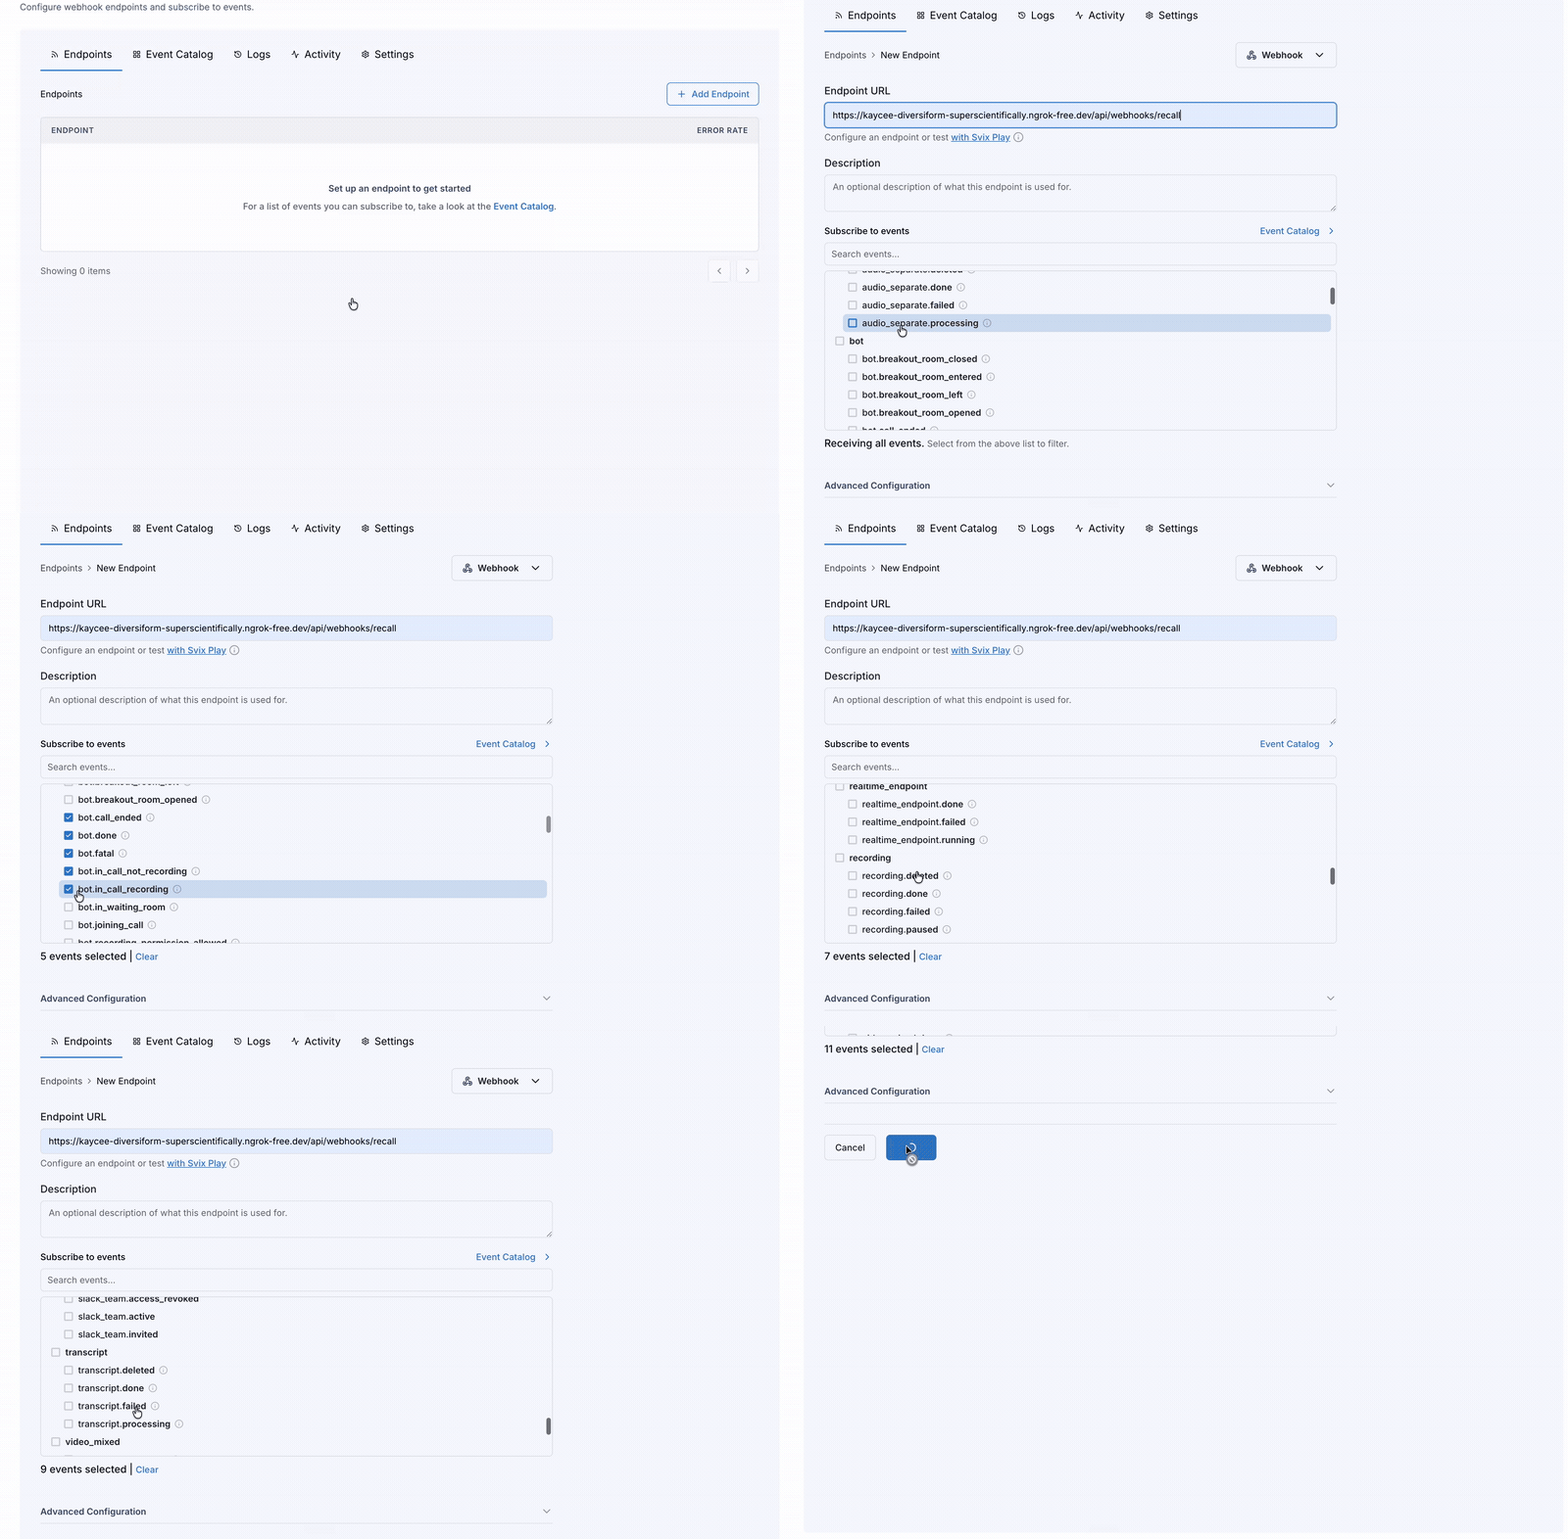
To set this up, go to the Webhooks tab in the dashboard sidebar and click Add Endpoint. Enter your webhook URL in the Endpoint URL field, then scroll down to Subscribe to Events. This app listens for three groups:
- The
bot.*events (joining_call,in_waiting_room,in_call_not_recording,in_call_recording,call_ended,done,fatal), which drive the status display so the interviewer can see whether the notetaker is waiting to be admitted or actively recording recording.doneandrecording.failed, which report when the recording is finished / ready to download and whether there were any issues generating the recording.transcript.done, which fires when transcription has finished and is ready to download. This is the event that kicks off note generation.
Fetching transcript data
The transcript.done webhook payload contains the id of the finished transcript, as well as the bot that produced the transcript. To get the transcript itself, call the Retrieve Transcript endpoint with that id. The response has a download_url in its data field, which I use to download the raw meeting transcript. The URL expires after a while, so the app fetches a fresh one when it needs it instead of storing it.
Here's an excerpt of what comes back:
[
  {
    "participant": {
      "id": 1,
      "name": "Aydin",
      ...
    },
    "words": [
      {
        "text": "Hello",
        "start_timestamp": {
          "relative": 0,
          "absolute": "2026-08-10T23:59:05.927163Z"
        },
        "end_timestamp": {
          "relative": 2.3542128,
          "absolute": "2026-08-10T23:59:08.281376Z"
        }
      }
    ]
  },
...
]
The transcript arrives as a flat array of utterances, each already attributed to a participant, so there's no need to reassemble speech from an undifferentiated stream of words. Within each utterance, every individual word carries its own start and end timestamp.
Typically, that's more precision than you need for display. Rendering the transcript in the UI is a matter of joining each utterance's words into a sentence and taking the first word's timestamp as the line's start time. I’d also recommend reformatting the transcript in this way before sending it to an LLM to not overwhelm it with context that it doesn’t need. Here’s how it’s done in the sample app:
//@title src/lib/utils.ts
export function toTranscript(raw) {
  return raw
    .map((entry) => {
      const words = entry.words ?? [];
      return {
        speaker: entry.participant?.name || "Unknown",
        startSeconds: words[0]?.start_timestamp?.relative ?? null,
        text: words.map((w) => w.text?.trim()).filter(Boolean).join(" "),
      };
    })
    .filter((utterance) => utterance.text);
}

export function readableTranscript(transcript) {
  return transcript
    .map((u) =>
      u.startSeconds === null
        ? `${u.speaker}: ${u.text}`
        : `${u.speaker}: [${formatTimestamp(u.startSeconds)}] ${u.text}`,
    )
    .join("\n");
}
Step 3: Generating interview notes
Now that I have a transcript with speaker names, I need to use it to produce interview notes. For this, I used the AI SDK since it makes it easy to experiment with different LLMs. When testing this repo yourself, you should be able to swap in your preferred model provider with ease.
Getting structured outputs with the AI SDK
The AI SDK has some really nice features for getting consistent, structured output out of language models. Instead of hoping the LLM returns properly formatted JSON, you define a schema, and the SDK validates the response against it and throws if the model returns something else:
//@title src/lib/notes.ts
const noteItemSchema = z.object({
  text: z.string(),
  timestamp_seconds: z
    .number()
    .nullable()
    .describe(
      "Seconds into the recording where this claim is supported. Use the [mm:ss] markers from the transcript.",
    ),
  speaker: z
    .string()
    .nullable()
    .describe("Speaker name if known, otherwise null"),
});

const notesSchema = z.object({
  candidate_name: z
    .string()
    .nullable()
    .describe("Candidate name from the transcript, or null if unknown"),
  role: z
    .string()
    .nullable()
    .describe("Role being interviewed for, or null if not mentioned"),
  overall_assessment: z
    .string()
    .describe("2-4 sentence hiring summary for the interviewer"),
  strengths: z
    .array(noteItemSchema)
    .describe("3-6 concise strengths with timestamps when possible"),
  concerns: z
    .array(noteItemSchema)
    .describe("0-4 concise concerns or gaps with timestamps when possible"),
  qa: z
    .array(
      z.object({
        question: z
          .string()
          .describe(
            "The interviewer's question, paraphrased tightly (e.g. "How large is the team you manage?")",
          ),
        bullets: z
          .array(noteItemSchema)
          .describe(
            "Short bullets capturing the candidate's answer, one idea per bullet, not full sentences from the transcript",
          ),
      }),
    )
    .describe(
      "Walk the interview in order: each major question the interviewer asked, with bulleted takeaways from the answer",
    ),
  follow_ups: z
    .array(noteItemSchema)
    .describe("Suggested follow-ups for a later round"),
});
The output produced here is much more reliable than free-form text output, and the .describe() calls guide the model, telling it exactly what you want to see in every field. This gives us the flexibility to prompt the model creatively while still being able to expect structured output that can be actioned on programmatically.
Notice that noteItemSchema is reused for almost everything: strengths, concerns, the bullets under each question, follow-ups, and later the scorecard evidence. All of them carry a timestamp_seconds and speaker field. This matters because it ensures that every claim the model produces is citable back to a specific moment and person in the recording.
Once we have the schemas defined, we can prompt the model. Here’s how it’s done in the repo:
//@title src/lib/notes.ts
import { generateText, Output } from "ai";
import { openai } from "@ai-sdk/openai"; // reads OPENAI_API_KEY

const { output: notes } = await generateText({
  model: openai("gpt-5.5"),
  instructions: `You are an expert technical interviewer writing structured interview notes for a hiring team.

Use ONLY evidence from the transcript. Every factual claim about the candidate should include timestamp_seconds from the [mm:ss] marker of the line that supports it.

Resume and job description are background only. Never invent interview answers, strengths, concerns, or evidence from them. An empty or thin transcript means empty notes, not a resume summary.`,
  prompt: `${jobDescription ? `## Job description\n${jobDescription}\n\n` : ""}${resume ? `## Candidate resume\n${resume}\n\n` : ""}## Transcript
${readableTranscript(transcript)}`,
  output: Output.object({
    name: "InterviewNotes",
    schema: notesSchema,
  }),
});
Using responses to evaluate candidates
Structured notes are useful, but many hiring teams also have a scorecard they fill in after every interview. The app takes that as a second input: you upload your existing scorecard as a text file or pdf, and a separate LLM call parses it into discrete criteria and fills each one in from the transcript.
//@title src/lib/notes.ts
const scorecardSchema = z.object({
  criteria: z.array(
    z.object({
      name: z.string(),
      score: z.number().nullable(),
      max_score: z.number(),
      rationale: z.string(),
      evidence: z.array(noteItemSchema),
    }),
  ),
  recommendation: z.string(),
  summary: z.string(),
});
The evidence field reuses the same noteItemSchema from earlier, so every criterion comes with quotes and timestamps attached. Requiring evidence should cut down on invention, since a model that has to produce a supporting quote is less likely to make a false claim.
score is nullable for a related reason. Interviews run out of time and questions get skipped, and a model with no null option will confidently grade a competency nobody asked about. That's the worst thing this application can do, because a fabricated score looks exactly like a real one. When the evidence isn't there, the prompt asks for a null score, empty evidence, and a recommendation to defer.
Step 4: Tracking and displaying interview notes
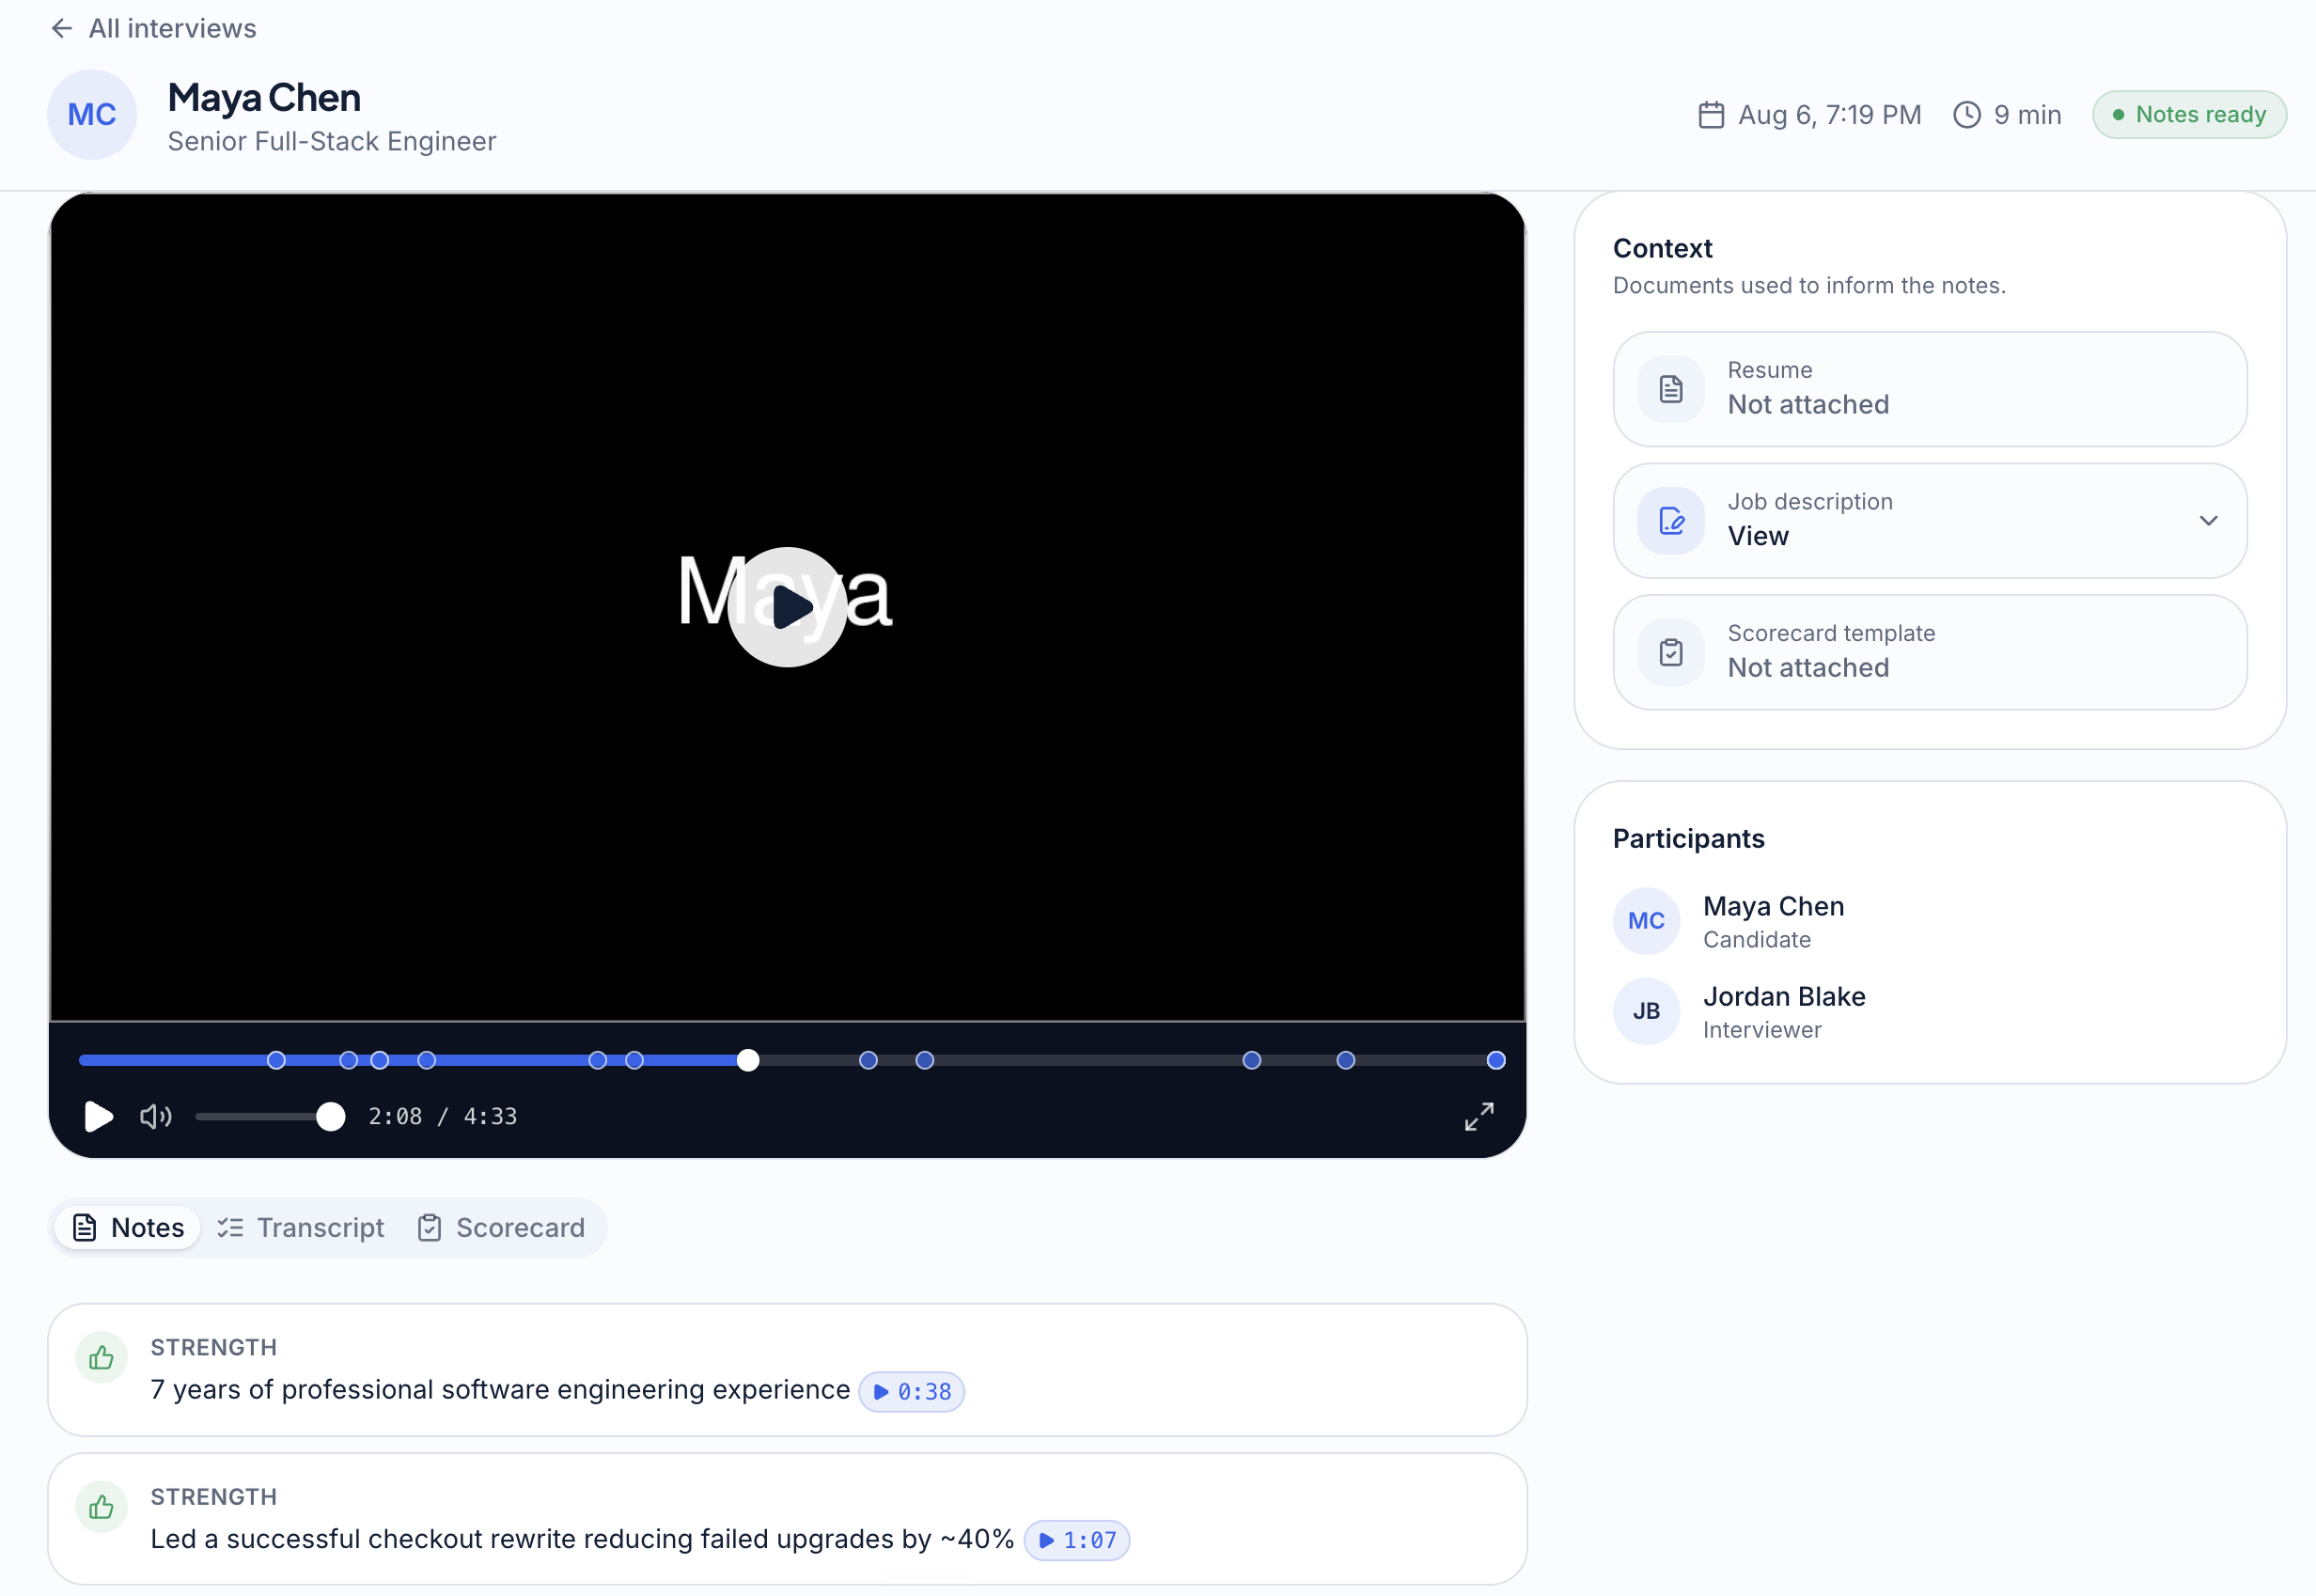
The interview page shows the notes, the scorecard, the full transcript, and the recording together. Because every note item carries a timestamp_seconds, each one renders as a button that seeks the video. This helps ensure that any analysis generated by AI can easily be cited and checked against the transcript and recording.
Extending the capability of the interview notetaker
Build integrations with popular ATS platforms
If your product isn't itself an applicant tracking system, then an ATS integration is likely the first thing your customers will ask for. Without integrations into the customer’s existing ATS, they’ll need to resort to copying and pasting your insights manually, which diminishes the overall product experience. Most ATS platforms expose an API for pushing structured feedback onto an application record, so you’ll be able to make this process seamless if you desire.
Automatically schedule the interview notetaker for all upcoming interviews
While asking a user to copy and paste a meeting URL into your web application is fine for a demo, it’s untenable to require this for every meeting the user wants to record. In reality, you’ll want to connect to your customers’ calendars directly so that you can automatically send bots to all of their relevant meetings.
Recall.ai has a built-in calendar integration to handle this for Google Calendar and Microsoft Outlook. In short, it works like this: Your user completes an OAuth flow, which gives your integration read access to all of their calendar events, including the meeting URLs. This enables you to schedule bots to join their meetings without any additional action needed on their end.
Analyzing nonverbal cues
Recall gives you the raw video and audio from the meeting, not just the transcript. This opens up analysis that text alone can't support. For example, you can analyze expressions and tone of voice from the interviewer and candidate and extract signals such as emotion that can’t be gleaned as easily by the transcript. Note that AI analysis of emotion can be prohibited in certain jurisdictions, so ensure that all parties are informed and that you are in compliance with the law if you pursue this feature.
Real time use cases
All of the processing and analysis I’ve mentioned so far happens after the call has ended. Doing it live unlocks a completely different set of product features. To name just a few: surfacing suggested follow-up questions, flagging competencies that haven't been covered with ten minutes left, or catching a claim on the resume that hasn't been probed. You can also simply use this data to generate interview notes in real time so that the interviewer can reference them while the meeting is still ongoing.
Luckily, it’s straightforward to enable real-time transcription via the API. In the Create Bot request, simply swap the transcription provider to prioritize_low_latency mode and register an endpoint where you want the real-time transcript to be sent:
recording_config: {
  transcript: {
    provider: {
      recallai_streaming: {
        mode: "prioritize_low_latency",
        language_code: "en",
      },
    },
    diarization: { use_separate_streams_when_available: true },
  },
  realtime_endpoints: [
    {
      type: "webhook",
      url: "YOUR_WEBHOOK_URL",
      events: ["transcript.data"],
    },
  ],
}
The prioritize_low_latency mode of Recall transcription delivers finalized utterances typically 1-3 seconds after they're spoken, which is fast enough to put a suggestion in front of an interviewer while it's still relevant. When this mode is enabled and you’ve registered an endpoint, you’ll receive transcript.data events sent continuously to your endpoint. The transcript is still saved as usual and you can retrieve the entire thing after the end of the call as well.
Other options for building an interview notetaker
Building your own bots
While this sample app used the Recall.ai Meeting Bot API to record meetings, it is possible to build this yourself without using an API. We’ve gone through the process of building a meeting bot from scratch on Zoom, Google Meet, and Microsoft Teams, and there are a shocking number of issues and pitfalls that accompany this process.
Even companies with their own in-house notetakers eventually decide to offload this extra burden to an API. BrightHire is the clearest example in this exact space. They built their own recording infrastructure for Zoom, Google Meet, and Microsoft Teams, spending 2-3 months per platform, and ended up with two full-time senior developers and a DevOps engineer doing nothing but keeping it running. As Will Decker, their VP of Engineering, put it:
"Offloading our recorder to Recall has been a huge sigh of relief. It's been extremely helpful for our team and for me personally. It's freed up time, made us more productive, and helped us provide more value for our customers."
Alternative recording form factors
I’d be remiss if I didn’t mention some other options for building a notetaker that don’t require the use of a bot. For example, an increasingly popular option has been to use a desktop application to record the meeting. This option can be seen as less intrusive since it doesn’t cause an additional participant to show up in the meeting.
Trying to record a meeting without bots can be just as difficult as building a bot from scratch, so I’d highly recommend using an API here as well. Recall.ai has a Desktop Recording SDK that handles this exact use case.
Conclusion
Considering that this project builds a notetaker for online meetings, it’s interesting that almost none of my time on this build went into recording or transcription. That part was one API call and a webhook. The part that took the most time was working on the AI-generated notes and building the user interface. Using the Recall.ai API allowed me to spend more of my time on the features that really matter for this type of application.
If you want to try out the interview notetaker I built or extend it for your own project, the complete source code is available on GitHub. You can sign up for a free Recall.ai account to test the notetaker out on your next interview!
FAQ
Does the bot work on Zoom, Google Meet, and Microsoft Teams?
Yes. The same Create Bot request works across all the major meeting platforms. Simply include the correct meeting URL, and the Recall.ai API will handle the rest.
Do the interviewers or candidates need to install anything?
No. The bot joins as a regular meeting participant, so neither the interviewer nor the candidate needs to install any software in order for the bot to record the meeting. This is one of the practical differences between the Meeting Bot API and the Desktop Recording SDK, which records from the interviewer's own machine and requires them to install a desktop app.
How accurate is the speaker attribution?
By default, this app uses a setting called perfect diarization. When this is enabled, the separate audio stream from each participant is transcribed separately. This ensures that speech is always attributed to the correct person, even if participants are talking over each other.
What happens if the interview runs long or gets rescheduled?
Bots will stay in a call until the call ends, or they are removed from the call. Bots can be removed either manually by the host or via the Remove Bot From Call API endpoint. Rescheduled interviews can be handled via the Update Scheduled Bot API endpoint, or by using the Recall.ai calendar integration.
How should I handle back-to-back interviews?
In some cases, interviewers may speak to multiple candidates back-to-back while remaining in the same meeting. To handle this, you can either generate multiple recordings using the same bot, or send a new bot and remove the old one each time a new candidate joins the meeting. This will allow you to produce separate recordings, transcripts, and notes for each of the candidates.


