


Tl;dr: This article explains how the Recall Calendar v1 integration works, and how to add it to your own app. If you want a working sample of the integration, you can find the source code in the calendar sample GitHub repository. If you’re looking for a calendar integration that supports custom scheduling logic check out my article about the Recall Calendar v2 integration.
If you’re building a product that records online meetings, your users’ calendars are a natural place to determine which meetings should be recorded. Rather than asking users to manually schedule a notetaker, you can have them connect their calendar directly to your application and automatically send bots to the meetings they want recorded.
But trying to build your own calendar integration is a challenging engineering problem. You need to keep up with meetings being created, moved, and cancelled, decide which events should actually be recorded, and avoid sending duplicate bots when multiple users are invited to the same call.
Recall.ai’s free calendar integration handles these complexities automatically. In this article, I’ll explain how the Calendar v1 integration works, and how you can add it to your own application.
What is the Recall.ai calendar v1 API?
Recall.ai's Calendar API lets your customers connect their Google Calendar or Microsoft Outlook accounts to your application so that meeting bots can be scheduled automatically. Recall currently supports two approaches to calendar integrations: Calendar v1 and Calendar v2.
We’ll primarily be discussing Calendar v1 in this article. Calendar v2 is the recommended integration for most use cases, but it’s worth learning about both before making a final decision.
Calendar v1 is a simple, managed integration. To use it, your application defines a set of recording preferences for each user, and Recall will monitor their connected calendar and automatically schedule or remove bots as their meetings change.
Calendar v2 gives your application more direct control. Instead of giving Recall a set of recording preferences, your application receives calendar updates and decides for itself which individual meetings should get a bot and how that bot should be configured.
Deciding which calendar version is right for your application
| Feaures | Calendar v1 | Calendar v2 |
|---|---|---|
| Supported Platforms | Google Calendar and Microsoft Outlook | Google Calendar and Microsoft Outlook |
| Scheduling Logic | Recall-managed based on preset recording preferences | Application-managed, on a per-meeting basis |
| Webhooks | No, scheduling is handled by Recall so webhooks are not necessary | Yes, scheduling is handled by your application, webhooks are required to react to calendar and event updates |
| Bot Configuration | All bots share the same workspace-level configuration. No configuration settings for individual bots | Bots can be uniquely configured on a per-meeting level |
| Bot Deduplication | Automatic, with platform-specific constraints | Customizable, controlled using a deduplication key |
The two calendar integration versions use completely different implementation paths, and there is not an easy way to migrate between them.
Let an agent set up your calendar integration
Recall.ai ships an MCP server that can help speed up your integration time considerably. It is able to read the docs, inspect and debug resources, and even create and update webhook endpoints if given write permissions. I’d highly recommend installing the MCP and then asking your coding agent to use it when setting up your own repo or the calendar sample repo.
How to set up Google and Microsoft OAuth clients for Calendar v1
Recall.ai's calendar integration connects to your customer's Google Calendar or Microsoft Outlook account so that it can read their calendar event data. To make that connection, you'll need to register an OAuth client with each platform. This lets your customers grant your application access to their calendars without sharing their Google or Microsoft passwords.
I’m speaking from experience when I say that setting up an OAuth client correctly can be one of the most frustrating parts of the calendar integration. Unlike the rest of the integration, this is the one part a sample app can’t do for you. The OAuth client has to be created and configured inside your own Google Cloud or Azure account, and it’s very common to run into issues during the setup phase due to the confusing UI of these platforms. To help improve this experience, I’ve recorded video walkthroughs showing the exact steps required to set up your OAuth client correctly.
Google Calendar OAuth client setup
Outlook Calendar OAuth client setup
How to integrate the Calendar API into your application (implementation)
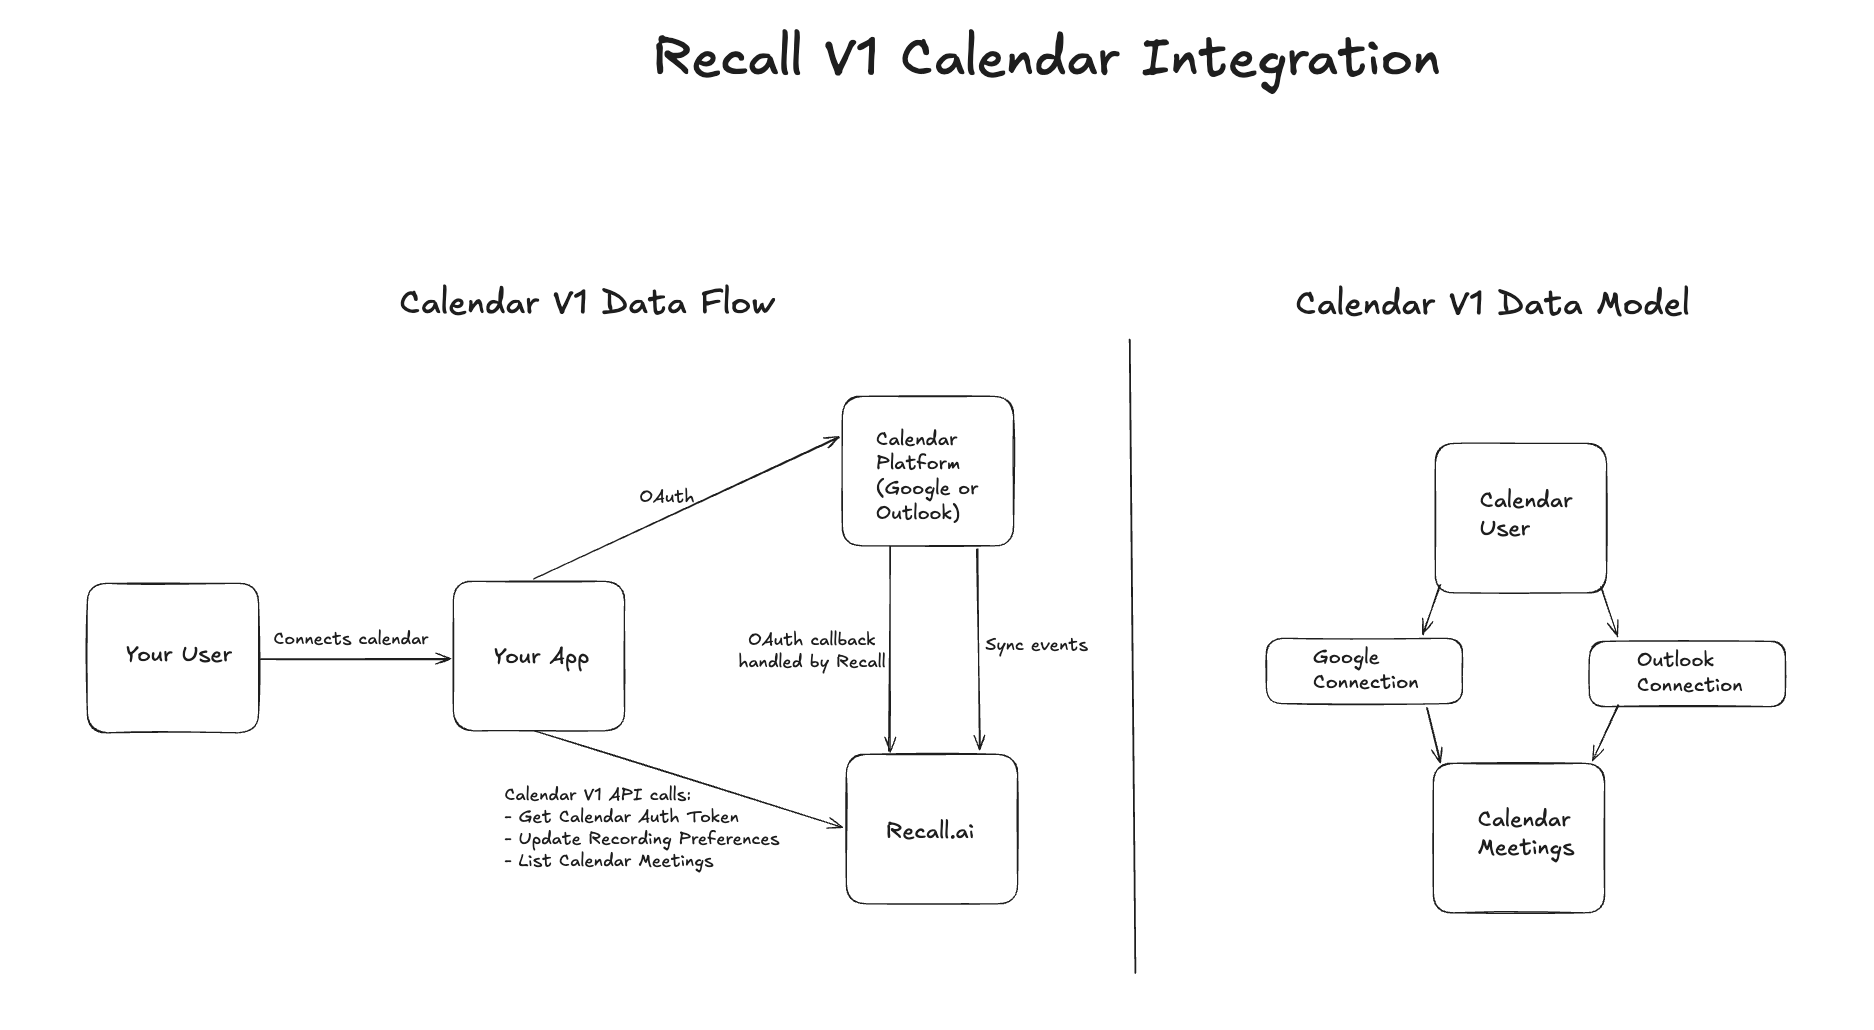
The primary object in the Calendar v1 data model is the Calendar User. This represents a single user of your application. This user can connect both their Outlook and Google calendars if they use both platforms. All events on these calendars are represented by Calendar Meeting objects.
Using the Calendar v1 auth token
Typically, requests to Recall's API are made using a Recall API key in the request header. Calendar v1 is the exception to this pattern. To call Calendar v1 API endpoints, you first make an authenticated request to the Get Calendar Auth Token endpoint. This returns a special token that's scoped to a specific Calendar User and expires in 24 hours. You then use this token for subsequent calls to the Calendar v1 endpoints. You should make this request from your backend; don’t expose your Recall API key to the client.
curl --request POST \
  --url https://YOUR_RECALL_REGION.recall.ai/api/v1/calendar/authenticate/ \
  --header 'Authorization: RECALL_API_KEY' \
  --header 'content-type: application/json' \
  --data '{ "user_id": "user_123" }'
When you call the Get Calendar Auth Token endpoint, you pass a user_id, which is an ID you define for this customer so that you can look them up in your own system. This ID is entirely controlled by you. It’s common to use an internal customer ID you've already created in your system for this purpose. You need to keep this ID consistent whenever you request a Calendar Auth Token for that customer, since it's how Recall.ai associates that customer with the correct Calendar User. If you make a request to this endpoint and pass a new user_id, a new Calendar User will automatically be created, and you’ll receive a Calendar Auth Token associated with that user in return.
Generating an authorization URL
If you followed all the steps in the videos above, then you should have a Google and/or Outlook OAuth client configured correctly for the calendar integration. The next step is to send your user through the provider’s authorization flow so that they can give your application permission to read their calendar events.
To do this, you’ll construct an authorization URL and redirect the user to it. The exact URL will be different depending on whether you’re using Google or Microsoft, but both contain the same basic information. You’ll need an OAuth client ID, the scopes your application is requesting, and the URL that the provider should redirect the user back to after they’ve finished authorizing your app. You’ll also specify response_type=code, which tells the provider to return an authorization code, and a parameter called state.
For Calendar v1, the state parameter should be a JSON-stringified object containing the Calendar Auth Token you generated above and the OAuth redirect URL. The redirect URL field will depend on whether you’re using Google (google_oauth_redirect_url) or Microsoft (ms_oauth_redirect_url). You can also include optional success_url and error_url fields, which tell Recall where to send the user after the calendar connection succeeds or fails.
src/recall-v1.ts lines 40-45
  const state = JSON.stringify({
    recall_calendar_auth_token: calendarAuthToken,
    google_oauth_redirect_url: redirectUri,
    success_url: successUrl,
    error_url: errorUrl,
  });
You can find more detailed information about how to create an authorization URL for both Outlook and Google in Recall’s documentation, and in the calendar sample application associated with this article.
src/oauth.ts lines 16-31

export function buildAuthorizeUrl(
  provider: ProviderName,
  { clientId, redirectUri, state }: { clientId: string; redirectUri: string; state: string },
): string {
  const p = PROVIDERS[provider];
  const url = new URL(p.authorizeUrl);
  url.search = new URLSearchParams({
    client_id: clientId,
    redirect_uri: redirectUri,
    response_type: "code",
    scope: p.scopes.join(" "),
    state,
    ...p.extraAuthorizeParams,
  }).toString();
  return url.toString();
}
After being redirected to this URL, your user will be brought to a consent screen hosted by Google or Microsoft, where they can give your OAuth application permission to access their calendar event data. If they approve the request, the provider generates a short-lived authorization code and redirects their browser to the redirect_uri you specified above.
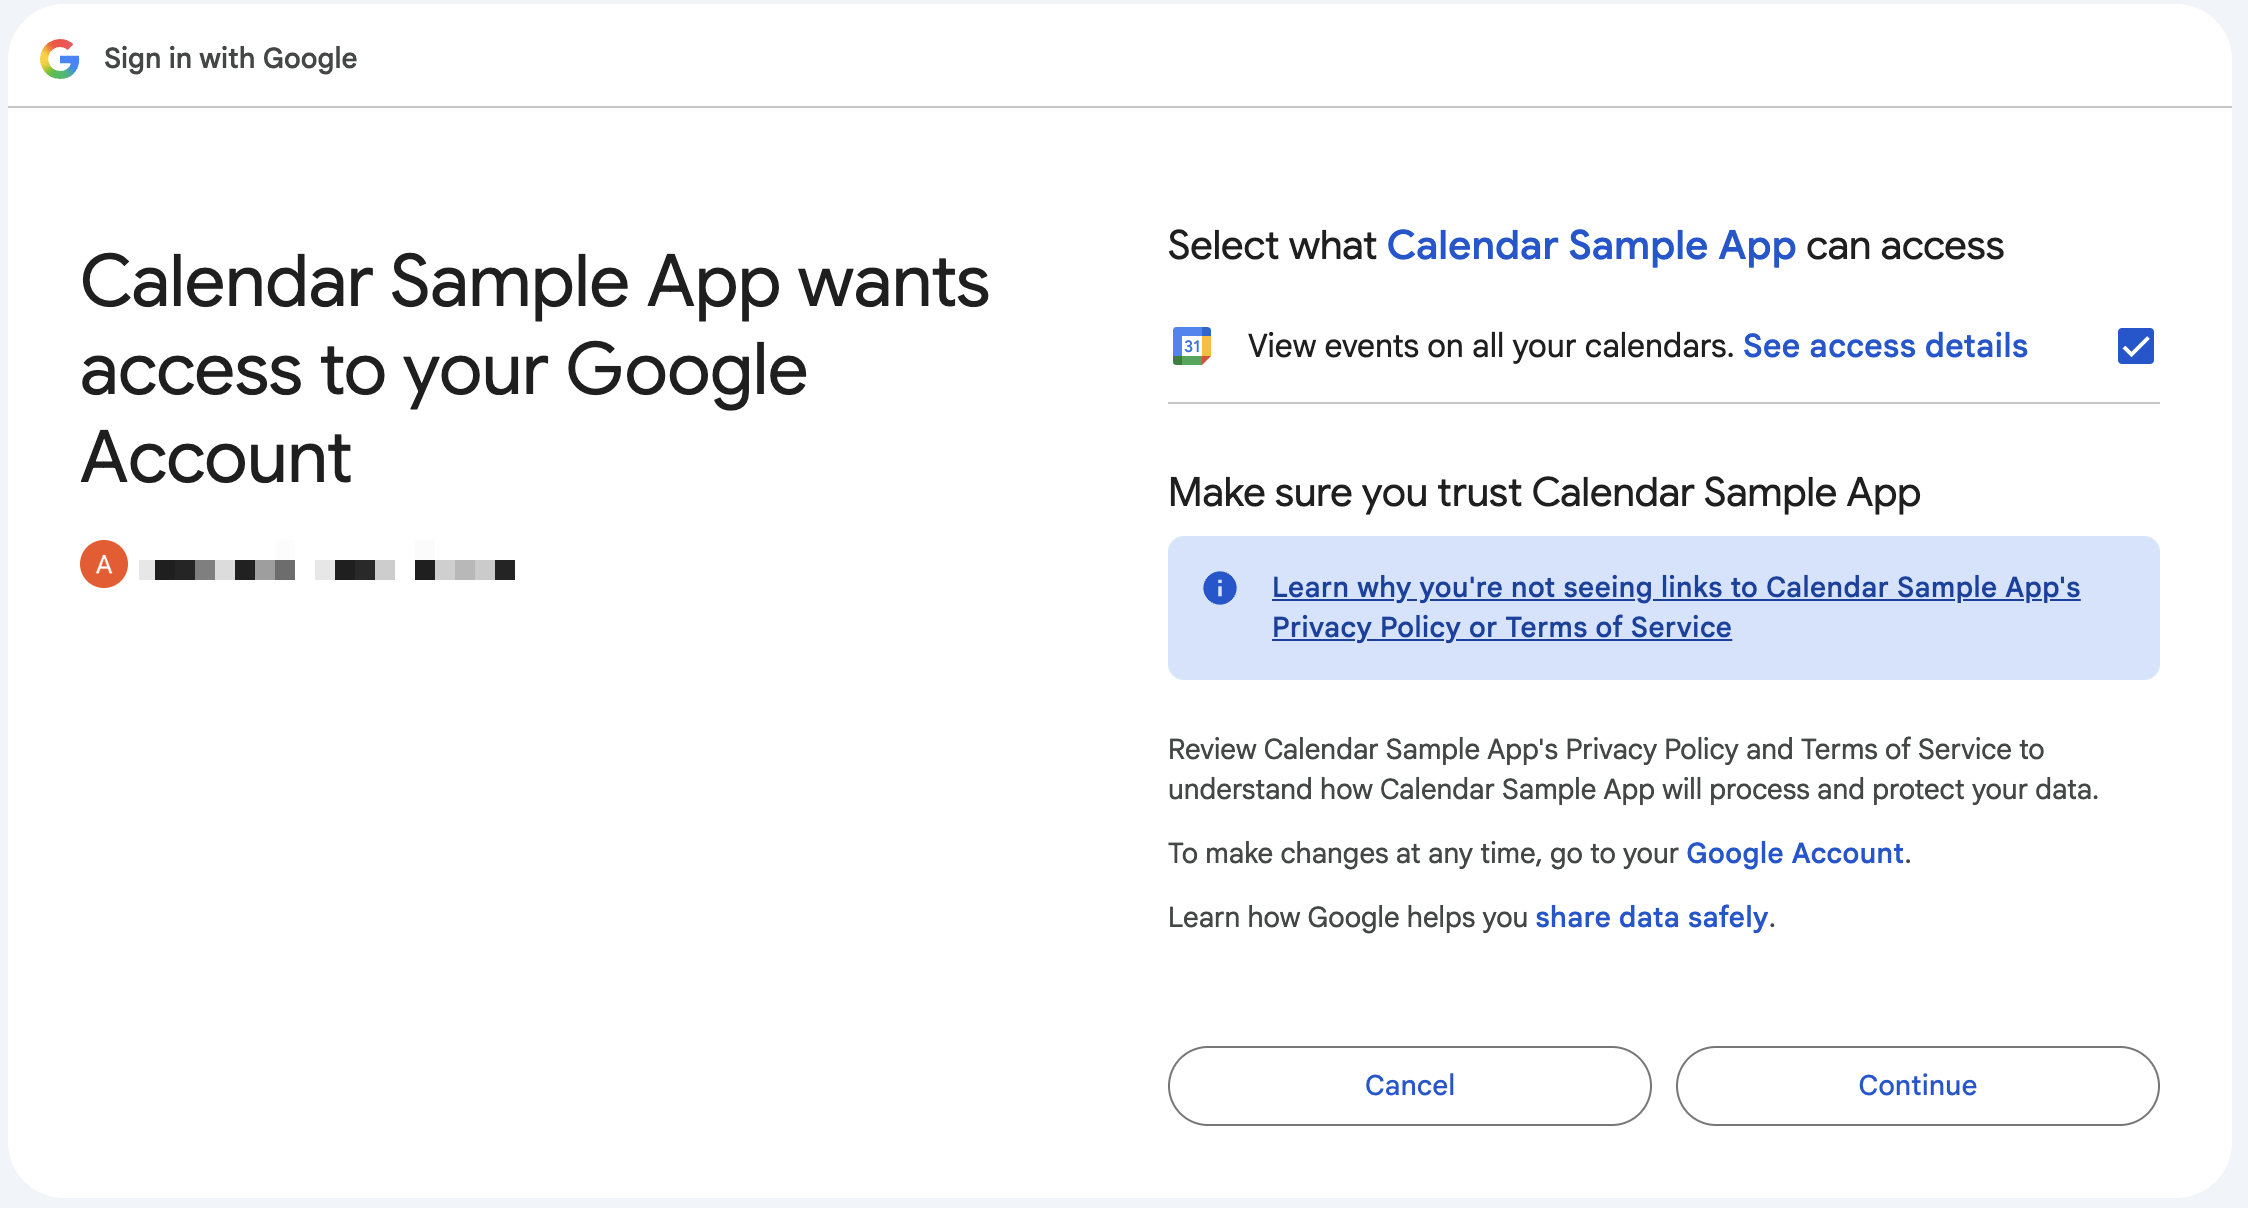
Handling the redirect
After the user successfully completes the authorization flow, Google or Microsoft redirects them back to the redirect_uri you included in the authorization URL, with the authorization code included in the request. Normally, the redirect_uri would point to your application’s backend, and your application would need to exchange this code for the OAuth credentials used to access the user’s calendar. When using Calendar V1, Recall ultimately handles the code exchange for you. During development you can point directly at Recall's callback URLs:
https://$REGION.recall.ai/api/v1/calendar/google_oauth_callback/
https://$REGION.recall.ai/api/v1/calendar/ms_oauth_callback/
In production, your application will need to receive the browser callback on its own verified domain and immediately forward the entire request to Recall’s corresponding OAuth endpoint.
Recall receives the authorization code, completes the OAuth exchange with Google or Microsoft, and obtains the credentials it needs to access the user’s calendar. From that point on, Recall can automatically read and sync the user’s calendar events, making them available through the Calendar API.
Get calendar information and upcoming meetings for your users
You may want to display a user’s upcoming meetings in your application’s UI so that your users can see which meetings currently have a bot scheduled to join. Use the List Calendar Meetings endpoint to retrieve them.
curl --request GET \
  --url https://YOUR_RECALL_REGION.recall.ai/api/v1/calendar/meetings/ \
  --header 'x-recallcalendarauthtoken: CALENDAR_AUTH_TOKEN'
In the response, you will receive a list of calendar meetings associated with that user. For any meeting that has a bot scheduled to join, the bot_id field in the meeting object will be populated. Here’s an example of a Calendar Meeting where a bot has been scheduled to attend, with some fields omitted for readability:
[
  {
    "id": "2b2e8538-8096-4576-87b1-d0cc2af50007",
    "platform_id": "7pofsbd6q6uk61tkpbeb745htb",
    "title": "Test Meeting!",
    "start_time": "2026-08-26T22:00:00Z",
    "meeting_platform": "google_meet",
    "calendar_platform": "google",
    "meet_invite": {
      "meeting_id": "..."
    },
    "bot_id": "fd6e2beb-844b-43ff-b353-7f0ad16c9877",
    "ical_uid": "...",
    ...
  },
...
]
Setting recording preferences
Even though your customer has successfully connected their calendar, there is one more action required for their meetings to be recorded. Your customer needs to set their recording preferences, telling you the circumstances in which they want a bot to be sent to their calls.
Preferences are boolean flags you set via the Update Recording Preferences endpoint, and they can be combined. These are the different flags:
record_internal: meetings where all attendees are internal (same email domain as host)record_external: meetings where at least one attendee is external (different email domain than host)record_only_host: only meetings where your connected user is the organizerrecord_non_host: only meetings where your connected user is just an attendeerecord_recurring: recurring meetings onlyrecord_confirmed: only meetings the user has actually accepted the invite
Instead of exposing these preferences directly to your user, I’d recommend defining a handful of named presets that your user can choose from. For example: "record everything", "external calls only", "only when I'm hosting", etc. Here’s a screenshot from the sample app demonstrating how you can show this UI to your own users:

Once the flags are set, Recall.ai handles the rest, automatically scheduling and unscheduling bots as the user’s meetings change.
Bot deduplication with Calendar v1
Deduplication is handled automatically in Calendar v1. If several of your users have the same meeting on their calendars, Recall can associate those calendar meetings with a single bot rather than sending one bot per user.
There is one important caveat: Calendar v1 deduplication happens separately for each calendar platform. If the same underlying meeting appears on connected Google Calendars and connected Outlook calendars, Recall will send two bots to the call instead of one.
If you need different deduplication behavior, e.g. one bot per person rather than one bot across all users, Calendar v2 lets you define that behavior yourself.
Configuring Calendar v1 bots
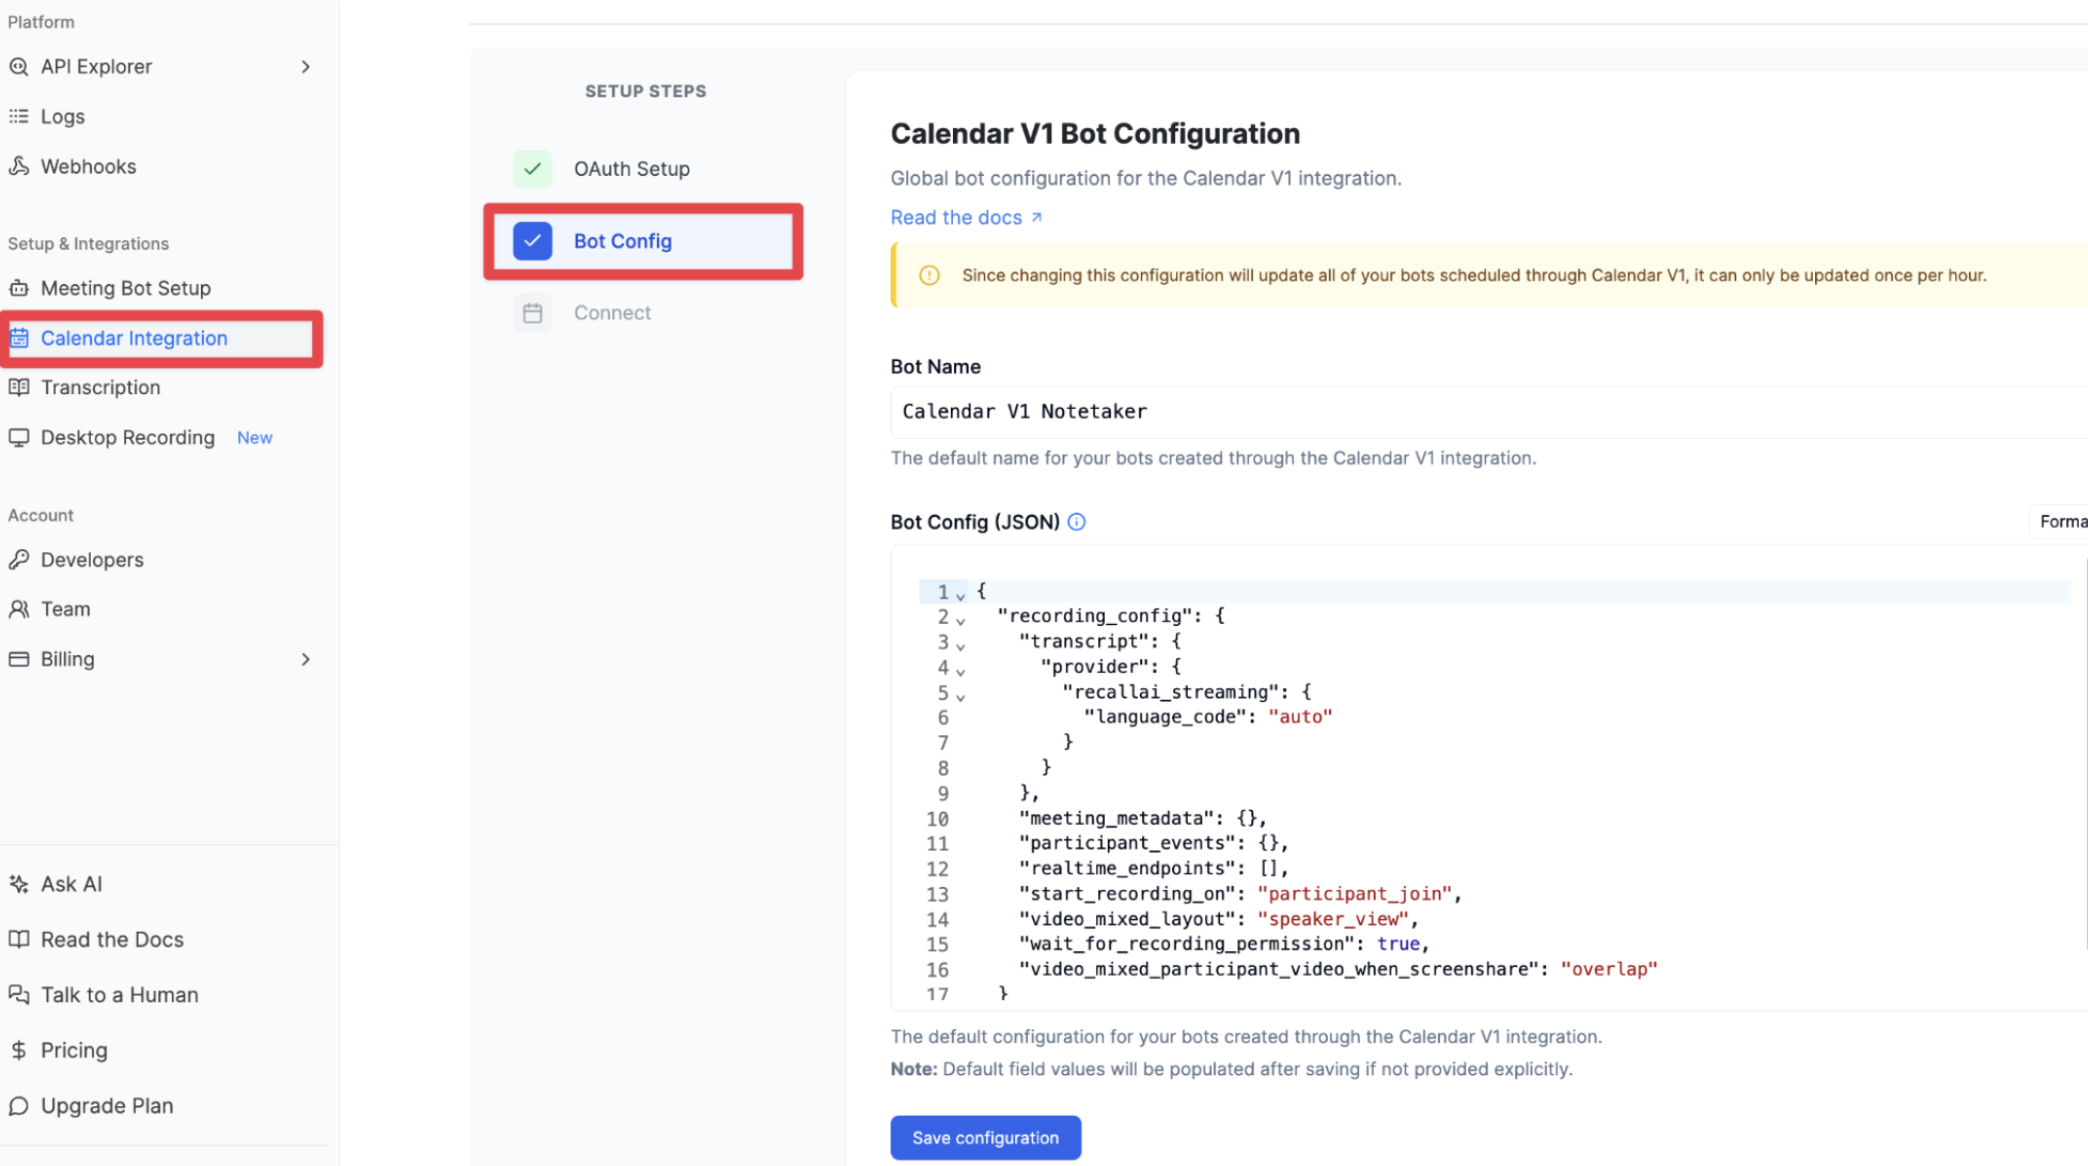
Bot configuration (i.e. the bot’s appearance, transcription settings, etc.) in Calendar v1 is set per workspace, not per bot. So if you've got multiple customers with different needs, you can't split that up. For example, say one user wants real-time transcription turned on and another doesn't. That’s not possible since every bot scheduled through Calendar v1 uses the workspace-level config. The one exception here is the bot’s name. That still gets set per user, via the bot_name parameter in the Update Recording Preferences endpoint. To modify any other parameters, navigate to the Calendar Integration section of the Recall dashboard and change the bot config field.
Conclusion
Calendar v1 is designed for applications that want automatic calendar-based recording without needing to build custom scheduling logic. Once a user connects their calendar and sets their recording preferences, Recall handles keeping their scheduled bots in sync as meetings are created, updated, or removed.
If those built-in recording preferences cover your product’s needs, Calendar v1 is the simpler integration. If you need to make your own scheduling decisions on a per-meeting basis, need to guarantee deduplication across calendar providers, or configure bots differently for individual events, Calendar v2 gives you that additional control.
To test both integrations and see which one works best for your application, check out the calendar sample app on GitHub.
FAQ
Can a Calendar v1 user connect two calendars from the same provider?
No. A Calendar v1 user can have one Google Calendar and one Microsoft Outlook calendar connected at a time, one of each is fine, two of the same isn't. Connecting a second calendar on the same provider replaces the first, bots and synced data included, so build your UI to make that consequence obvious before someone disconnects a calendar they meant to keep.
Will my customers see Recall's name during the OAuth flow?
No. You're the one who registered the OAuth client, so your customer will see your application's name and logo on the consent screen, not Recall's.
Can a user force a single meeting to be recorded (or skipped) without changing their preferences?
Yes. Every Calendar Meeting has an override_should_record field, which you can set through the Update Calendar Meeting endpoint. true records the meeting regardless of preferences, false skips it regardless of preferences, and null (the default) falls back to the user's recording preferences. This is the easiest way to add a per-meeting "record this / don't record this" toggle to your UI.
My user's preferences are set correctly, so why isn't a meeting getting a bot?
Before preferences are even evaluated, a meeting has to pass a few prerequisites: it needs a valid meeting link, a start and end time (all-day events don't qualify), and it can't be cancelled or already over. If it passes those and still has no bot_id, check that the preferences you set are actually true. Flags set to false are ignored, not treated as exclusions, and no meetings are recorded by default.
What happens to bots that are already scheduled when a user changes their preferences?
Recall reconciles them for you. If the new preferences match fewer meetings, bots are automatically removed from the upcoming meetings that no longer qualify. There’s no action you need to take on your end.
The OAuth redirect goes to Recall, so how does my app know whether the connection succeeded?
Add a success_url and error_url to the state parameter when you build the authorization URL. After the exchange, Recall redirects the user to whichever one applies, and preserves any query parameters you attached so you can carry user context through.
Is Recall.ai's Calendar API available for free?
Yes, Recall.ai's calendar API is completely free. Unlike other providers, Recall.ai's calendar API remains free regardless of how many user calendars you need to integrate with, supporting your company's growth.


