

There are several ways to programmatically get recordings and transcripts from Zoom, each with different levels of effort, cost, and maintenance. In this guide, I’ll walk through one of the simplest options: using an API to add an external bot to a Zoom meeting to capture meeting data.
What you’ll get:
- Real-time transcripts via webhook events
- Structured transcripts via the API endpoint after the meeting ends
MP4video andMP3audio recordings accessible via url
For a full exploration of the options to get transcripts, see our blog on all of the APIs to get transcripts from Zoom.
Architecture overview
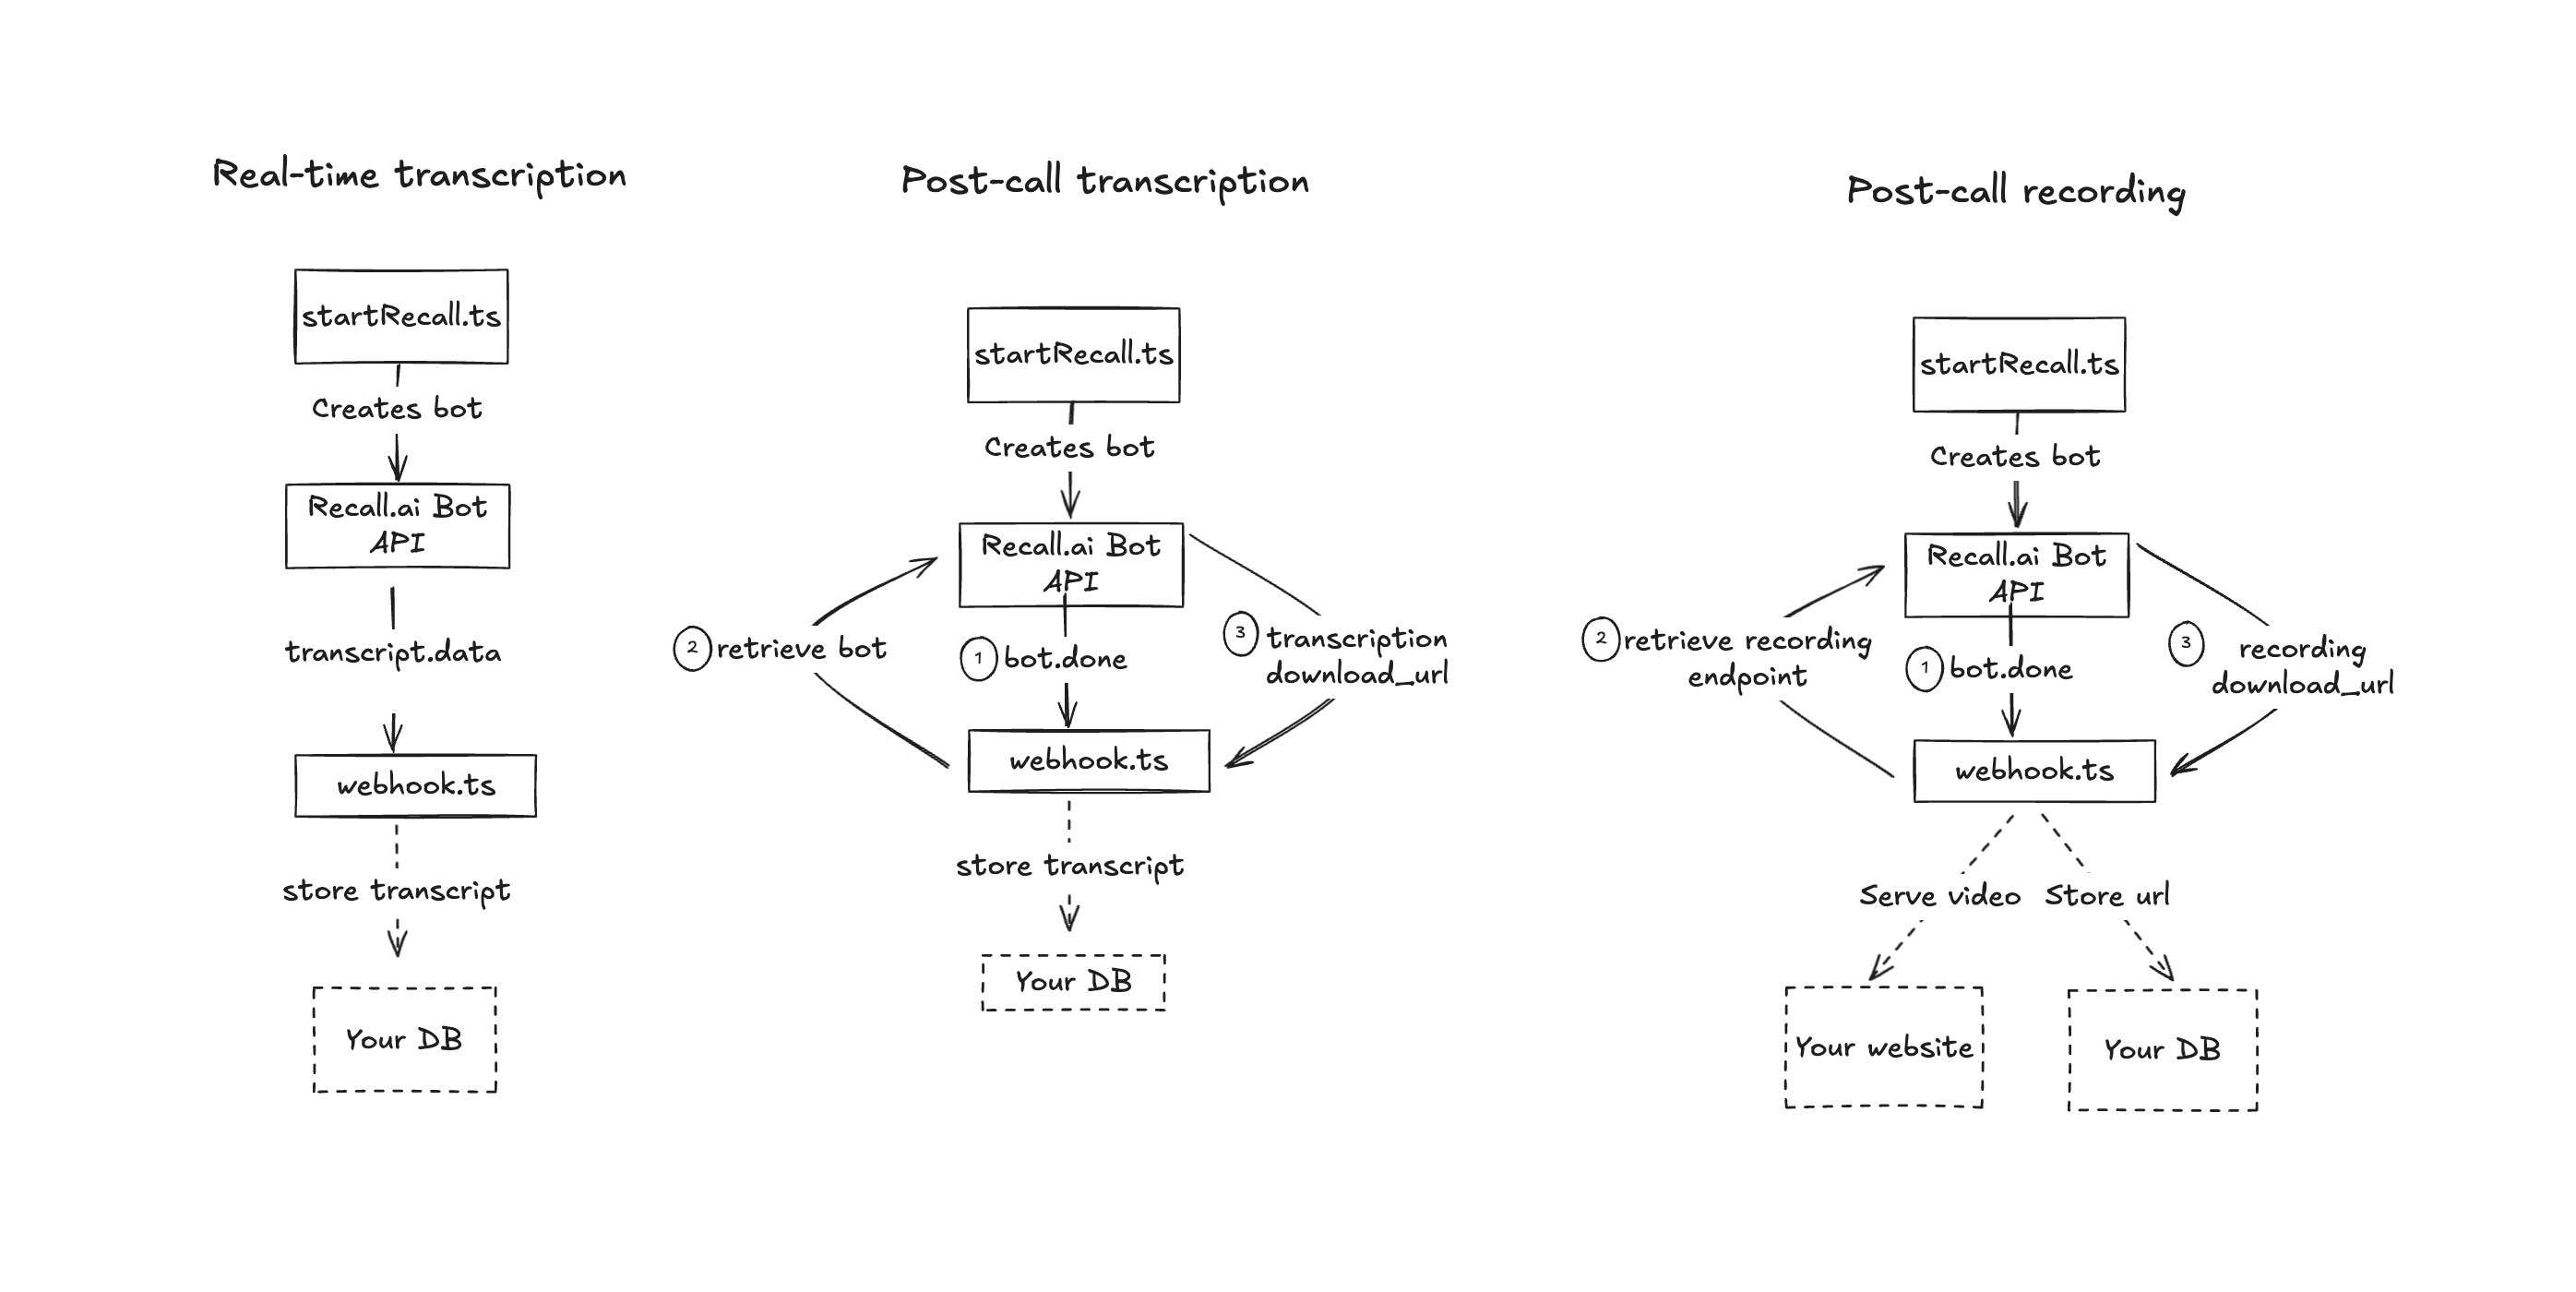
The dashed arrows in the architecture diagram are things you might choose to do as logical next steps.
This blog outlines a minimal backend prototype showing how to get Zoom transcripts and recordings.
A sneak peek at the end result
The demo shared above is a more full-featured app that includes a bot joining a Zoom meeting, streaming transcripts in real time, displaying the video recording after the call, and providing a link to download the video. If you want to take a look at the code, you can check out my sample repo. In this blog I will go over the backend necessary to power an app like this, but will not be covering the frontend and database.
Prerequisites
Before getting started, make sure you have the following:
- Clone the github repo
- A Recall.ai API key (which you can generate for free and store in your
.envfile) - A publicly accessible URL to receive webhooks (e.g. via ngrok during development)
- A basic backend server capable of:
- Sending HTTP POST requests (to start the bot)
- Receiving HTTP POST requests (to handle webhooks)
- Performing authenticated
fetch()requests to Recall.ai’s API to retrieve media
Step 1: Setting up your backend to launch bots and receive meeting data
Before we get started, make sure you've cloned the repo. Once that's done, to get meeting data, you first must send a Zoom bot into the meeting. You’ll need to pass a Zoom meeting link to the backend (startRecall.ts). In the backend, a unique externalId is generated to tie the session together. The backend then passes the Zoom meeting link to the Create Bot endpoint to launch a bot.
Here’s an example of how to call the Create Bot endpoint with a POST request from a Node.js backend using fetch():
//@title pages/api/startRecall.ts
const botResp = await fetch(`https://${RECALL_REGION}.recall.ai/api/v1/bot`, {
  method: 'POST',
  headers: { authorization: process.env.RECALL_API_KEY },

body: JSON.stringify({
  meeting_url : zoomLink,
  external_id : externalId,
  metadata    : { external_id: externalId },
  webhook_url : 'https://your-app/api/webhook',

  recording_config: {
    video_mixed_mp4   : {},
    audio_mixed_mp3   : {},
    transcript: { provider: { meeting_captions: {} } },
    realtime_endpoints: [
      {
        type : 'webhook',
        url  : 'https://your-app/api/webhook',
        events: ['transcript.data', 'transcript.partial_data']
      }
    ]
  }
})
})
As you can see, when calling this endpoint, you’ll need to provide:
- Meeting URL: The meeting the bot will join
- Webhook URL: Where real-time transcripts will be sent
- Transcript configurations: The transcription provider you want and the latency you want
- Recording configurations: The recording types you want (video, audio, mixed, individual, etc) and when you want it (post meeting or real-time)
For this tutorial, I used meeting_captions as the transcription provider since it’s free, but you could swap in a different transcription provider.
Once the bot is created, store the bot ID and external ID from the metadata to make it easier to retrieve transcripts and recordings later. You’ll also want to copy the webhook URL which you’ll use to subscribe to events later.
To receive the necessary webhooks, you’ll also need to set up a webhook listener for the events you specified in the bot config above. You'll handle the webhook events in a webhook.ts file, using conditionals to check for each event type you're interested in as shown below:
//@title pages/api/webhook.ts
import type { NextApiRequest, NextApiResponse } from 'next'
import http from 'http'
import { prisma } from '../../lib/prisma'

export const config = { api: { bodyParser: false } }

export default async function handler (
  req: NextApiRequest,
  res: NextApiResponse
) {
  const chunks: Uint8Array[] = []
  for await (const c of req) chunks.push(c)
  const raw    = Buffer.concat(chunks)
  const rawStr = raw.toString('utf8')

  let ev: any
  try { ev = JSON.parse(rawStr) }
  catch { res.status(400).end('Invalid JSON'); return }
  // Handle real-time finalized transcript events
  if (ev.event === 'transcript.data') {
    const words = ev.data?.data?.words ?? []
    const externalId = ev.data?.bot?.metadata?.external_id
    const text = words.map((w:any) => w.text).join(' ').trim()
    if (!externalId || !text) return res.status(204).end()
    const meeting = await prisma.meeting.findUnique({ where: { externalId } })
    if (!meeting) return res.status(404).end('Meeting not found')

    await prisma.transcript.create({
      data: {
        meetingId: meeting.id,
        speaker: ev.data?.data?.participant?.name ?? 'Unknown speaker',
        text,
        timestamp: new Date(words[0]?.start_timestamp?.absolute ?? new Date())
      }
    })

    // Optional: emit to WebSocket server for real-time UI updates
    http.request(
      {
        host: 'localhost', port: 4000, path: '/send', method: 'POST',
        headers: { 'content-type': 'application/json' }
      },
      r => r.resume()
    ).end(JSON.stringify({
      externalId,
      message: {
        type: 'transcript',
        payload: { text, speaker: ev.data?.data?.participant?.name }
      }
    }))
    return res.status(200).end('Transcript saved')
  }
  // Handle post-call recording metadata for transcripts and recordings
  if (ev.recording?.id) {
    const externalId = ev.external_id
    const meeting = await prisma.meeting.findUnique({ where: { externalId } })
    if (!meeting) return res.status(404).end('Meeting not found')
    // Store post-call transcript if available
    if (ev.transcript) {
      await prisma.transcript.create({
        data: {
          meetingId: meeting.id,
          text:      ev.transcript,
          speaker:   'Unknown',
          timestamp: new Date()
        }
      })
    }
    //Store recording metadata (e.g. to retrieve MP4/MP3 later via download_url)
    await prisma.meeting.update({
      where: { id: meeting.id },
      data : {
        recordingId: ev.recording.id,
        videoUrl   : ev.video_url ?? null
      }
    })
    return res.status(200).end('Post-call stored')
  }
  res.status(200).end('No action')
}
Once this endpoint is running, you’ll start receiving webhooks for both real-time updates and final media notifications.
To subscribe to the change status webhook events, copy the webhook URL that you saved previously and navigate to the Recall.ai dashboard. From there go to Webhooks in the sidebar and then select + Add Endpoint. Paste your webhook URL in the Endpoint URL field. Scroll down to Subscribe to Events, select bot.status_change, and click Create. By subscribing to the bot.status_change events you’ll be notified of when the bot is recording, when it’s processing the recording, and when it’s finished and the data is ready to be fetched.
Step 2: Receiving transcripts in real-time and post-call
There are two ways to receive transcripts: during the meeting (real-time) or after the meeting ends (post-call).
Getting the transcript in real-time

To capture transcripts in real-time, your backend listens for webhook events sent as raw JSON via HTTP POST.
While the meeting is in progress, Recall.ai emits transcript.data webhook events with finalized segments of speech.
{
  "event": "transcript.data",
  "data": {
    "bot": {
      "metadata": {
        "external_id": "meeting-abc123"
      }
    },
    "data": {
      "words": [
        {
          "text": "Welcome everyone",
          "start_timestamp": {
            "absolute": "2025-07-30T17:23:00.123Z"
          },
          "end_timestamp": {
            "absolute": "2025-07-30T17:23:02.456Z"
          }
        }
      ],
      "participant": {
        "name": "Alice",
        "platform": "Zoom"
      }
    }
  }
}
If you're using a framework like Next.js or Express, be sure to disable the default body parser and manually parse the raw body to access the payload.
Each event includes:
external_idto identify the meeting- The transcript segment (
text) within thewordsarray indata - Timestamps for each word (also in the
wordsarray) - Speaker name and platform
While this guide doesn’t cover data storage or routing after you gather it, you can choose to log, process, or forward these messages to another system depending on your app’s goals.
You can also configure Recall.ai to send partial transcript results that are lower latency. These appear in the form of
transcript.partial_dataevents. These are not final and may be revised later. In this guide, I don’t usetranscript.partial_data.
Real-time events are ideal for building real-time coaching features, AI agents that provide feedback during the meeting, or live notetaking products.
Getting the transcript post-call
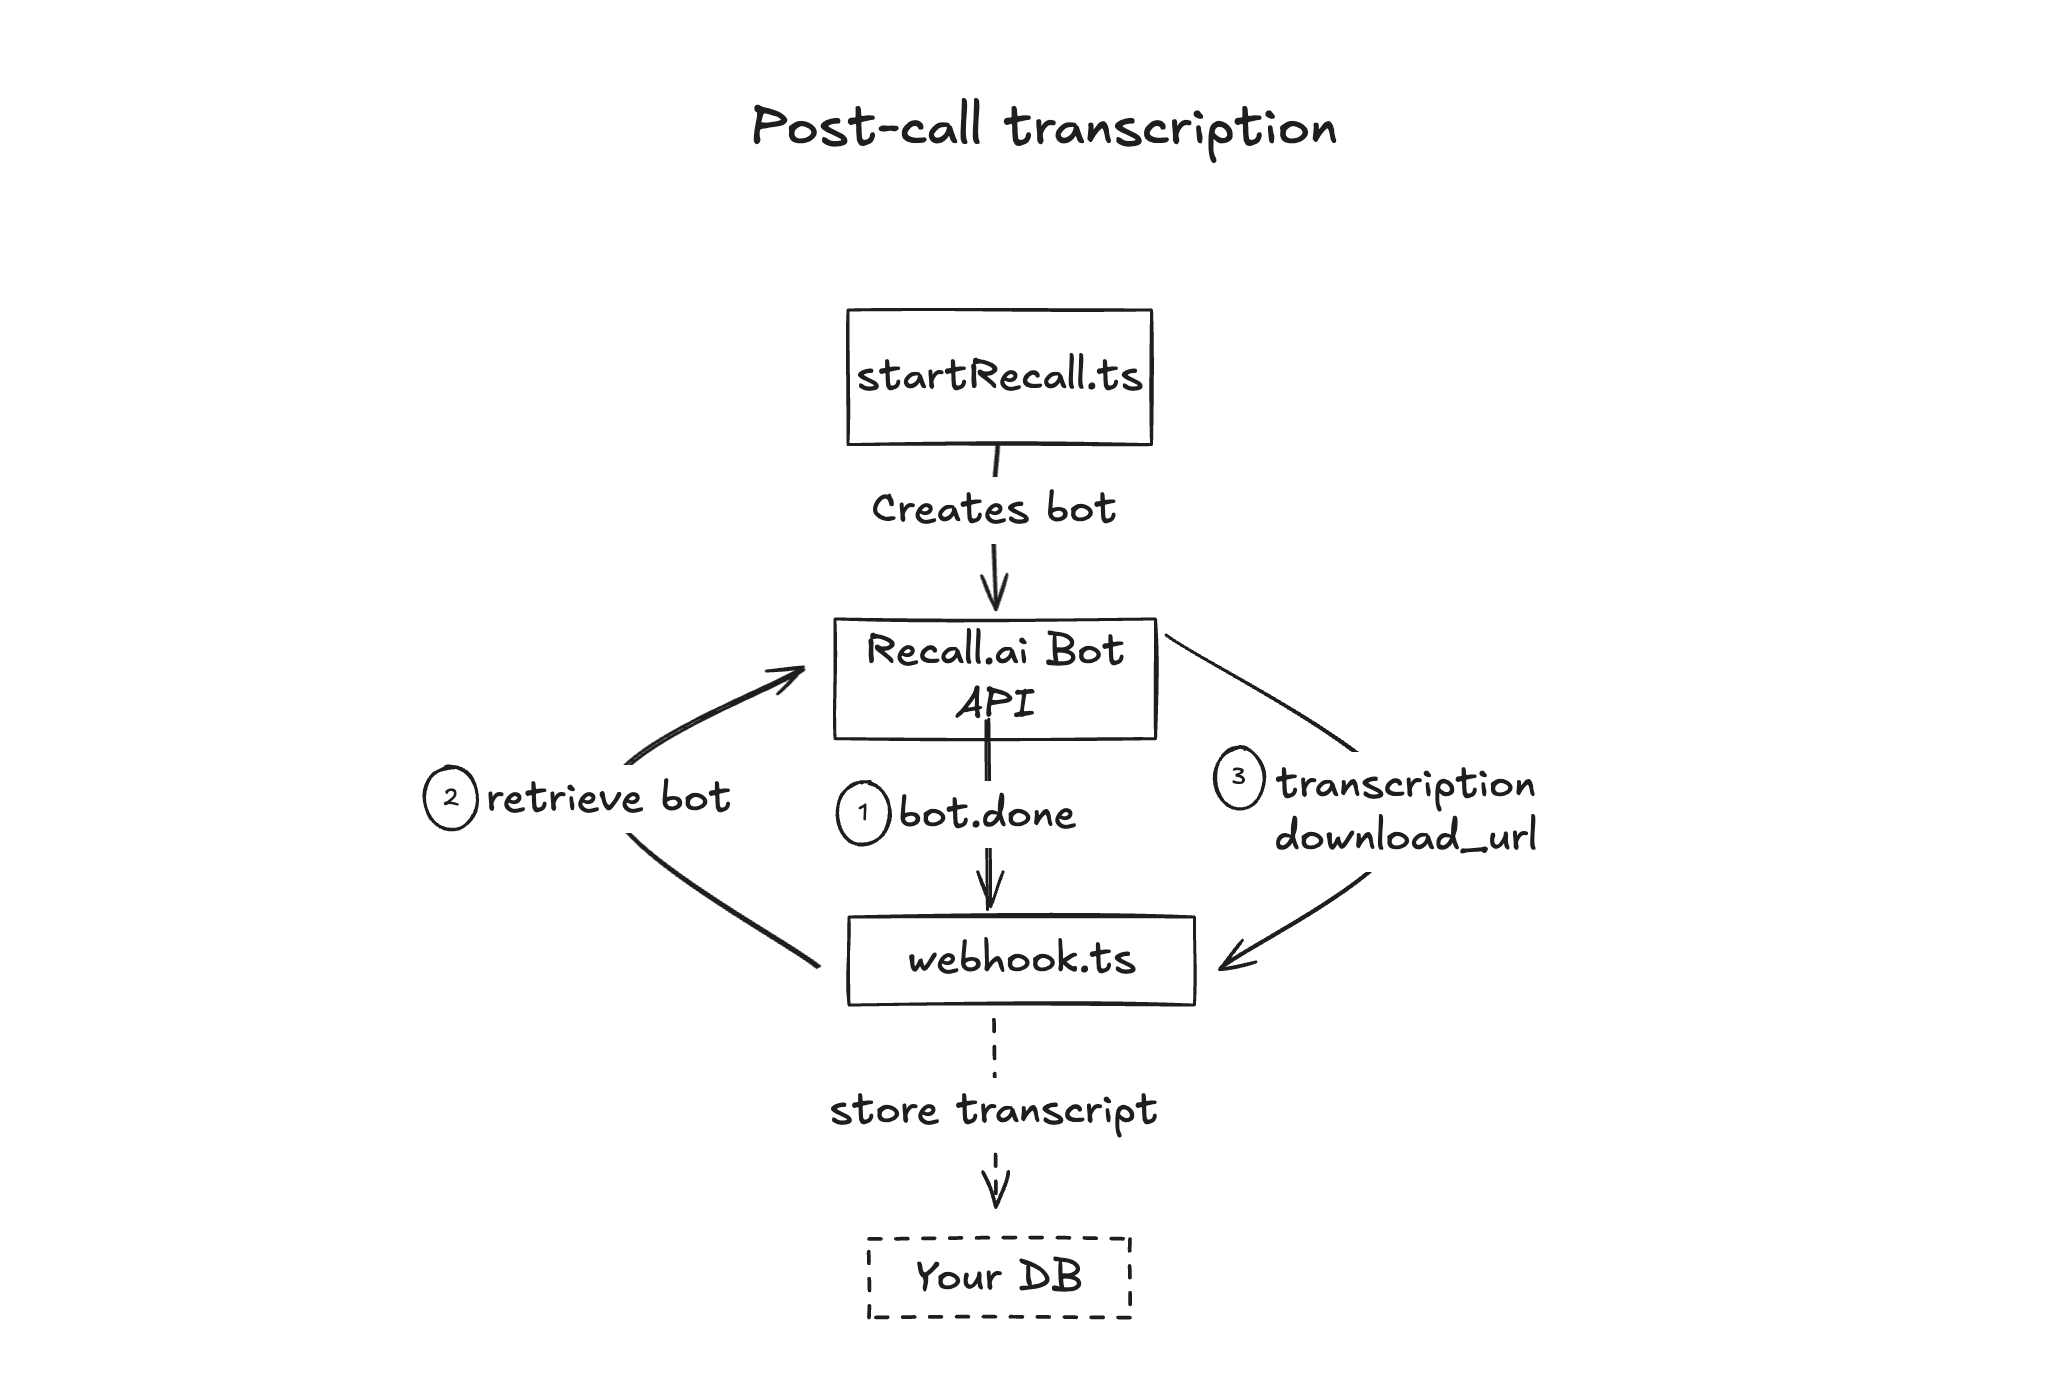
After the call ends, a Bot Status Change event with the status bot.done signals that the full structured transcript is available for download via the API.
{
  "event": "bot.done",
  "data": {
    "data": {
      "code": string,
      "sub_code": string | null,
      "updated_at": string
    },
    "bot": {
      "id": string,
      "metadata": object
    }
  }
}
This signals that the full structured transcript is now ready to be retrieved. It does not include the transcript itself.
Take the bot ID from the JSON provided in the object sent via the bot.done webhook event and retrieve the bot using the Retrieve Bot endpoint:
//@title Retrieve Bot Endpoint
const options = {method: 'GET', headers: {accept: 'application/json'}};

fetch('https://us-east-1.recall.ai/api/v1/bot/id/', options)
  .then(res => res.json())
  .then(res => console.log(res))
  .catch(err => console.error(err));
You will see a list of recordings, and inside each you’ll find a download_url.
Note: Transcripts are nested under recordings because they are an artifact from a meeting.
Here is an example of the response you can expect to get from the Retrieve Bot Endpoint:
//@title Example Response
{
  "id": "2e8ec5a4-a608-4ea0-b9d0-2a12aec3f0f0",
  "recordings": [
    {
      "id": "c9d15f08-83a4-4d83-ad1b-3e311bb0f253",
      "media_shortcuts": {
        "transcript": {
          "id": "b2c3c59f-45a4-43a8-9b0f-1bb79ba33580",
          "data": {
            "download_url": "https://us-east-1.recall.ai/api/v1/download/transcript?token=..."
          },
          "provider": {
            "meeting_captions": {}
          }
        },
        ...
      }
    }
  ],
  ...
}
Once you have the download_url, use the url to get the structured transcript JSON:
const downloadUrl = "https://us-east-1.recall.ai/api/v1/download/transcript?token=..."
const response = await fetch(downloadUrl, {
  method: 'GET',
  headers: {
    'Authorization': `Bearer ${process.env.RECALL_API_KEY ?? ''}`,
    'Accept': 'application/json',
  }
})
This returns JSON with full meeting transcription data which uses the following schema:
[
  {
    "participant": {
      "id": number, // Id of the participant in the meeting. This id is not unique across meetings.
      "name": string | null, // Display name of the participant.
      "is_host": boolean | null, // Whether the participant is the host of the meeting.
      "platform": string | null, // Meeting platform constant
      "extra_data": json | null, // Extra data about the participant from the meeting platform.
    },
    "words": [
      {
        "text": string, // The text of the word.
        "start_timestamp": {
                    "absolute": number, // seconds
          "relative": number // seconds
        },
        "end_timestamp": {
                    "absolute": number, // seconds
          "relative": number // seconds
        }
      }
    ]
  }
]
Post-call events give you structured, finalized transcripts after the meeting is done.
To see all of the configuration options for transcription, see the appendix.
Step 3: Receiving recordings post-call
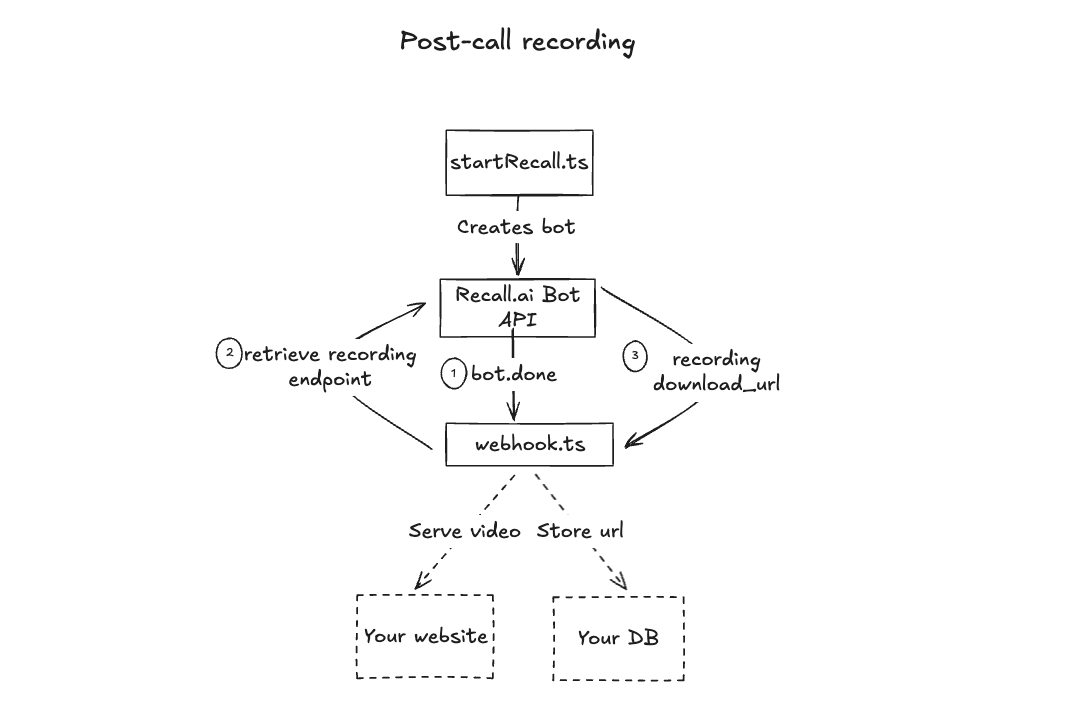
Receiving video recordings post-call
Video and audio recordings (MP4/MP3) are available only after the meeting ends. Once you receive the bot.done Status Change event, you can retrieve the video recording using the Retrieve Video Mixed endpoint by specifying the recording_id.
Here is an example of a call to the Retrieve Video Mixed endpoint:
const videoUrl = `https://us-east-1.recall.ai/api/v1/video_mixed?recording_id=RECORDING_ID_HERE`

const res = await fetch(videoUrl, {
  headers: {
    'Authorization': `Bearer ${process.env.RECALL_API_KEY ?? ''}`,
    'Accept': 'application/json'
  }
})

if (!res.ok) {
  throw new Error(`Failed to fetch video: ${res.statusText}`)
}

const data = await res.json()
const downloadUrl = data.results?.[0]?.data?.download_url
As always, make sure to specify your region in the request (us-east-1 is just an example).
//@title Sample response:
{
  "id": "3fa85f64-5717-4562-b3fc-2c963f66afa6",
  "recording": {
    "id": "3fa85f64-5717-4562-b3fc-2c963f66afa6",
    "metadata": {
      "additionalProp": "string"
    }
  },
  "created_at": "2025-08-01T04:05:14.009Z",
  "status": {
    "code": "processing",
    "sub_code": "string",
    "updated_at": "2025-08-01T04:05:14.009Z"
  },
  "metadata": {
    "additionalProp": "string"
  },
  "data": {
    "download_url": "string"
  },
  "format": "mp4"
}
You can use the download_url to access the video after the call.
Receiving audio recordings post-call
To retrieve audio, follow the same steps as above, but call the Retrieve Audio Mixed endpoint instead of the Retrieve Video Mixed endpoint.
For a full list of available recording configurations (e.g., video_separate, audio_separate), see the appendix.
Bonus: Receiving real-time video and audio streams
You can also get real-time video and audio streams. Real-time streams are made available via RTMP for observer room use cases, or via websocket for automated processing, such as facial recognition or deepfake detection.
Why did I choose this implementation?
As mentioned earlier, this is one of many ways to get Zoom transcripts and recordings. So why did I choose this method?
No media infrastructure required: Recall.ai handles ingestion, recording, and processing, so you don’t need to manage WebRTC or Zoom SDKs.
Real-time streaming available: Get transcripts, raw audio, and video frames via WebSocket or webhook with minimal set up.
Flexible output formats: Supports mixed/per-participant recordings, raw audio streams, and RTMP.
Flexible transcription provider support: Use meeting captions, AssemblyAI, Deepgram, etc., via a single API; swap providers without minimal configuration changes.
Speaker diarization available: You’re able to get speaker names no matter which transcription provider you use. Depending on your configuration, you can also get perfect diarization.
Rich participant metadata available: Always includes speaker names, roles, and join/leave events.
Cross-platform support: Works with Zoom, Google Meet, Microsoft Teams, etc using the same API. List of all supported platforms.
Minimal backend logic: Your app only needs to manage bot sessions and store metadata.
Why you might choose another option
We use Recall.ai, a third-party API to offload the majority of the engineering work in this option. This might not be the ideal method if you are:
- Cost Conscious: A third-party API like Recall.ai has additional costs based on usage.
- Don’t want vendor reliance: Third party APIs can be a sticking point for some companies.
- Don’t want a bot in the meeting: If you prefer not to have a bot in the meeting, you might want to consider:
- The Desktop Recording SDK (API Docs) is the most discrete option for capturing in-person or on-screen conversations across any platform.
- Meeting Direct Connect connects directly via Zoom’s Real-Time Media Streams API, without showing a bot in the meeting. Setup requires you to create a Zoom Marketplace app, obtain an RTMS-enabled webhook, and have your users OAuth the Zoom app.
Conclusion
With just a minimal backend and no media infrastructure, you now have a working prototype that captures real-time transcripts, post-call transcripts, and post-call recordings from Zoom. Hopefully this has provided a jumping off point for whatever you’re building. If you have any questions we’re always happy to help, and if you want to build anything we’ve gone over in the tutorial, you can sign up and try Recall.ai for free.
Appendix
Transcript & recording formats accessible using the Meeting Bot API
Recall.ai delivers transcripts and recordings in real time or after the call, depending on your bot configuration. Delivery happens through webhooks, WebSocket, or by polling the API.
Transcripts
| Type | Delivery Method | Notes | API Docs URL |
|---|---|---|---|
| Real-time | transcript.data via Webhook or WebSocket |
Finalized segments with word-level timing | https://docs.recall.ai/docs/bot-real-time-transcription |
| Partial (real-time) | transcript.partial_data via Webhook |
Low-latency previews; not final | https://docs.recall.ai/docs/bot-real-time-transcription#partial-results |
| Post-call | GET /transcript/{id} |
Full structured transcript after receiving bot.done webhook |
https://docs.recall.ai/reference/bot_retrieve |
- Supports meeting captions (free) and transcription providers
- Includes diarization with speaker names, and timestamps
Recordings
| Format | Timing | Access | Notes | API Docs URL |
|---|---|---|---|---|
Mixed MP4 / MP3 |
Post-call | /video_mixed, /audio_mixed APIs |
Combined audio/video of all participants | https://docs.recall.ai/reference/video_mixed_retrieve |
| Speaker-separated (Audio/Video) | Real-time or Post-call | /video_separate, /audio_separate APIs or WebSocket |
Per-participant media; use real-time for analysis tools | https://docs.recall.ai/docs/how-to-get-separate-videos-per-participant-async https://docs.recall.ai/docs/how-to-get-separate-audio-per-participant-async |
| RTMP (Live) | Real-time | RTMP stream or video_mixed_flv.data via WebSocket |
Ideal for live rebroadcast or human viewing | https://docs.recall.ai/docs/stream-real-time-video-rtmp |
| Raw Audio / Video Frames | Real-time | WebSocket | Raw 16kHz PCM audio and 360p PNG video frames (\~2fps) | https://docs.recall.ai/docs/real-time-audio-protocol https://docs.recall.ai/docs/real-time-video |
Storing transcripts in Postgres
For apps storing meeting metadata and transcripts, here’s a minimal schema to get started:
model Meeting {
  id         String   @id @default(cuid())
  externalId String   @unique
  userId     String
  botId      String
  videoUrl   String?
  createdAt  DateTime @default(now())
  transcript Transcript[]
}

model Transcript {
  id        String   @id @default(cuid())
  meetingId String
  speaker   String
  text      String
  timestamp DateTime
}
Meetingtracks session metadata like user, bot, and external IDTranscriptstores finalized speech segments- You can extend the schema as needed (e.g. add
durationMs,speakerRole, etc.)