


.avif)

Why build a Google Meet Bot?
Why build a Google Meet bot? Maybe you're like me, and you've been tasked with building a notetaker for Google Meet or more specifically with building a meeting bot to get transcripts from meetings. I put this guide together to show you exactly how I built a Google Meet bot that scrapes Google Meet's live captions.
This guide walks through one concrete path—scraping Meet’s live captions with a headless Playwright bot, using a set interval to flush them to a the database (storing in memory in the interum), then summarizing with OpenAI when the meeting ends— and outlines other options. Getting here took more experimentation than I care to admit. This guide clears the path for you.
For the shortcut to getting your notetaker up and running without more than 8 lines of code, skip to the bottom.
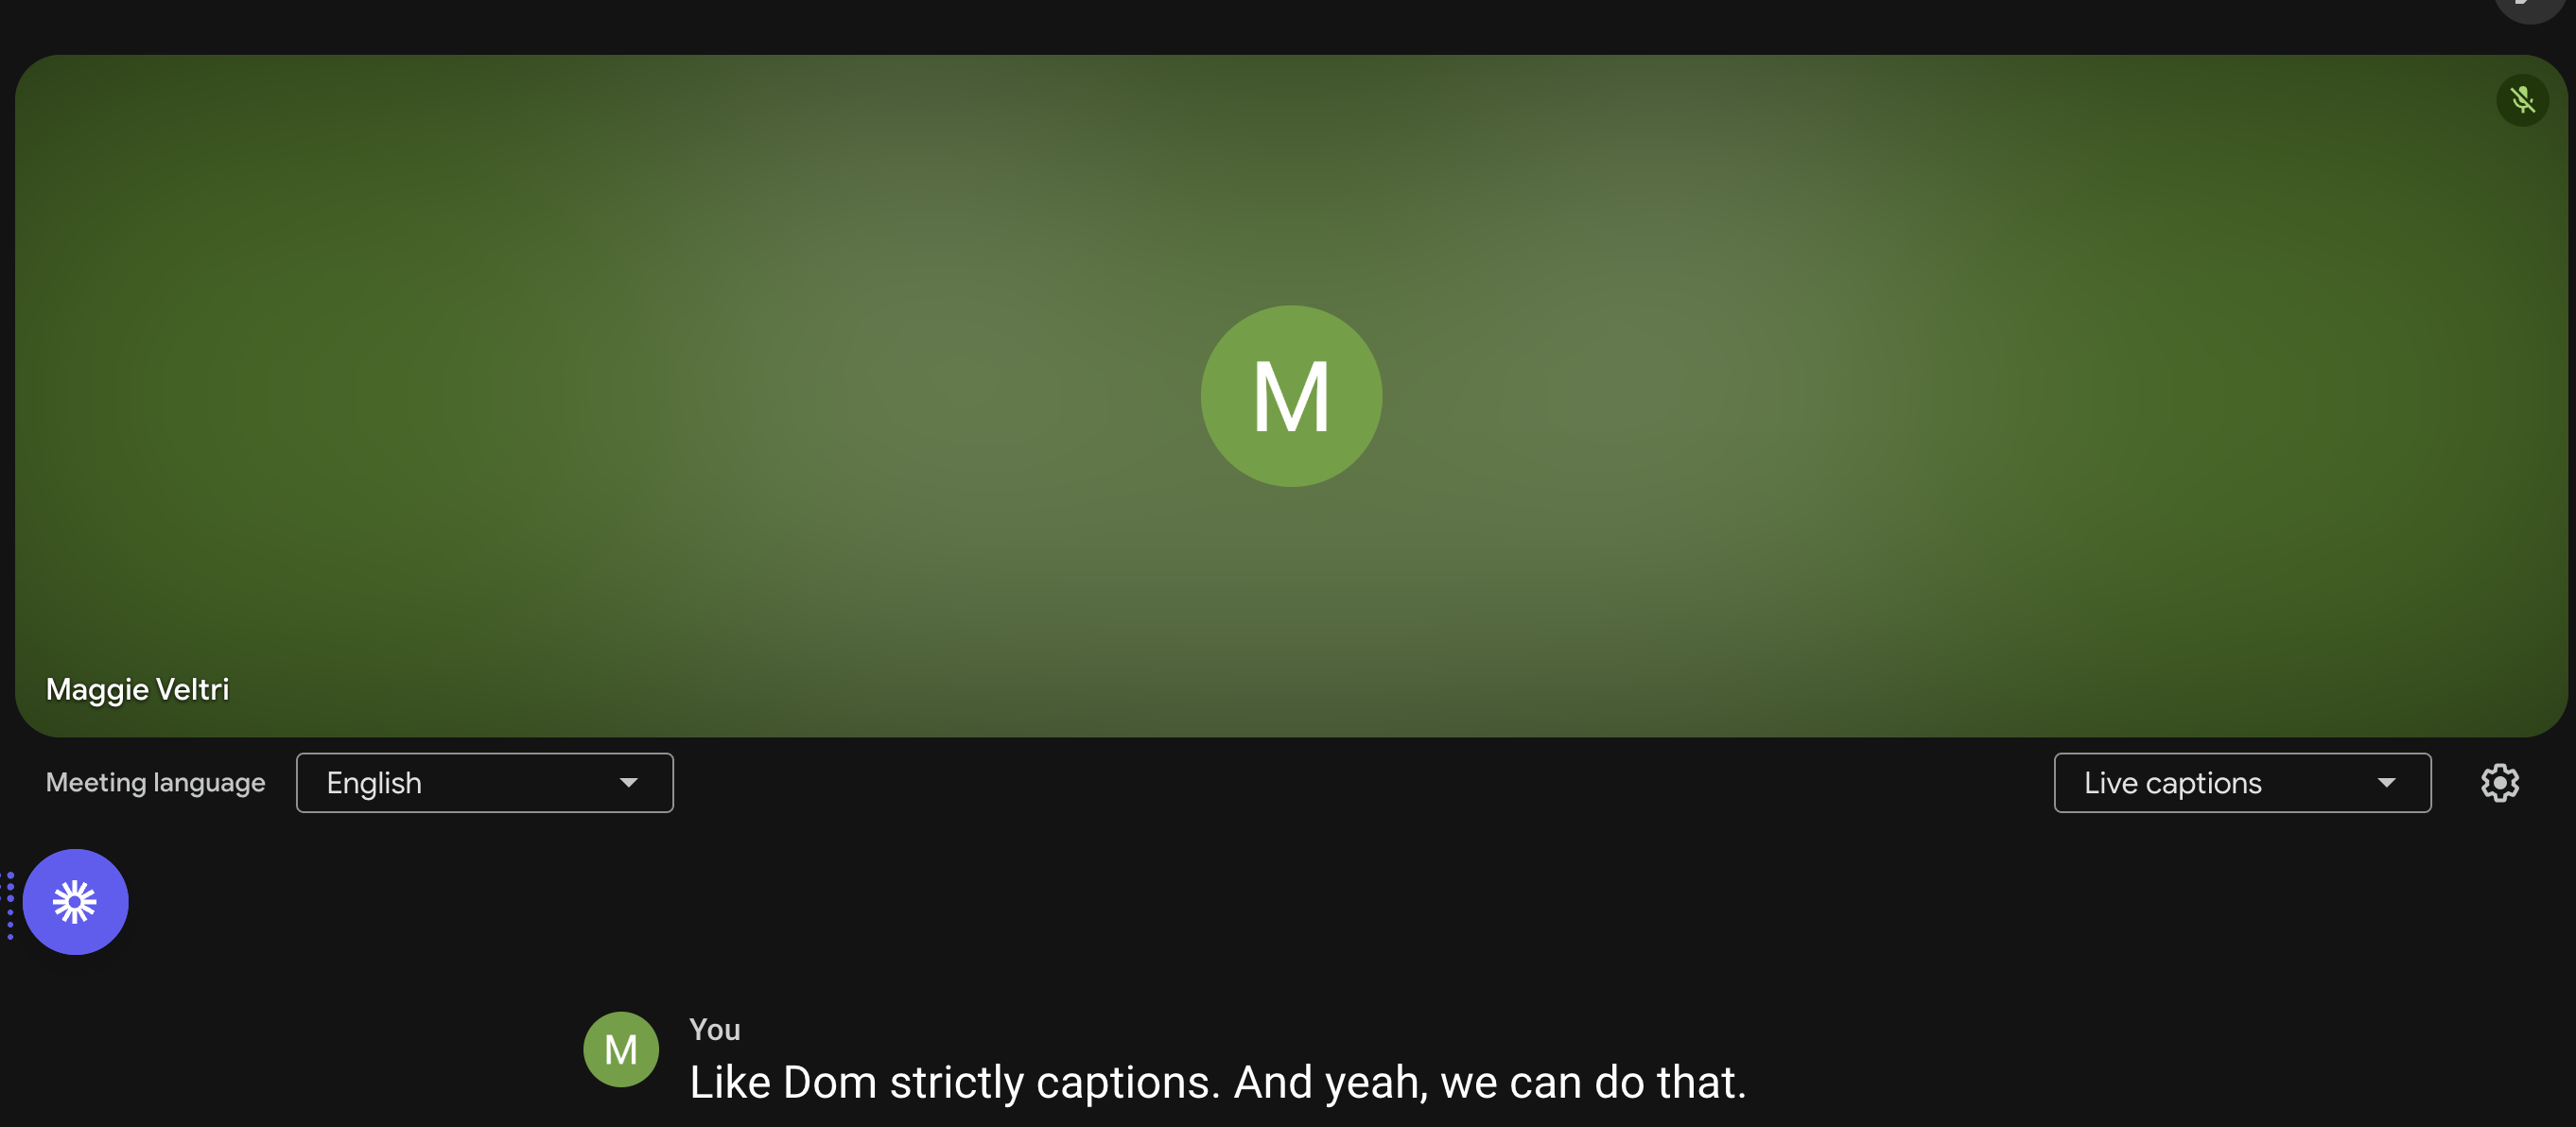
For a sneak peek, take a look at what I made (though in the repo I replaced an idle timer with exit phrases so that you can tell your bot to leave): Short Demo
What’s in scope?
In scope for this article:
- Join a Google Meet as a bot
- Enable captions
- Scrape live captions in real time from the DOM
- Add basic speaker attribution
- Real-time transcription
- Send transcript to OpenAI after meeting for summarization
- Containerized deployment
Out of scope:
- Recording/uploading audio or video
- Perfect speaker diarization (many people talking at once)
- Real-time NLP
- Multiple bots in a single meet
- Dynamic scaling across hundreds of simultaneous meets (covered conceptually)
- Calendar integration
Why these are out of scope:
- Recording/uploading: Requires mic permissions and persistent storage
- Perfect diarization: Hard to reach in Google Meet when speakers talk over one another
- Real-time NLP: Requires low latency infra
- Dynamic scaling: Requires orchestration infra
- Calendar integration: Adds OAuth and third-party integrations
The options I discovered for building a Google Meet notetaker
From a speedy round of research, three primary paths emerged to extract meeting content. All three pass the content to OpenAI in this case, but you could use another provider for summarization.
Option 1: Scrape captions via DOM (what I built)
- Pros: No recording permissions + no audio routing = simpler setup
- Cons: Fragile DOM, captions can drop words, Google Meet anti-bot heuristics
Option 2: Recording audio & piping to 3rd party
- Use headless Chrome to join the meeting and route audio through virtual audio cables (eg
snd-aloop,Loopback) then record the stream (e.g.,pyaudio,ffmpeg) then transcribe via Whisper or Deepgram (or another provider) - Pros: Higher fidelity, more control, built in language flexibility
- Cons: Complex audio routing, expensive at scale, compliance concerns (PII overhead/storage)
Option 3: Calling an API
- As of writing this article, no public Google APIs let you get transcription in real-time. There is currently the option to get transcription after the meeting, assuming the host of every meeting is on the right Google Workspace plan. There is an option to use a 3rd-party meeting bot API, like Recall.ai's Google Meet Bot API, but we are not going to use that for this POC.
- Pros: Clean, simple solution
- Cons: Doesn’t currently exist for this use case from Google, and using a 3rd party API comes with extra cost
What I chose and why
I ended up going with Option 1: Scrape captions via the DOM, and here’s why.
First, I wanted something I could build and test quickly—no special permissions and no third-party accounts. DOM scraping requires no audio routing, no elevated Google Workspace plans (Option 2), and no external dependencies-just a real Google account and a headless browser.
Second, it gave me full control over the data. Everything the bot captures stays inside my infrastructure. That matters not just for privacy and compliance, but also for debugging and iterating quickly without guessing what an API is doing under the hood.
And finally, it was practical. Even though this method comes with its own challenges — like DOM fragility and occasional caption drops - it was still the fastest way to get a working prototype. I was able to build a functioning notetaker with summarization in under a week by focusing full-time on the project.
For a proof of concept, that was the right tradeoff: limited complexity, full ownership, and enough reliability to move fast.
How I landed on the architecture
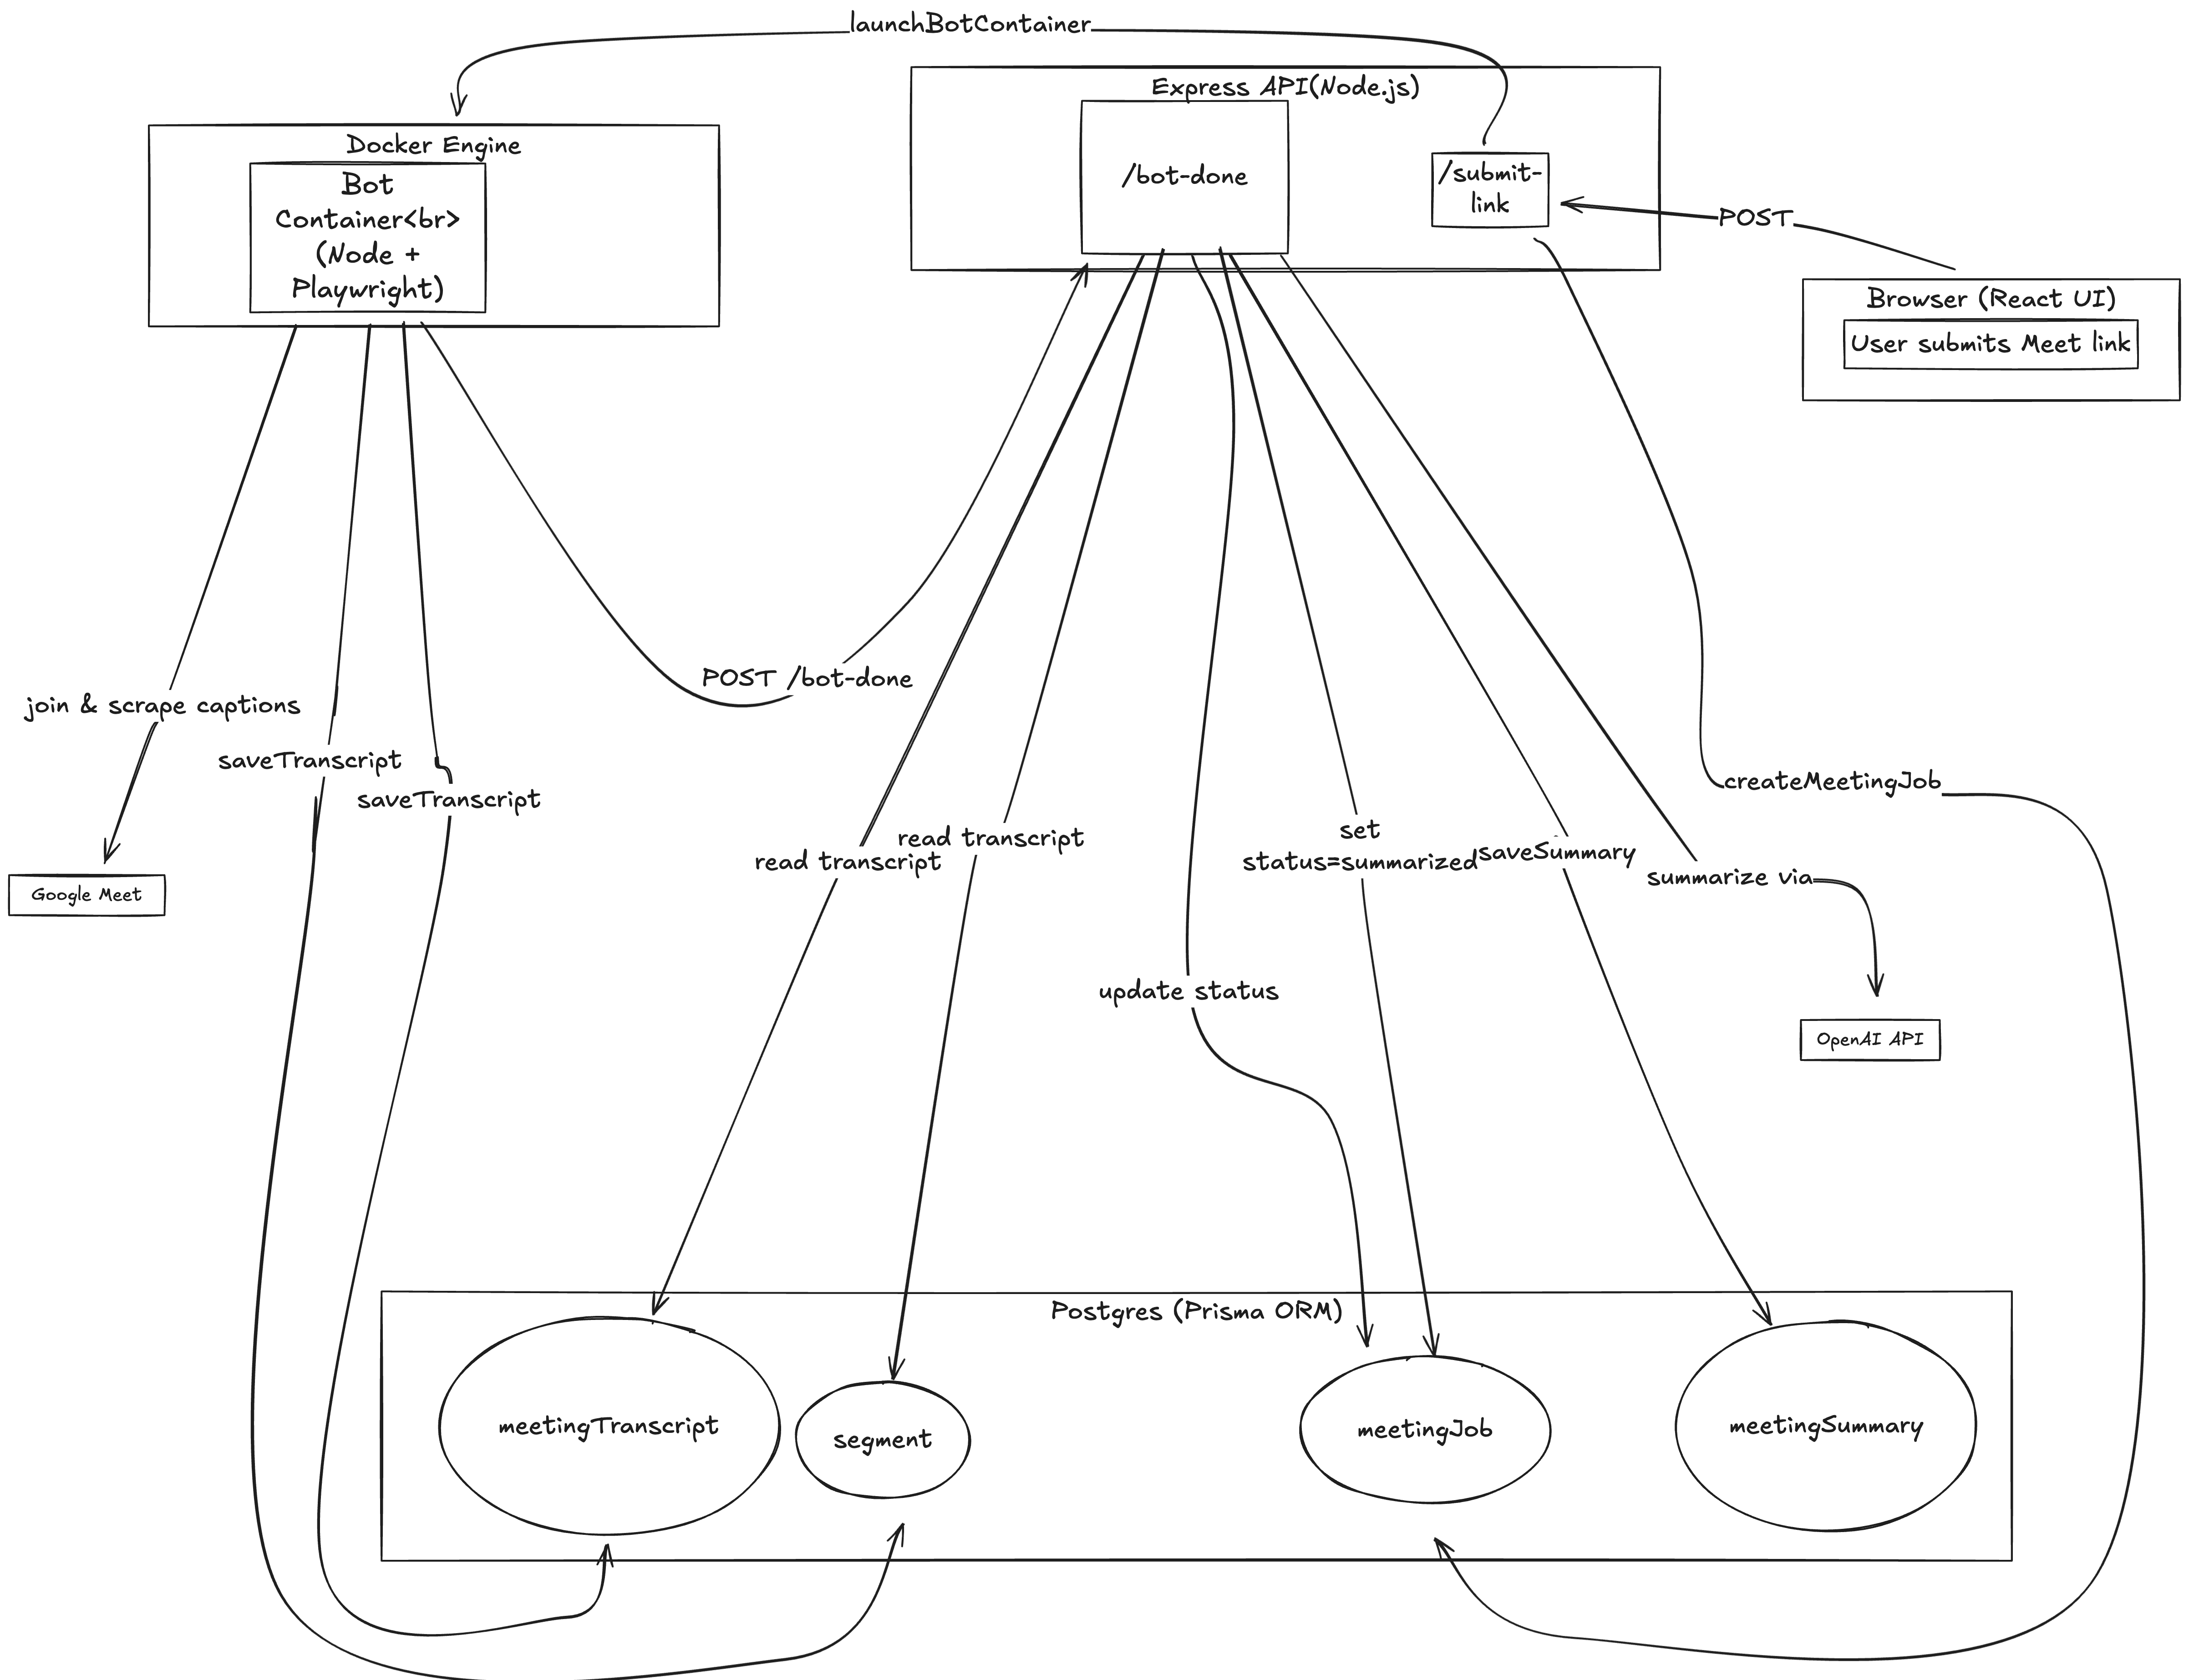
Once I decided on the general approach I'd take, the next task was to map out the pieces. Most of this was pretty basic, but it helped to break things down by how the user would interact with the system and then every interaction thereafter to reach the transcript and summary.
-
I started by thinking about how I wanted to interact with my bot. For me, this meant a basic frontend that would offer users the chance to paste a Google Meet url.
-
From there I needed the url to go somewhere. Enter REST API to route to the backend (server.ts).
-
At this point I was ready to run the bot so I added a
runBotfile that launches headless Chromium browser via Playwright and joins a meeting and starts scraping captions. -
Once the bot collected data I'd need a place to put that data. Enter the storage service. I also needed a summarization service to take the transcript and summarize the meeting. Since the largest thing I'd store was a transcript (fairly lightweight) and I am my only customer, I decided on Postgres for my storage solution. Longer-term, my storage solution would need to be supplemented with Redis for Segment storage (which I'll touch on in the models section) and s3 (or some other blob storage) to store large transcripts and video/audio recordings.
-
Finally, I was back to the data. I defined my types in
model.tsto make it easy to make changes that will exist everywhere and then mirrored that in my prisma schema. -
I thought I was done, but after I finished my first pass, I revisited how my bot gets launched and realized that I needed to spin up a Docker container for my bot. I decided on containerization because I want all bots to have the same environment, but I want isolation so that bots don't interfere with one another.
Headless Chrome (Playwright)
    ↳ Joins Google Meet
    ↳ Turns on Captions
    ↳ Scrapes caption text from DOM in real-time
    ↳ Buffers to file w/ timestamps + speaker IDs
    ↳ On exit, POSTs transcript to summarizer (OpenAI)
Containerized with Docker for scale-out.
When the bot finishes, it triggers an event-driven callback to the backend via POST /bot-done, which finalizes the job by storing the transcript and generating the summary.
How captions are collected?
Instead of saving captions line-by-line to disk or a queue in real time, this implementation buffers them in-memory as an array of segments (each with speaker, text, start, and end indexes). When either:
- no captions are received for 30 seconds (
MAX_IDLE_TIME), or - the call runs too long (
MAX_TOTAL_TIME),
…the bot will saveTranscript() to the DB (postgres), and POST to the backend.
Why I choose this implementation
- Keeps infra light—no Redis, disk IO, or extra queues
- Memory-safe at typical call durations
- Easier to debug and test
Alternatives and tradeoffs
| Method | Pros | Cons |
|---|---|---|
| Line-by-line to disk | Very simple, append-only | Not great for real-time access or distributed storage |
| Stream to Redis/S3 | Durable, easy to fan out | Extra infra, chunking logic needed |
| Emit via Webhooks | Real-time reactions (e.g. Slack) | Delivery failures need retry/queueing |
| WebSocket | Low latency for live clients | Harder to scale & reconnect |
This method prioritizes simplicity and observability. If you need real-time processing (e.g., NLP alerts mid-call), consider introducing an event bus or durable queue.
Why is building a Google Meet recording bot even hard?
Though mentioned in more detail below and there are examples at the end, here are some things to keep in mind while building:
- DOM fragility: Google can change class names or layout at any time.
- Auth & bot joining: Logging in with real credentials or service accounts.
- No public bot support: Google doesn’t have APIs for bots to join meets (seems like that actively try to prevent bots).
- Rate-limiting / session issues: Frequent joins can trigger CAPTCHA.
- Scale: Managing hundreds of Playwright instances requires orchestration (e.g., Kubernetes) and GPU isn’t helpful for this approach.
What I actually stored: the models
For the purposes of this project, I created models in Prisma. You can create your models/schema via another method. I prefer Prisma because it enforces type safety and validation at the database level — it won’t let me insert data that doesn’t match my defined schema. It is also relatively simple to use. Here is documentation on Prisma if you’d like to read more, or you can simply look at my models if you’re more interested in the general shape of data. I used Segments here in order to guarantee that I was sending in real time.
export type MeetingTranscript = {
    meetingId: string;
    createdAt: Date;
    segments: Segment[]
    };


export type Segment = {
    start: number;
    end: number;
    text: string;
    speaker: string;
}
export type MeetingSummaryInput = {
    meetingId: string;
    generatedAt: Date;
    summaryText: string;
    model: 'gpt-4-turbo' | string;
    };

/*
Use this if you plan on adding recordings
(which should be stored in s3 or something similar)

export type MediaAsset = {
    meetingId: string;
    createdAt: Date;
    type: 'audio' | 'video';
    storagePath: string;
    durationSec: number;
};
*/
A segment array makes up a transcript and will end up looking something like this:
[
    {
    speaker: 'Maggie',
    start: 0,
    end: 100,
    text: `I'm so sick of testing this thing`
    },
    {
    speaker: 'Amanda',
    start: 110,
    end: 140,
    text: `You're almost done. Don't give up.`
    }
]
Now to the good stuff: the code
📁 Project structure
Not pictured are all of the javascript (js) files that result from transpiling typescript (ts) and package-lock.json files (which I have in each directory)
meetingbotpoc/
├─ dist/
├─ node_modules/
└─ src/
   ├─ backend/          # REST, queue, migrations
   ├─ bot/              # index.ts
   ├─ frontend/         # index.html, main.ts
   ├─ playwright/
   │   ├─ runBot.ts     # <— Playwright driver (hard part)
   │   ├─ Dockerfile
   │   ├─ package.json
   │   └─ auth.json     # saved Google cookies
   ├─ storage.ts
   ├─ summarize.ts
   ├─ models.ts
   └─ tsconfig.json
├─ Dockerfile.be
├─ Dockerfile.bot
└─ docker-compose.yml
🧰 Step 0: Setting up your environment
Before you can run your bot, you’ll need a few tools installed and configured ahead of time:
Required installs
| Tool | Why It’s Needed | Install Link |
|---|---|---|
| Node.js (>= v18) | Runs the bot scripts and backend | nodejs.org |
| Docker | To containerize and deploy the bot + backend (not necessary for a first version) | docker.com |
| Docker Compose | To run the full stack (Postgres, backend, bot) locally (also not necessary for a first version) | Bundled with Docker Desktop |
| Playwright CLI | For local testing and browser automation | npm install -D playwright |
| Git | To clone the repo and manage versions | git-scm.com |
| OpenAI API key | To make calls to OpenAI for summarization (if you don’t care about summarization, forget about this) | OpenAI Keys |
I also suggest that you create a .env file with any credentials that you need (eg API keys/DB passwords) since best practice is to leave sensitive credentials out of your git commit history.
Recommended reading
You’ll also want some familiarity with:
- TypeScript or Node.js app structure
- Basic Docker workflows (build, run, volumes)
- Google Meet’s UI quirks (especially for debugging joins)
- I suggest you open DevTools, open the elements tab, and then manually go through the flow of joining a meeting. At each step look over at the elements tab and find the corresponding element by mousing over the elements. Then every time you find the section that the element you are looking for belongs to, click on the down arrows to narrow it down to the exact element responsible for the action you are trying to take. Digging into the structure like this will seem a bit like Russian Nesting Dolls. I’ve also got some common issues I ran into at the bottom of this article.
🔐 Step 1: Setup auth (Google account)
You’ll need a real Google account that can join meetings. Service accounts will NOT work.
- Create a dedicated bot Google account (e.g.,
maggienotetaker@gmail.com) - Disable 2FA, set your join permissions
- Log in once manually and store the Chrome profile in
auth.json - Use
auth.jsonto setstorageStatein playwright - To test, run your bot locally (with
auth.jsonin the same directory) and confirm it can join a Google Meet without prompting for login—if it works locally, it’ll work headless in Docker.
🪟 Step 2: Build your point of entry
I built a very simple web app with a front end that was just a page where you could input a Google Meet url, and a backend that took in that url and routed it elsewhere. For your project you could choose to ignore the frontend, instead directly calling the backend from some other code you already have, or opting to narrow your user base to technical folks and use a cli approach for getting user input. Below I’ve pasted my simple index.html file and main.ts file responsible for creating the page.
This index file creates the form—that means it creates the structure where a user can input a value for the url and click a button.
<!DOCTYPE html>
<html>
    <head>
        <title> Meeting Bot Joiner</title>
        <link rel="stylesheet" href="style.css"/>
    </head>
    <body>
        <h1> Submit a link to your Google Meet</h1>
        <form id="meeting-form">
            <input type="text" id="url" placeholder="Insert your link here">
            <button type="submit">Submit</button>
        </form>
        <div id="status"></div>
        <script type="module" src="main.ts"></script>
    </body>
</html>
A form is useless if the information submitted goes nowhere, so the following code allows us to pass the url to the backend so that we can join the meeting. Now that we’ve got a basic frontend down, let’s move onto the backend so that we have a server up, giving the frontend something to talk to.
const form = document.getElementById('meeting-form') as HTMLInputElement
const input = document.getElementById('url') as HTMLInputElement
const statusElem = document.getElementById('status') as HTMLInputElement

form.addEventListener('submit', async (e) => {
    e.preventDefault()
    const url = input.value

    statusElem.innerText = "Submitting"
    try {
        const res = await fetch(`http://localhost:3000/submit-link`,{
            method: 'POST',
            headers: {'Content-Type': 'application/json'},
            body: JSON.stringify({url:url})
    })
    const inputText = await res.text()
    statusElem.innerText = inputText
}
    catch{
        statusElem.innerText = `Error occurred`
    }
})
🛠️ Step 3: Building the entry to the backend
I’ll always start with a server.ts file when building a basic project like this. In the server.ts file I will plop all of my middleware—everything coming into and out of the backend must pass through middleware.
There are three key pieces of middleware:
- Cross-origin request (CORS) handling, which allows requests from different ports or origins (necessary when your front and backend run on separate ports)
- JSON parsing, using
express.json(),which allows the server to understand incoming payloads. - Logging middleware, which logs incoming requests:
app.use((req, _, next) => {
    console.log(`[${req.method}] ${req.url}`);
    next();
  });
At the end of this code block you’ll see app.listen() that tells our server what port to listen on. In this case, 3000. That way when traffic from the frontend is sent to port 3000, as specified here: http://localhost:3000/submit-link the backend is ready to receive requests and action them.
Because this is such a small project, I will also put all of my endpoints in here.
Next, we’ll move onto the /submit-link endpoint. Our frontend is configured to send a request to /submit-link using fetch() (as defined in main.ts). If this endpoint doesn’t exist on the backend, the server will respond with a 404 error, indicating the requested route could not be found. Defining /submit-link ensures the frontend has a valid route to send its data.
import express from 'express'
import cors from 'cors'
import {summarizeTranscript} from '../summarize'
import {createMeetingJob, getTranscript, saveSummary, updateMeetingStatus} from '../storage'
import { launchBotContainer } from './launchBot'

const app = express()
app.use(cors({
    origin: 'http://localhost:5173',
    methods: ['POST', 'GET', 'OPTIONS'],
    allowedHeaders: ['Content-Type']
}))

app.use(express.json())
app.use((req, _, next) => {
    console.log(`[${req.method}] ${req.url}`);
    next();
  });


function validateMeetLink(url:string){
    const prefix = /^https:\/\/meet\.google\.com/
    return prefix.test(url)
}

app.post('/submit-link', async (req, res) => {
    const { url } = req.body;
    if (!url) return res.status(400).send(`Missing the URL`);
    if (!validateMeetLink(url)) return res.status(400).send(`Invalid link`);

    try {
        const job = await createMeetingJob(url);
      await launchBotContainer(url, job.id);

      res.send(`Bot started for meeting`);
    } catch (err) {
      console.error(err);
      res.status(500).send(`Failed to launch bot`);
    }
  });


app.post('/bot-done', async (req, res) => {
    const { jobId, meetingId } = req.body;
    if (!jobId || !meetingId) return res.status(400).send('Missing fields');

    try {
      console.log(`Bot reported completion for job ${jobId}, meeting ${meetingId}`);

      await updateMeetingStatus(jobId, 'transcript_saved', meetingId);

      const transcript = await getTranscript(meetingId);
      if (!transcript) {
        console.warn(`Transcript not found for meeting ${meetingId}`);
        return res.status(202).send('Transcript not found yet');
      }

      const summary = await summarizeTranscript(transcript);
      console.log(`Summary created for job ${jobId}`);

      await saveSummary(summary);

      await updateMeetingStatus(jobId, 'summarized');

      res.send('Summary completed and saved');
    } catch (err) {
      console.error(`Error processing job ${jobId}:`, err);
      res.status(500).send('Failed to finalize job');
    }
  });


app.listen(3000, '0.0.0.0', () => {
    console.log('Backend listening on port 3000');
  });
As you can see from the code above, some of the endpoints call many other functions, but the majority of the logic lives outside of the server.ts file. In this version of the server.ts file I have a call to launchBotContainer(). However, at this point, you’ll want to replace that with some placeholder code in order to test connection between front and backend as well as the url validation. Here is a simple line you can replace the try/catch in /submit-link with:
async function waitOneSecond(): Promise<void> {
await new Promise(resolve => setTimeout(resolve, 1000));
return;
}
and then in /submit-link just call that new basic function
🎭 Step 4: Headless join + caption scraping (Playwright)
In this step (which admittedly could be multiple steps), you need to have your backend call out to playwright. I elected to do this through an index.ts file (which of course is transpiled into js) which then actually makes the calls to runBot() in the runBot.ts file which lives in the playwright directory.
index.ts
import { runBot } from '../playwright/runBot'

(async () => {
  const url   = process.env.MEETING_URL;
  const jobId = process.env.JOB_ID;

  if (!url) {
    console.error('Missing MEETING_URL env var');
    process.exit(1);
  }

  try {
    const meetingId = await runBot(url);
    console.log(`Bot finished, meetingId=${meetingId}`);

    if (jobId) {
      await fetch('http://backend:3000/bot-done', {
        method: 'POST',
        headers: { 'Content-Type': 'application/json' },
        body: JSON.stringify({ jobId, meetingId })
      });
    }
    process.exit(0);
  } catch (err) {
    console.error('runBot failed:', err);
    process.exit(1);
  }
})();
runBot.ts
This is where most of the logic lives, from joining to scraping. As a primer, here is a brief overview of scraping:
- Google Meet renders captions into the DOM, in a live-updating
<region>element. - I use page.evaluate() to install a MutationObserver that watches for new caption elements.
- When new captions appear, the observer pulls out speaker names and caption text, deduplicates them, and calls window.onCaption(…).
- Back in Node-land, I’ve exposed a callback (page.exposeFunction) named onCaption, which tracks growing segments of speech per speaker in memory, listens for any of the exit phrases, flushes and saves the current transcript when needed.
- When the meeting ends or the FLUSH_EVERY_MS timer is hit, I save the transcript to the database.
import { BrowserContext, chromium } from "playwright";
import { saveTranscriptBatch } from "../storage";
import { v4 as uuidv4 } from "uuid";
import { Page } from "playwright";
import { Segment } from "src/models";

// Constants removed in this snippet, found in repo with complete code

// launches broswer, joins Google Meet, records captions
export async function runBot(url: string): Promise<string> {
  const meetingId = uuidv4();
  const createdAt = new Date();

  // ensures meeting always exists
  await saveTranscriptBatch(meetingId, createdAt, [], true);

  const browser = await chromium.launch({
    headless: true,
    args: [
      "--no-sandbox",
      "--use-fake-ui-for-media-stream",
      "--use-fake-device-for-media-stream",
    ],
  });

  const context: BrowserContext = await browser.newContext({
    storageState: "auth.json",
  });
  const page = await context.newPage();

  // for debugging so that you see all console lines in terminal
  page.on("console", (msg) => console.log(`[page:${msg.type()}]`, msg.text()));

  try {
    await context.tracing.start({ screenshots: true, snapshots: true });

    await page.goto(url, { waitUntil: "domcontentloaded" });

    // mute mic, turn off camera, clear popup
    await clickIfVisible(page, 'button[aria-label*="Turn off microphone"]');
    await clickIfVisible(page, 'button[aria-label*="Turn off camera"]');
    await clickIfVisible(page, 'button:has-text("Got it")');

    console.log("Current URL:", page.url());
    console.log(
      "Visible buttons on screen:",
      await page.locator("button").allTextContents(),
    );

    // join/ask to join, handle 2-step join preview, close modals, wait until in meeting
    await clickJoin(page);
    await collapsePreviewIfNeeded(page);
    await dismissOverlays(page);
    await waitUntilJoined(page);
    console.log("joined meeting");

    // turn captions on
    await ensureCaptionsOn(page);
    console.log("captions visible");

    // scrape captions
    const mid = await scrapeCaptions(page, meetingId, createdAt);
    console.log("done scraping. Returning meetingId.");

    await context.tracing.stop({ path: "run.zip" });
    return mid;
  } catch (err) {
    throw new Error(`Run Bot error: ${err}`);
  }
}

async function scrapeCaptions(
  page: Page,
  meetingId: string,
  createdAt: Date,
): Promise<string> {
  // index = caption timing, flushedCount = how many segments have been saved
  // exitRequested = exit condition, segments = finalized segments, activeSegments = ongoing segment for speaker
  let index = 0;
  let flushedCount = 0;
  let exitRequested = false;
  const segments: Segment[] = [];
  const activeSegments = new Map<string, Segment>();

  // filter system msgs
  const isNotRealCaption = (text: string) =>
    /you left the meeting|return to home screen|leave call|feedback|audio and video|learn more/.test(
      text.toLowerCase(),
    );

  // browser-side func to receive captions from injected observer
  await page.exposeFunction(
    "onCaption",
    async (speaker: string, text: string) => {

    },
  );

  // wait for captions to be initialized
  await page.waitForSelector("[aria-live]");

  await page.waitForFunction(() => {
    const live = Array.from(
      document.querySelectorAll<HTMLElement>("[aria-live]"),
    );
    return live.some((el) => el.textContent?.trim().length);
  });

  await page.evaluate(() => {
    //inject observer into page to listen to DOM changes & send caption updates
  });

  // flush segments to backend
  const flushTimer = setInterval(async () => {
    const segmentsToFlush = Array.from(activeSegments.values());
    if (segmentsToFlush.length) {
      await saveTranscriptBatch(meetingId, createdAt, segmentsToFlush);
    }
  }, FLUSH_EVERY_MS);

  // leave call and final flush
  const leaveCall = async () => {
    const hangUpSel =
      'button[aria-label*="Leave call"], button[aria-label*="Leave meeting"]';
    if (await page.$(hangUpSel)) {
      await clickIfVisible(page, hangUpSel);
    } else {
      await page.keyboard.press("Ctrl+Alt+Q");
    }
    await page
      .waitForSelector(LEAVE_BANNER_SEL, { timeout: 10_000 })
      .catch(() => undefined);
    await saveTranscriptBatch(
      meetingId,
      createdAt,
      segments.slice(flushedCount),
    )
      .then(() => {
        flushedCount = segments.length;
      })
      .catch((err) => console.error("[FLUSH-after-leave] failed", err));
  };

  // exit conditions (exit phrase, leave banner, hard timeout)
  await Promise.race([
    (async () => {
      while (!exitRequested) await new Promise((r) => setTimeout(r, 500));
      await leaveCall();
    })(),
    page.waitForSelector(LEAVE_BANNER_SEL, { timeout: 0 }),
    new Promise((_, rej) =>
      setTimeout(
        () => rej(new Error("Hard timeout (100 min) exceeded")),
        100 * 60 * 1000,
      ),
    ),
  ]);

  // final flush and cleanup
  clearInterval(flushTimer);
  const finalSegments = Array.from(activeSegments.values()).filter(
    (seg) => !isNotRealCaption(seg.text) || seg.end < index - 2,
  );

  await saveTranscriptBatch(meetingId, createdAt, finalSegments, true);

  // done, notify backend to trigger summarizer
  try {
    const jobId = process.env.JOB_ID;
    if (!jobId)
      console.warn("Missing JOB_ID env var – summary worker won’t start");
    else {
      const res = await fetch("http://backend:3000/bot-done", {
        method: "POST",
        headers: { "Content-Type": "application/json" },
        body: JSON.stringify({ jobId, meetingId }),
      });
      console.log(`[bot-done] ${res.status}`);
    }
  } catch (err) {
    console.error("[bot-done] POST failed:", err);
  }
  console.log(`Meeting ${meetingId}: ${segments.length} segments captured`);
  return meetingId;
}

async function clickIfVisible(page: Page, selector: string, timeout = 5000) {
    // If element exists and is visible, click it
}

async function clickJoin(page: Page): Promise<void> {
    // Try different known join button variations
    // Fall back to pressing Enter if none are found
}

async function waitUntilJoined(page: Page, timeoutMs = 60_000) {
    // Wait until presence of "Leave call", "You’ve been admitted", or "You’re the only one here"
}

async function collapsePreviewIfNeeded(page: Page) {
    // Handle 2-step Join UX where a preview screen is collapsed before joining
}

async function dismissOverlays(page: Page) {
    // Close pop-ups and overlays that might interfere with interaction
}

async function captionsRegionVisible(page: Page, t = 4000): Promise<boolean> {
    // Check if caption region is visible in the DOM
}

async function ensureCaptionsOn(page: Page, timeoutMs = 60_000) {
    await page.waitForTimeout(5000);

    // Dismiss UI overlays if present
    for (let i = 0; i < 8; i++) {
        // Press Escape to dismiss
    }

    // Try enabling captions via Shift+C or clicking captions button
}
Core helpers in runBot.ts:
  // expose
   await page.exposeFunction(
    "onCaption",
    async (speaker: string, text: string) => {
      const caption = text.trim();
      if (!caption) return;

      const normalized = caption.toLowerCase();
      const isExit = EXIT_PHRASES.some((p) => normalized.includes(p));
      if (isExit) {
        console.log("Exit phrase heard — hanging up");
        exitRequested = true;
      }

      const existing = activeSegments.get(speaker);

      if (!existing) {
        // first segment for speaker
        const seg = {
          speaker,
          text: caption,
          start: index,
          end: index + 1,
          meetingId,
        };
        activeSegments.set(speaker, seg);
      } else {
        // update existing segment if caption is growing
        if (
          caption.startsWith(existing.text) ||
          caption.length > existing.text.length + 5
        ) {
          existing.text = caption;
          existing.end = index + 1;
        }
      }

      index++;
      // if exit = triggered, flush curr captions
      if (isExit) {
        const finalSegments = Array.from(activeSegments.values());
        await saveTranscriptBatch(meetingId, createdAt, finalSegments, true);
      }
    },
  );


  // evaluate
  await page.evaluate(() => {
    const badgeSel = ".NWpY1d, .xoMHSc";
    let lastSpeaker = "Unknown Speaker";

    // extract speaker
    const getSpeaker = (node: HTMLElement): string => {
      const badge = node.querySelector<HTMLElement>(badgeSel);
      const speaker = badge?.textContent?.trim();
      return speaker || lastSpeaker;
    };

    // extract caption
    const getText = (node: HTMLElement): string => {
      const clone = node.cloneNode(true) as HTMLElement;
      clone
        .querySelectorAll<HTMLElement>(badgeSel)
        .forEach((el) => el.remove());
      return clone.textContent?.trim() ?? "";
    };

    // send caption to exposed onCaption()
    const send = (node: HTMLElement): void => {
      const txt = getText(node);
      const spk = getSpeaker(node);
      if (txt && txt.toLowerCase() !== spk.toLowerCase()) {
        // @ts-expect-error
        window.onCaption?.(spk, txt);
        lastSpeaker = spk;
      }
    };

    // watch DOm for caption updates and run send()
    new MutationObserver((mutations) => {
      for (const m of mutations) {
        // new caption elements
        Array.from(m.addedNodes).forEach((n) => {
          if (n instanceof HTMLElement) send(n);
        });
        // live text edits inside an existing element
        if (
          m.type === "characterData" &&
          m.target?.parentElement instanceof HTMLElement
        ) {
          send(m.target.parentElement);
        }
      }
    }).observe(document.body, {
      childList: true,
      characterData: true,
      subtree: true,
    });
  });
After you’ve written your runBot.ts file you can then replace your placeholder in server.ts with a call to runBot() for the time being.
💾 Step 5: Storage (transcripts, meetings, summaries)
You will need some way of inserting your transcript into the DB in real time. In order to do that, I elected to use Segments (a model I created) to represent a portion of the conversation that I wanted to add to the transcript. I then wrote this file to handle storing and retrieving transcript, meeting, and summary data. You can refer to the models above to refresh the schemas.
storage.ts
import { PrismaClient } from "@prisma/client";
import { MeetingSummaryInput, MeetingTranscript } from "./models";

const prisma = new PrismaClient()

// Save a batch of transcript segments
export async function saveTranscriptBatch(
  meetingId: string,
  createdAt: Date,
  batch: Segment[],
  force = false,
) {
  // If batch is empty, don't save unless forced
  if (batch.length === 0 && !force) return;
  console.log("[FLUSH] saving", batch.length, "segments");

  try {
    // Ensure transcript record exists
    await prisma.meetingTranscript.upsert({
      where: { meetingId },
      update: { createdAt },
      create: { meetingId, createdAt },
    });

    // Save or update each segment
    for (const seg of batch) {
      // Insert or update segment record in DB
    }

    console.log("[FLUSH] OK");
  } catch (err) {
    console.error("[FLUSH] FAILED", err);
  }
}

export async function saveSummary(summary: MeetingSummaryInput){
    // Store summary in DB
}

export async function createMeetingJob(meetingUrl: string) {
    // Create a meeting job entry in DB
}

export async function updateMeetingStatus(id: string, status: string, meetingId?: string) {
    // Update job with new status (and optionally meetingId)
}

export async function getMeetingJob(id: string) {
    // Retrieve job details by ID
}

export async function getTranscript(meetingId: string): Promise<MeetingTranscript> {
    const transcript = await prisma.meetingTranscript.findUniqueOrThrow({
        where: { meetingId },
        include: { segments: true }
    });
    return {
        meetingId: transcript.meetingId,
        createdAt: transcript.createdAt,
        segments: transcript.segments
    };
}
🧠 Step 6: Post-process summary via OpenAI
Review the docs that OpenAI has to get the most up-to-date version of their API. At the time of publication, I’ll be using responses.
summarizer.ts
try {
    const resp = await client.responses.create({
        // use OpenAI to summarize the combined text of all transcript segments
    });

    return {
        meetingId,
        generatedAt: new Date(),
        summaryText: resp.output_text,
        model: 'gpt-4.1',
    }
} catch (err) {
    throw new Error(`OpenAI Error`)
}
🐳 Step 7: Dockerize it
I had one Dockerfile for the playwright directory, one for my bot and one for the backend. In truth I gave prompts to GPT to create these Dockerfiles which worked out well. I also had it output my docker-compose and then edited as necessary. I suggest that if you know what you are doing, this is a fine way to write files like this because the files aren’t so long that you wouldn’t be able to easily read through completely, but they aren’t trivial to write either in my opinion. If you do not know what you are doing at all though, I suggest you do some research because these files determine what your Docker container looks like and how it builds. If you do not know what a Docker container is, Docker put together a resource to explain containers at a high level.
In your bot Dockerfile (not shown) make sure you copy the auth.json file in root like so:
COPY auth.json ./auth.json
Dockerfile
# 1. Base image with all Playwright dependencies pre-installed
FROM mcr.microsoft.com/playwright:v1.52.0-noble

# 2. Set working directory inside container
WORKDIR /app

# 3. Copy only package.json and lock file first (to take advantage of Docker layer caching)
COPY package*.json ./

# 4. Install dependencies
RUN npm install

# 5. Copy the rest of the application code
COPY . .

# 6. Set environment variables (optional)
ENV NODE_ENV=production

# 7. Default command to run your bot script (adjust as needed)
CMD ["node", "runBot.js"]
docker-compose.yml
version: "3.8"

services:
  postgres:
    image: postgres:15
    container_name: meetingbot-db
    environment:
      POSTGRES_USER: meetingbot
      POSTGRES_PASSWORD: supersecret
      POSTGRES_DB: meetingbotpoc
    ports:
      - "5432:5432"
    volumes:
      - pgdata:/var/lib/postgresql/data

  backend:
    build:
      context: .
      dockerfile: Dockerfile.be
    container_name: meetingbot-backend
    ports:
      - "3000:3000"
    env_file:
      - .env
    depends_on:
      - postgres
      - bot
    volumes:
      - /var/run/docker.sock:/var/run/docker.sock

  bot:
    build:
      context: .
      dockerfile: Dockerfile.bot
    image: meetingbotpoc-bot
    entrypoint: ["true"]


volumes:
  pgdata:
🤖 Step 8: Launch Google Meet recording bot
At this point you’re ready to replace the call to runBot() in your server.ts file with a call to createMeetingJob() and then launchBotContainer(). Once a meeting link is submitted via POST /submit-link, the backend calls launchBotContainer(), which uses Dockerode (a Node.js Docker SDK) to spin up a new containerized instance of the bot. This container is passed meeting-specific environment variables (e.g. MEETING_URL, JOB_ID, OPENAI_API_KEY) and runs the Playwright bot in isolation.
The bot joins the meeting, transcribes the captions, then calls back to the backend when finished. If you’re planning to scale this to hundreds of simultaneous meetings, you could swap this local container launch for a Kubernetes Job, an AWS ECS Task, or a queue-based scheduler that runs on-demand workers.
export async function launchBotContainer(meetingUrl: string, jobId: string) {
    const containerName = `meetingbot-${Date.now()}`;

    const env = [
      `MEETING_URL=${meetingUrl}`,
      `JOB_ID=${jobId}`,
      `GOOGLE_ACCOUNT_USER=${process.env.GOOGLE_ACCOUNT_USER ?? ''}`,
      `GOOGLE_ACCOUNT_PASSWORD=${process.env.GOOGLE_ACCOUNT_PASSWORD ?? ''}`,
      `DATABASE_URL=${process.env.DATABASE_URL}`,
      `OPENAI_API_KEY=${process.env.OPENAI_API_KEY ?? ''}`
    ];

    const container = await docker.createContainer({
        Image: 'meetingbotpoc-bot',
        Env: env,
        Cmd: ['node', 'dist/bot/index.js'],
        HostConfig: {
          // AutoRemove: true,   ← comment out for debugging
          NetworkMode: 'meetingbotpoc_default'
        }
      });

    await container.start();
    console.log(`Started bot container: ${containerName}`);
    return containerName;
  }
🔎 Step 9: Observability
Logging lifecycle events
Each bot logs key lifecycle events to stdout:
- Bot startup (
runBot()begins) - Caption capture start (
scrapeCaptions()initialized) - Each segment (
${speaker}: ${text}) - Participant triggered exit
- Transcript successfully saved
- Error stack traces from failed joins or failed requests
MutationObserver failures
I log clear warnings when:
- The caption region is missing (
querySelectorreturns null) - The observer is attached but never sees any captions
These are often the first signs of DOM breakage.
Screenshot tracing
Playwright tracing is enabled with:
await context.tracing.start({ screenshots: true, snapshots: true });
This produces a ZIP archive of DOM snapshots and visual state for debugging failed sessions.
To be honest, pre-prod there are also a TON of console log lines to help debug. For my flow, this would be cleaned up prior to putting this into prod, but for a POC and in development I think it is totally fine.
Finally, the fruits of my labor are born: demo time
Finally, the moment you and I have been waiting for. The demo. Here I demo how to have my bot join the meeting, transcribe, and then send a transcript to OpenAI via their API for summarization.
Here is a brief walk through. I forgot, as any relatable demo does, to output the summary at first so I ran some SQL queries to show what was stored in the database.
Cons & limitations of this approach
This section might seem daunting. It is not meant to be, but I would hate for anyone to embark on this journey only to realize that what they thought was the entire endeavour was really only the tip of the iceberg.
Functional limitations
| Challenge | Explanation | Mitigations |
|---|---|---|
| DOM structure is volatile | Google Meet’s UI changes —class names, container hierarchy, etc. | Keep all selectors centralized; smoke test bot hourly; add feature flags for hot-patches. |
| Not full-fidelity | Captions can miss cross-talk, mumbling, or multilingual conversation. | Accept ≈90% accuracy; optionally add a secondary ASR pass (e.g., Whisper) on recorded audio. |
| No real-time NLP | This approach buffers captions and sends them to OpenAI only after the meeting which is appropriate for the use case, but you may want in meeting interaction. | For live NLP, consider WebSockets or event bus; this is intentionally deferred to keep infra light. |
| Multiple languages unsupported | Google Meet captions can only transcribe one language at a time per meeting. | Choose the dominant meeting language in bot config or consider post-processing with Whisper. |
| Auth & session fragility | Bots require real Google accounts. Captions may fail if the login state is invalid or triggers CAPTCHA. Google may wipe cookies | Use auth.json (Playwright’s storageState) from a manual login; pool bot accounts; detect auth redirects (accounts.google.com) and restart. |
| No mid-call persistence | Captions are buffered in memory and only written to the DB at the end of the meeting. If the bot crashes mid-call, all data is lost | Periodically flush to disk or database during the meeting; use chunked writes or temporary local storage for checkpointing. |
Scale limitations
| Challenge | Explanation | Mitigations |
|---|---|---|
| Running many headless browsers | Chromium uses hundreds of MB RAM each. Launch spikes CPU. | Disable GPU/audio; limit to 3–4 bots per vCPU; autoscale nodes/pods. |
| Session management | Though multiple bots can share the same credentials, each bot needs its own cookie/session storage to avoid collisions. | One Playwright persistent context per pod; mount unique /user-data directory via its own Persistent Volume Claim to isolate browser session data. |
| CAPTCHAs & rate limits | Google may block repeated automation or account reuse. | Rotate bot accounts (instead of having one account have many); use residential proxies (not AWS/GCP IPs); stagger join times; exponential backoff retries. |
| Orchestration complexity | At scale, each meeting is a containerized job that must be scheduled and isolated. | Use Kubernetes Jobs or ECS tasks; image pre-warming; queue-driven bot launcher with node limits (to avoid hitting CPU, RAM etc limits). |
| Unbounded memory growth from segment buffer | Each bot stores all caption segments in memory for the entire call. Longer meetings or many bots running in parallel can lead to memory pressure or OOM errors. | Add a hard segment cap (e.g., 10K segments); stream segments to Redis, S3, or disk mid-call; log memory + segment count to catch runaway usage early. |
Next steps & extensions
This bot works well as a POC, but if you're planning to scale, integrate into real workflows, or harden it for production, here are some concrete extensions to allow your efforts to graduate to production code.
Improve transcript quality
- Deduplicate caption lines: Google Meet occasionally re-emits lines or fragments. De-dup before storage.
- Add retries & backoff: For flaky joins, broken selectors, or rate-limited API calls.
- Speaker clustering: Use BERT or other embeddings + k-means to cluster unknown speakers post-call.
- Secondary ASR pass: For better accuracy, run Whisper or Deepgram over recorded audio (if/when you add recording support).
Bringing the data into the fold: workflow integration
- Push summaries via webhook: Send to Slack, Jira, Notion, etc.
- Add calendar triggers: Auto-launch bots based on calendar events or meeting metadata.
- Expose a real API: For programmatic job creation, status polling, and summary fetching.
- Support Zoom/Teams: Abstract the caption collector behind a common interface so you can reuse infra across platforms.
Scale with confidence (because right now this will not scale)
- Add a queue + control plane: Queue jobs and spin up containers dynamically.
- Autoscale with Kubernetes or ECS: Swap Dockerode for real orchestrators when you need to go beyond a handful of meetings.
- Use persistent volumes per bot: Avoid session collision by isolating user data dirs.
- Add a graceful shutdown hook: Detect container kill and write whatever data you have before exit.
Observability & reliability (recommended)
Google Meet's UI isn’t made for bots, in fact, it’s designed to discourage bot use—so when you're using a headless browser to extract content from it, things can break silently. That’s why even for an early prototype, basic observability is critical. Here’s what I log and track today—and what I recommend adding before you scale.
-
Add explicit
joinedlog:
AfterwaitUntilJoined(), log a message like:console.log('Bot successfully joined meeting');Why? This will help you distinguish between login issues vs. caption scraping failures in logs.
-
Implement a
/healthroute in backendAdd a lightweight HTTP health check that verifies:
- DB connection is alive
- Bot queue (if applicable) is reachable
Why: This enables infra monitoring, readiness probes, and incident debugging.
-
Add memory + segment count logging
Inside the interval loop in
scrapeCaptions(), log:console.log(`[bot ${meetingId}] Segments: ${segments.length}, Memory: ${(process.memoryUsage().heapUsed / 1024 / 1024).toFixed(1)} MB`);Why: Get info ahead of crash/OOM issues by tracking growth trends and flagging potential memory issues.
-
Set Up a smoke bot
Deploy a recurring job that joins a dummy Google Meet link and verifies:
- Captions are observed
- Expected DOM elements are still present
Why: Catch DOM selector regressions before users report them.
-
Add CI bot tests
Use Playwright's built-in test runner and a mock meeting URL to validate selectors and basic flows.
Why: You’ll want to ensure your core logic doesn’t break between commits. In most established companies this will be a given and will require just adding some new tests to your existing fleet.
Wrapping it up
If you’ve made it this far—thanks for sticking with it. If you want a more in depth view of how this was built, I’ve published this Google Meet Bot repo. This isn’t production-grade code, but it’s a real starting point for building your own Google Meet bot from scratch.
If you’d rather offload most of the work that I went over in this blog post so that you can focus on building your product, then feel free to make your way over to our meeting bot API docs where you’ll find info on how a Recall.ai can provide you with all of the meeting data you can think of with a single API. You can sign up and start building right away by opting for our new self-serve, Pay As You Go Plan or book a demo with our team to walk through your use case and how Recall.ai can help you solve your problem. If you want your meeting notetaker to actually be more like a full-fledged virtual assistant in meetings, then check out Output Media. And if you’re looking to build a desktop app recorder instead of a bot, then check out our Desktop Recording SDK.
Appendix: What I dealt with so that you don’t have to
-
Auth Issues
- Problem: Sometimes after login there is a 2fa request to make sure you aren’t a bot (which of course, you are). You must put in a phone number or auth in some other way
- Solutions:
- Add a conditional check for this routing (which happens right after password)
- Use an
auth.jsonfile that you generate by going though these steps:- Run Playwright once on your local machine (headed) and log in manually.
- Save
storageStatetoauth.json. - COPY that file into the image and pass it to
browser.newContext({ storageState: 'auth.json' }).
-
Timeout issues
-
Problem: If you’re used to writing for web, maybe you won’t have this issue, but as someone who’s been buried in backend work for most of my career, I didn’t really understand the different options for
waitUntilor how they were meant to be used. -
Solution: I would recommend reading up for your use case, but I ended up using the
domcontentloadedoption when navigating to the Google Meet url I provided, but then usingwaitForSelector()in a helper function I wrote to make sure I didn’t timeout prematurely, and also did not spend forever in a waiting state. Here is my helper function:async function waitUntilJoined(page: Page, timeoutMs = 60_000) { const inCall = await Promise.race([ page.waitForSelector('button[aria-label*="Leave call"]', { timeout: timeoutMs }), page.waitForSelector('text=You\'ve been admitted', { timeout: timeoutMs }), page.waitForSelector('text=You’re the only one here', { timeout: timeoutMs }) ]).catch(() => false); if (!inCall) throw new Error('Not admitted within time limit'); }
-
-
Popups (the little prompts that Google throws your way like levels to beat)
- Problem: Your bot runs in a headless browser (meaning there is no UI to interact with). If you elect to run your bot in a headed browser, you’ll face the same problem–but you can work around it manually by answering the prompts that Google presents. This is not a solution that scales since it requires a human to intervene every time the bot starts or Google displays a prompt. A common example is when Google asks whether to mute the mic or turn on the camera before allowing the participant to join. Until those options are set, it is impossible to select the ‘Join’ button. If you run headless and haven’t accounted for prompts like this in your automation, your bot will get stuck outside of the meeting every time.
- Solution: Add the selections to the
auth.jsonmentioned in Auth Issues solution (this will save the preferences)
-
Not making your locator specific enough
- Problem: The input type password was not specific enough so it did not know which element to resolve to. Therefore, it would wait for forever because it couldn’t resolve and then timeout
- Solution: Pretty self-explanatory, make sure you are specific regarding the element you want.
I want to build with another tool: FAQs
How does joining a Google Meet with Playwright compare to using Puppeteer?
Playwright and Puppeteer are similarly reliable for automating tasks like joining a Google Meet meeting through the web client. Playwright’s built-in waiting, permission handling, and multi-browser support can make the join flow a bit smoother out of the box, while Puppeteer may require more manual waits or configuration to handle the same steps. In practice, both tools can achieve the same results. The choice mainly depends on your project’s setup and preferred automation style.
How can I build a Selenium Google Meet bot to join meetings automatically?
Similar to how you'd build a bot to join a Google Meet with Playwright or Puppeteer, you can build a Selenium Google Meet bot by launching a browser with Selenium, opening the Google Meet meeting URL, entering a display name, and clicking the “Join” button on the web client. From there, you can use waits to detect when the meeting has started or ended and handle pop-ups or permission prompts. Selenium can automate this reliably, though it may need a bit more setup for timing and permissions compared to Playwright or Puppeteer.
Is there a Google Meet recording API?
Recall.ai's Google Meet Recording API page is where you can find information on accessing audio and video in real time from Google Meet.
Is there a Google Meet transcript API?
Recall.ai's Google Meet Transcription API page is where you can find information on accessing transcripts in real time from Google Meet.
Is there a Google Meet notetaker API?
Recall.ai offers notetaking capabilities both in bot form via that Meeting Bot API and through the Desktop Recording SDK. For information on getting meeting notes from both form factors see the Notetaker API page is where you can find information on accessing audio and video in real time from Google Meet, Microsoft Teams, Zoom, and more.
Can I build a bot for other meeting platforms?
If you're looking for a blog on how to use Recall.ai to build a meeting bot that works for Zoom, Google Meet, Microsoft Teams and more from scratch, check out our blog on how to build a meeting bot. You can also find blogs on how to build a Microsoft Teams bot from scratch or Zoom bot from scratch. Even find ways to send a bot to Slack Huddles.
What are all of the ways to get transcripts from Google Meet?
To learn about all of the ways to get a transcript from Google Meet read our blog on how to get transcripts from Google Meet. It covers native APIs, meeting bots, and more.
Is there a native API to get recordings from Google Meet?
The short answer is yes. However, using the API requires that all of your users are on specific Google workspace plans, that you are the meeting owner or have specific and special permissions, and more. Check out our blog on how to get a recoring from native Google Meet APIs to read all about how to retrieve recordings from Google Meet with a native API.
